如何用FFmpeg将输出的TS流写到内存-程序员宅基地
最近需要实现一个功能:利用FFmpeg将编码出来的视频流和音频流混合封装成TS格式,然后通过自定义协议将TS流发送出去。因为发送协议是自己定义的,FFmpeg不支持这种网络协议,不能用它内置的协议。后来发现原来FFmpeg也支持将输出的流回调到给上层去处理,下面简单讲一下实现的流程。
首先,我们按照把流输出到文件的方式来处理,但是有小小的不同,下面是初始化输出流的代码:
AVOutputFormat *m_fmt;
AVFormatContext *m_oc;
AVStream *audio_st, *video_st;
typedef struct _capstuff {
UINT m_nPixelFormat; //enum PixelFormat
int m_videobitrate; //视频码率
int m_audiobitrate; //音频码率
int m_audio_samplerate; //音频采样率
int m_framerate; //帧率
UINT m_nRCMode; //视频的编码模式,0--CBR, 1--VBR
UINT m_StreamType; //0--Video, 1--Audio, 2--Video+Audio
UINT m_IFramesIntervals; //关键帧间距
UINT m_nVideoCodec;//CodecID
UINT m_nAudioCodec; //CodecID
UINT m_Quant; //质量系数
char m_szFormatName[64]; //流的封装格式,比如TS,MOV,MPG,MP4
BOOL m_bDefaultCodec;
}CAPSTUFF;
CAPSTUFF m_CapStuff[8]; //最多支持8个输入流BOOL CVideoDevice::InitFFmpeg()
{
m_fmt = NULL;
m_oc = NULL;
/* initialize libavcodec, and register all codecs and formats */
av_register_all();
char outputformat[64] = {0};
strcpy(outputformat, "1.ts"); //默认使用TS
/* allocate the output media context */
avformat_alloc_output_context2(&m_oc, NULL, NULL, outputformat);
if (!m_oc) {
TRACE("Could not deduce output format from file extension: using MPEG.\n");
avformat_alloc_output_context2(&m_oc, NULL, "mpeg", "1.mpg");
}
if (!m_oc) {
return FALSE;
}
m_fmt = m_oc->oformat;
#if 0
const char *filename = "D:\\camera_ffmpeg.ts";
strcpy(m_oc->filename, filename);
#else
const char *filename = outputformat;
unsigned char* outbuffer = NULL;
outbuffer = (unsigned char*)av_malloc(65536);
AVIOContext *avio_out = avio_alloc_context(outbuffer, 65536, 0, this, NULL, write_buffer,NULL);
m_oc->pb = avio_out;
m_oc->flags |= AVFMT_FLAG_CUSTOM_IO;
m_oc->flags |= AVFMT_FLAG_FLUSH_PACKETS;
m_fmt->flags |= AVFMT_NOFILE; //不生成文件
#endif
/* add the audio and video streams using the default format codecs
and initialize the codecs */
video_st = NULL;
audio_st = NULL;
if (m_fmt->video_codec != CODEC_ID_NONE) {
video_st = add_video_stream(m_oc,
(CodecID)m_CapStuff[0].m_nVideoCodec,
m_CapStuff[0].m_capwidth, m_CapStuff[0].m_capheight,
m_CapStuff[0].m_videobitrate, m_CapStuff[0].m_framerate,
m_CapStuff[0].m_IFramesIntervals);
}
if (m_fmt->audio_codec != CODEC_ID_NONE) {
audio_st = add_audio_stream(m_oc,
(CodecID)m_CapStuff[0].m_nAudioCodec,
m_CapStuff[0].m_audiobitrate, m_CapStuff[0].m_audio_samplerate, 2);
}
//av_dump_format(m_oc, 0, filename, 1);
/* now that all the parameters are set, we can open the audio and
video codecs and allocate the necessary encode buffers */
if (video_st)
open_video(m_oc, video_st);
if (audio_st)
open_audio(m_oc, audio_st);
#if 1
/* open the output file, if needed */
if (!(m_fmt->flags & AVFMT_NOFILE))
{
if (avio_open(&m_oc->pb, filename, AVIO_FLAG_WRITE) < 0)
{
TRACE("Could not open %s\n", filename);
return FALSE;
}
}
#endif
/* write the stream header, if any */
avformat_write_header(m_oc, NULL);
return TRUE;
}上面的CVideoDevice::InitFFmpeg()函数先生成了一个AVFormatContext类型的输出流上下文对象,并且指定输出格式为TS。然后调用avio_alloc_context函数,关键是这个函数,它指定了对流处理的几个相关的回调函数。
AVIOContext *avio_alloc_context(
                  unsigned char *buffer,
                  int buffer_size,
                  int write_flag,
                  void *opaque,
                  int (*read_packet)(void *opaque, uint8_t *buf, int buf_size),//重写该函数,指定从内存中读取的方法,将buf_size字节大小的数据保存到buf
                  int (*write_packet)(void *opaque, uint8_t *buf, int buf_size),//对应的这是写内存的函数
                  int64_t (*seek)(void *opaque, int64_t offset, int whence));
在我的应用中,需要实现write_packet回调函数,这样FFmpeg输出的流就会通过这个回调函数传递给应用层。下面是我的write_packet回调函数的实现:
int write_buffer(void *opaque, uint8_t *buf, int buf_size)
{
	CVideoDevice * pThisDev = (CVideoDevice*)opaque;

	pThisDev->m_pStreamSender->AddData(buf, buf_size, 0, 1);
	return buf_size;
}
它只是把传过来的数据送给自己的协议层去处理。
整个方案的处理流程图如下:
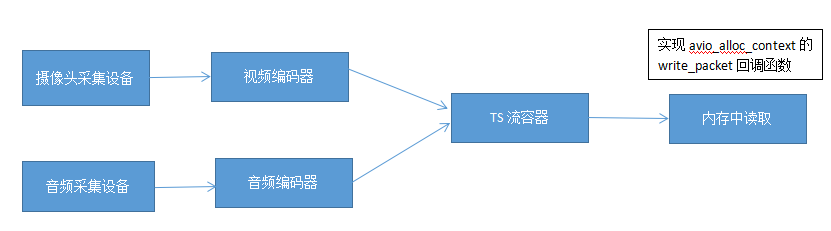
但是目前还没有完毕,我们要输出TS流必须调用av_interleaved_write_frame将编码器出来的数据写进TS流容器,那么write_packet回调函数才会有数据回调。下面是一段示例的代码:
void CVideoDevice::write_video_frame(AVFormatContext *oc, AVStream *st, PixelFormat pixformat, BYTE * pSrcData, DWORD dbSize, INT64 lTimeStamp)
{
	int out_size, ret = 0;
	AVCodecContext *c;

	c = st->codec;

	int	Y_PLANE_SIZE;
	int	U2_PLANE_SIZE;
	int	V2_PLANE_SIZE;

	Y_PLANE_SIZE  = c->width * c->height;
	U2_PLANE_SIZE = Y_PLANE_SIZE/4;
	V2_PLANE_SIZE = Y_PLANE_SIZE/4;

	uint8_t  *dest_y = pSrcData;
	uint8_t  *dest_u = pSrcData + Y_PLANE_SIZE;
	uint8_t  *dest_v = pSrcData + Y_PLANE_SIZE + V2_PLANE_SIZE;

	picture->linesize[0] = c->width;
	picture->linesize[1] = c->width / 2;
	picture->linesize[2] = c->width / 2;
	picture->data[0] = dest_y;
	picture->data[1] = dest_v;
	picture->data[2] = dest_u;

	int out_size = avcodec_encode_video(c, video_outbuf, video_outbuf_size, picture);

	if (out_size > 0)
	{
		picture->pts += 1;

		AVPacket pkt;
		av_init_packet(&pkt);
		pkt.data = NULL;
		pkt.size = 0;

		pkt.pts = (INT64)st->time_base.den * (lTimeStamp)/SYSTEM_CLOCK_TIME_BASE;

		if(c->coded_frame->key_frame)
			pkt.flags |= AV_PKT_FLAG_KEY;

		pkt.stream_index= st->index;
		pkt.data = video_outbuf;
		pkt.size = out_size;

		//TRACE("video pkt.pts: %ld\n",  pkt.pts);

		ret = av_interleaved_write_frame(oc, &pkt);

		//av_free_packet(&pkt);
	}
}
注意:
(1) 上面代码有个问题,如果 avio_alloc_context函数调用写成这样形式:
avio_alloc_context(outbuffer, 65536, 0, this, NULL, write_buffer,NULL);
则会卡在av_interleaved_write_frame或av_write_frame函数,并且write_buffer回调没有被调用。
这个问题卡了我好久,后来找到解决办法,解决方法是:将 avio_alloc_context的第三个参数改成1,即改为:
avio_alloc_context(outbuffer, 65536, 1, this, NULL, write_buffer,NULL);
这样就可以成功将Muxer输出的数据写到内存。
(2)avio_alloc_context的第二个参数是分配的输出缓冲区大小,如果赋值为65536,则write_buffer函数每次回调传入的字节数都是65536,但是我们可能更希望它写入了每一帧就回调当前帧的数据长度,如果是这样,必须设置AVFMT_FLAG_FLUSH_PACKETS参数,设置示例代码如下:
m_oc->flags |= AVFMT_FLAG_FLUSH_PACKETS;
下面给个较为详细的例子(将H264文件转为PS流,并输出到内存):
FILE *file = NULL;

int write_packet(void *opaque, uint8_t *buf, int buf_size)
{
	//printf("write data\n");
	if (file)
		fwrite(buf, buf_size, 1, file);//可以写文件,也可以通过协议发出去
	return 0;
}

//将一个H264文件(或其他格式)转为PS文件
int main(int argc, char **argv)
{
	fopen_s(&file, "output.dat", "ab+");//输出ps数据到文件
	if (file == NULL)
		printf("open output file failed\n");

	AVIOContext* pb = NULL;
	AVOutputFormat *ofmt = (AVOutputFormat*)av_mallocz(sizeof(AVOutputFormat));//输出格式
	AVFormatContext *ifmt_ctx = NULL, *ofmt_ctx = NULL;
	AVPacket pkt;
	const char *in_filename, *out_filename;
	int ret, i;
	in_filename = "hello.h264";//源文件

	av_register_all();

	if ((ret = avformat_open_input(&ifmt_ctx, in_filename, 0, 0)) < 0) {
		fprintf(stderr, "Could not open input file '%s'", in_filename);
		goto end;
	}
	if ((ret = avformat_find_stream_info(ifmt_ctx, 0)) < 0) {
		fprintf(stderr, "Failed to retrieve input stream information");
		goto end;
	}
	av_dump_format(ifmt_ctx, 0, in_filename, 0);

	uint8_t* buf = (uint8_t*)av_mallocz(sizeof(uint8_t)* 32768);
	pb = avio_alloc_context(buf, 32768, 1, NULL, NULL, write_packet, NULL);//注意:第3个参数赋值为1,否则write_packet回调将不能被成功调用

	avformat_alloc_output_context2(&ofmt_ctx, NULL, "dvd", NULL/*out_filename*/);//设置输出视频的格式为Mpegs-ps,在ffmpeg定义为dvd。如果需要输出TS格式,则设置为"mpegts"

	if (!ofmt_ctx) {
		fprintf(stderr, "Could not create output context\n");
		ret = AVERROR_UNKNOWN;
		goto end;
	}
	ofmt_ctx->pb = pb;//这个是关键,指定ps输出的方式
	ofmt_ctx->flags |= AVFMT_FLAG_CUSTOM_IO;

	printf("output format:%s[%s]\n", ofmt_ctx->oformat->name, ofmt_ctx->oformat->long_name);
	ofmt = ofmt_ctx->oformat;
	//输出环境上下文的初始化
	for (i = 0; i < ifmt_ctx->nb_streams; i++) {
		AVStream *in_stream = ifmt_ctx->streams[i];
		//Add a new stream to a media file
		AVStream *out_stream = avformat_new_stream(ofmt_ctx, in_stream->codec->codec);
		if (!out_stream) {
			fprintf(stderr, "Failed allocating output stream\n");
			ret = AVERROR_UNKNOWN;
			goto end;
		}
		ret = avcodec_copy_context(out_stream->codec, in_stream->codec);
		if (ret < 0) {
			fprintf(stderr, "Failed to copy context from input to output stream codec context\n");
			goto end;
		}
		out_stream->codec->codec_tag = 0;
		if (ofmt_ctx->oformat->flags & AVFMT_GLOBALHEADER)
			out_stream->codec->flags |= CODEC_FLAG_GLOBAL_HEADER;
	}
	av_dump_format(ofmt_ctx, 0, NULL, 1);
	ret = avformat_write_header(ofmt_ctx, NULL);
	if (ret < 0) {
		fprintf(stderr, "Error occurred when opening output file\n");
		goto end;
	}

	int nVideoFramesNum = 0;

	//实现REMUXING
	while (1) {
		AVStream *in_stream, *out_stream;
		ret = av_read_frame(ifmt_ctx, &pkt);
		if (ret < 0)
			break;
		in_stream = ifmt_ctx->streams[pkt.stream_index];
		out_stream = ofmt_ctx->streams[pkt.stream_index];

		if(in_stream->codec->codec_type == AVMEDIA_TYPE_VIDEO)
		{
			if(pkt.pts == AV_NOPTS_VALUE) //FIX:No PTS (Example: Raw H.264)
			{
				AVRational time_base1 = out_stream->time_base;

				//Duration between 2 frames (us)
				int64_t calc_duration =(double)AV_TIME_BASE/av_q2d(in_stream->r_frame_rate);

				pkt.pts = (double)(nVideoFramesNum*calc_duration)/(double)(av_q2d(time_base1)*AV_TIME_BASE);
				pkt.dts = pkt.pts;
				pkt.duration = (double)calc_duration/(double)(av_q2d(time_base1)*AV_TIME_BASE);
			}
			else
			{
				pkt.pts = av_rescale_q_rnd(pkt.pts, in_stream->time_base, out_stream->time_base, (AVRounding)(AV_ROUND_NEAR_INF | AV_ROUND_PASS_MINMAX));
				pkt.dts = av_rescale_q_rnd(pkt.dts, in_stream->time_base, out_stream->time_base, (AVRounding)(AV_ROUND_NEAR_INF | AV_ROUND_PASS_MINMAX));
				pkt.duration = av_rescale_q(pkt.duration, in_stream->time_base, out_stream->time_base);
				pkt.pos = -1;
			}

			nVideoFramesNum++;
		}
		else
		{
			pkt.pts = av_rescale_q_rnd(pkt.pts, in_stream->time_base, out_stream->time_base, (AVRounding)(AV_ROUND_NEAR_INF | AV_ROUND_PASS_MINMAX));
			pkt.dts = av_rescale_q_rnd(pkt.dts, in_stream->time_base, out_stream->time_base, (AVRounding)(AV_ROUND_NEAR_INF | AV_ROUND_PASS_MINMAX));
			pkt.duration = av_rescale_q(pkt.duration, in_stream->time_base, out_stream->time_base);
			pkt.pos = -1;
		}


		ret = av_interleaved_write_frame(ofmt_ctx, &pkt);
		if (ret < 0) {
			fprintf(stderr, "Error muxing packet\n");
			break;
		}
		av_free_packet(&pkt);
	}
	av_write_trailer(ofmt_ctx);
end:
	avformat_close_input(&ifmt_ctx);
	/* close output */
	if (ofmt_ctx && !(ofmt->flags & AVFMT_NOFILE))
		avio_close(ofmt_ctx->pb);
	avformat_free_context(ofmt_ctx);
	if (ret < 0 && ret != AVERROR_EOF) {
		return 1;
	}
	return 0;
}
(反过来的情况:如何让FFmpeg从内存中读取PS/TS流数据,以及怎么分离和解码视频可参考我的另外一篇博文:http://blog.csdn.net/zhoubotong2012/article/details/79349359)
智能推荐
PHP程序运行流程:词法分析(Lexing,Tokenizing,Scanning)_phpscanning-程序员宅基地
文章浏览阅读1k次。在不开启 Opcache 的情况下,PHP解释器在解释PHP脚本的时候,首先会经过词法分析(Lexing),而词法分析的具体实现就是将PHP代码转换成 Tokens,此过程成为 Lexing / Tokenizing / Scanning 。那么 Tokens 是啥样的呢,Lex就是一个词法分析的依据表。 Zend/zend_language_scanner.c会根据Zend/zend_language_scanner.l (Lex文件),来输入的 PHP代码进行词法分析,从而得到一个一个的“词”,PHP_phpscanning
编程语言数值型和字符型数据的概念_数值 字符-程序员宅基地
文章浏览阅读1.7k次。在编程语言中区分变量的数据类型;最简单的是数值型和字符型;以SQL为例;新建一个表如下图;name列是字符型,age列是数值型;保存表名为pp;录入如下图的数据;看这里name列输入的‘123’、'789',这些是字符型的数据;age输入的内容是数值型;显示结果如下;因为age列是数值型,输入的 009 自动变为了 9;写查询语句时字符型数据按语法规则是用引号括起来;如果如下图写也可以运行出结果;是因为sqlserver本身具有一定的智能识别功能;写比较长的SQL语句_数值 字符
Caffe2 Tutorials[0](转)-程序员宅基地
文章浏览阅读558次。Caffe2 Tutorials[0](转)https://github.com/wizardforcel/data-science-notebook/blob/master/dl/more/caffe2-tut.md本系列教程包括9个小节,对应Caffe2官网的前9个教程,第10个教程讲的是在安卓下用SqueezeNet进行物体检测,此处不再翻译。另外由于栏主不关注RNN和LS..._writer.add_scalar [enforce fail at pybind_state.cc:221] ws->hasblob(name). c
java学习笔记day09 final、多态、抽象类、接口_} } class a { public void show() { show2(); } publ-程序员宅基地
文章浏览阅读155次。java学习笔记day09思维导图final 、 多态 、 抽象类 、 接口 (都很重要)一、final二、多态多态中的成员访问特点 【P237】多态的好处 【P239]多态的弊端向上转型、向下转型 【P241】形象案例:孔子装爹多态的问题理解: class 孔子爹 { public int age = 40; public void teach() { System.out.println("讲解JavaSE"); } _} } class a { public void show() { show2(); } public void show2() { s
Qt5通信 QByteArray中文字符 出现乱码 解决方法_qbytearray中文乱码-程序员宅基地
文章浏览阅读2.4k次,点赞3次,收藏9次。在写qt网口通信的过程中,遇到中文就乱码。解决方法如下:1.接收端处理中文乱码代码如下 QByteArray-> QString 中文乱码解决: #include <QTextCodec>QByteArray data= tcpSocket->readAll(); QTextCodec *tc = QTextCodec::codecForName("GBK"); QString str = tc->toUnicode(data);//str如果是中文则是中文字符_qbytearray中文乱码
JavaScript之DOM操作获取元素、事件、操作元素、节点操作_元素事件-程序员宅基地
文章浏览阅读2.5k次,点赞2次,收藏15次。什么是 DOM?文档对象模型(Document Object Model,简称 DOM),是 W3C 组织推荐的处理可扩展标记语言(HTML或者XML)的标准编程接口。W3C 已经定义了一系列的 DOM 接口,通过这些 DOM 接口可以改变网页的内容、结构和样式DOM 树文档:一个页面就是一个文档,DOM 中使用 document 表示元素:页面中的所有标签都是元素,DOM 中使用 element 表示节点:网页中的所有内容都是节点(标签、属性、文本、注释等),DOM 中使用 node._元素事件
随便推点
kettle 提交数据量_kettle——入门操作(表输出)详细-程序员宅基地
文章浏览阅读820次。表输出控件如下1)步骤名称,2)数据库连接,前面有过部分解释3)目标模式,数据库中的概念,引用:https://www.cnblogs.com/csniper/p/5509620.html(感谢)4)目标表:数据库中的表,这里有两种方式:(1) 应用数据库中已经存在的表,浏览表选中对应表即可,下图有部分sql功能。ddl可以执行ddl语句。(2) 创建新的表,填写表的名字,点击下面的sql就可以执..._kettle 步骤 提交
Sublime 多行编辑快捷键_submlite 同时操作多行 macos-程序员宅基地
文章浏览阅读4.4k次,点赞2次,收藏2次。鼠标选中多行,按下 widows 下 Ctrl Shift L( Mac下 Command Shift L)即可同时编辑这些行;鼠标选中文本,反复按widows 下CTRL D(Mac下 Command D)即可继续向下同时选中下一个相同的文本进行同时编辑;鼠标选中文本,按下Alt F3(Win)或Ctrl Command G(Mac)即可一次性选择全部的相同文本进行同时编辑;..._submlite 同时操作多行 macos
如何双启动Linux和Windows-程序员宅基地
文章浏览阅读252次。尽管Linux是具有广泛硬件和软件支持的出色操作系统,但现实是有时您必须使用Windows,这可能是由于关键应用程序无法在Linux下运行。 幸运的是,双重引导Windows和Linux非常简单-本文将向您展示如何使用Windows 10和Ubuntu 18.04进行设置。 在开始之前,请确保已备份计算机。 尽管双启动设置过程不是很复杂,但是仍然可能发生事故。 因此,请花点时间备份您的重要..._windows linux双启动
【flink番外篇】1、flink的23种常用算子介绍及详细示例(1)- map、flatmap和filter_flink 常用的分类和计算-程序员宅基地
文章浏览阅读1.6w次,点赞25次,收藏20次。本文主要介绍Flink 的3种常用的operator(map、flatmap和filter)及以具体可运行示例进行说明.将集合中的每个元素变成一个或多个元素,并返回扁平化之后的结果。按照指定的条件对集合中的元素进行过滤,过滤出返回true/符合条件的元素。本文主要介绍Flink 的3种常用的operator及以具体可运行示例进行说明。这是最简单的转换之一,其中输入是一个数据流,输出的也是一个数据流。下文中所有示例都是用该maven依赖,除非有特殊说明的情况。中了解更新系统的内容。中了解更新系统的内容。_flink 常用的分类和计算
(转)30 IMP-00019: row rejected due to ORACLE error 12899-程序员宅基地
文章浏览阅读590次。IMP-00019: row rejected due to ORACLE error 12899IMP-00003: ORACLE error 12899 encounteredORA-12899: value too large for column "CRM"."BK_ECS_ORDER_INFO_00413"."POSTSCRIPT" (actual: 895, maximum..._row rejected due to oracle
降低Nginx代理服务器的磁盘IO使用率,提高转发性能_nginx tcp转发 硬盘io-程序员宅基地
文章浏览阅读918次。目前很多Web的项目在部署的时候会采用Nginx做为前端的反向代理服务器,后端会部署很多业务处理服务器,通常情况下Nginx代理服务器部署的还是比较少,而且其以高效性能著称,几万的并发连接处理速度都不在话下。然而去年的时候,我们的线上系统也采用类似的部署结构,同时由于我们的业务需求,Nginx的部署环境在虚拟机上面,复用了其他虚拟机的整体磁盘,在高IO消耗的场景中,我们发现Nginx的磁盘_nginx tcp转发 硬盘io