Games101Homework【5】Intersection of a ray with a triangle(Include framework Interpretation)_games101 homework5-程序员宅基地
Framework analysis:
Since the code is extensive and the author is relatively inexperienced, I've used AI to generate some comments. I can generally understand it. When I have time, I'll explain the entire rendering process, including the formulas and algorithms.
Core:
At the camera origin, shoot a ray towards each pixel (with recursion depth set, the content inside curly braces denotes recursive steps):
{
If the ray misses, return background color. Then check if the ray intersects with objects in the scene (for spheres: solve the implicit equation of the ray and the 3D sphere, for triangular surfaces: use the Möller–Trumbore algorithm) and save intersection information. Next, based on material information, compute the lighting model (refraction and reflection Fresnel, default Phong model). In cases of refraction and reflection, recursively shoot rays from refraction and reflection points in the direction of refraction and reflection until the maximum depth is reached. Determine the final return color based on the refraction and reflection rates (Fresnel).
}
main.cpp:
The main function demonstrates the entire scene creation process, while rendering occurs in the Renderer class
//主函数中创建场景(创建物体和光源)以及设置渲染选项(图像宽度和高度、最大递归深度、视场角等)。
//然后调用渲染函数进行渲染。
int main()
{
    // 初始化场景,设置窗口大小为1280x960
    Scene scene(1280, 960);
    // 创建并设置第一个球体,位置在(-1, 0, -12),半径为2,材料类型为漫反射和光泽反射,颜色为(0.6, 0.7, 0.8)
    auto sph1 = std::make_unique<Sphere>(Vector3f(-1, 0, -12), 2);
    sph1->materialType = DIFFUSE_AND_GLOSSY;
    sph1->diffuseColor = Vector3f(0.6, 0.7, 0.8);
    // 创建并设置第二个球体,位置在(0.5, -0.5, -8),半径为1.5,材料类型为反射和折射,折射率为1.5
    auto sph2 = std::make_unique<Sphere>(Vector3f(0.5, -0.5, -8), 1.5);
    sph2->ior = 1.5;
    sph2->materialType = REFLECTION_AND_REFRACTION;
    // 将两个球体添加到场景中
    scene.Add(std::move(sph1));
    scene.Add(std::move(sph2));
    // 定义一个四边形网格,用于创建一个平面
    Vector3f verts[4] = {
   {-5,-3,-6}, {5,-3,-6}, {5,-3,-16}, {-5,-3,-16}};
    uint32_t vertIndex[6] = {0, 1, 3, 1, 2, 3};
    Vector2f st[4] = {
   {0, 0}, {1, 0}, {1, 1}, {0, 1}};
    // 创建并设置网格,材料类型为漫反射和光泽反射
    auto mesh = std::make_unique<MeshTriangle>(verts, vertIndex, 2, st);
    mesh->materialType = DIFFUSE_AND_GLOSSY;
    // 将网格添加到场景中
    scene.Add(std::move(mesh));
    // 添加两个光源到场景中
    scene.Add(std::make_unique<Light>(Vector3f(-20, 70, 20), 0.5));
    scene.Add(std::make_unique<Light>(Vector3f(30, 50, -12), 0.5));
    // 渲染场景
    Renderer r;
    r.Render(scene);

    return 0;
}
Render.cpp:
Defined ray propagation and rendering algorithms.
#include <fstream>
#include "Vector.hpp"
#include "Renderer.hpp"
#include "Scene.hpp"
#include <optional>
inline float deg2rad(const float °)
{ return deg * M_PI/180.0; }
// Compute reflection direction
Vector3f reflect(const Vector3f &I, const Vector3f &N)
{
return I - 2 * dotProduct(I, N) * N;
}
// 根据斯涅尔定律计算折射方向的函数
// **功能说明**:
// 此函数主要实现根据斯涅尔定律(Snell's Law)计算光线在穿过不同介质边界时的折射方向。
//斯涅尔定律表明入射角、折射角与两介质的折射率之间的关系。
// **特殊情况处理**:
// 函数需要精细处理两种情况:
// 1. 当光线位于物体外部时:
// 入射角的余弦cosi应基于法向量N和入射向量I的点积计算,但此时需取负值,即 `cosi = -N.I`。
//这是因为通常约定法向量指向物体内部,而光线从外部进入时,二者方向相反。
// 2. 当光线位于物体内部时:
// 需要对以下两点进行调整:
// a) 交换折射率:计算折射角时,应使用折射率较大的介质作为入射介质,较小的作为出射介质。
// b) 取反法向量N:确保计算出正确的折射向量,当光线从内部射出时,法向量的方向应指向物体外部,因此需要对其取反。
/**
@param I 入射光线向量
* @param N 物体表面的法向量(单位向量)
* @param ior 光线在两种介质中的折射率比值,即入射介质的折射率除以出射介质的折射率
* @return 折射后的光线向量。如果光线无法折射(全反射),则返回一个零向量。
**/
Vector3f refract(const Vector3f &I, const Vector3f &N, const float &ior)
{
// 计算入射角的余弦值,并确保其在合法范围内
float cosi = clamp(-1, 1, dotProduct(I, N));
// 初始化介质的折射率
//etai 和 etat 分别代表光线从一种介质进入另一种介质时的相对折射率。
//初始化时,假设当前所在介质的折射率为 1(通常指空气或其他参考介质),目标介质的折射率为 ior(指定的折射率)。
float etai = 1, etat = ior;
Vector3f n = N; // 初始化法向量
// 判断光线是从内部射出还是从外部射入,据此调整折射率和法向量的方向
if (cosi < 0) { cosi = -cosi; } else { std::swap(etai, etat); n = -N; }
// 计算折射率比值和折射系数
float eta = etai / etat;
float k = 1 - eta * eta * (1 - cosi * cosi);
// 根据折射系数判断是否发生全反射,若发生则返回零向量,否则计算并返回折射向量
return k < 0 ? 0 : eta * I + (eta * cosi - sqrtf(k)) * n;
}
/**
* 计算Fresnel方程
*
* 该函数用于计算光线在两种介质交界面处的反射和透射率,根据入射角和材料的折射率来确定。
*
* @param I 入射光线的方向向量
* @param N 交点处的法线向量
* @param ior 材料的折射率(指数)
*
* @return 返回一个包含反射和透射率的复数,其中实部表示反射率,虚部表示透射率。
*/
float fresnel(const Vector3f &I, const Vector3f &N, const float &ior)
{
// 计算入射角的余弦值,并限制在合法范围内
float cosi = clamp(-1, 1, dotProduct(I, N));
float etai = 1, etat = ior;
// 根据入射角的余弦值判断光线是从哪种介质射入另一种介质
if (cosi > 0) { std::swap(etai, etat); }
// 使用斯涅尔定律计算折射角的正弦值
float sint = etai / etat * sqrtf(std::max(0.f, 1 - cosi * cosi));
// 判断是否发生全内反射
if (sint >= 1) {
return 1; // 全内反射,反射率近似为1
}
else {
// 计算折射后的余弦值
float cost = sqrtf(std::max(0.f, 1 - sint * sint));
cosi = fabsf(cosi); // 取入射角余弦值的绝对值
// 计算反射率 Rs 和 Rp
float Rs = ((etat * cosi) - (etai * cost)) / ((etat * cosi) + (etai * cost));
float Rp = ((etai * cosi) - (etat * cost)) / ((etai * cosi) + (etat * cost));
// 返回反射率和透射率的平均值
return (Rs * Rs + Rp * Rp) / 2;
}
// 由于能量守恒,透射率可以通过反射率计算得到,但该部分代码未在此处显示
// As a consequence of the conservation of energy, transmittance is given by:
// kt = 1 - kr;
}
/**
* 检测光线是否与场景中的物体相交。
*
* \param orig 光线的起点
* \param dir 光线的方向
* \param objects 场景中包含的物体列表
* \param[out] tNear 包含到最近相交物体的距离
* \param[out] index 如果相交物体是网格,则存储相交三角形的索引
* \param[out] uv 存储相交点的u和v坐标(对于网格上的纹理映射)
* \param[out] *hitObject 存储指向相交物体的指针(用于检索材质信息等)
* \param isShadowRay 是否为阴影光线。如果是,则只要找到一次命中就可以早些返回。
*
* \return 如果光线与物体相交则返回true,否则返回false。
*/
std::optional<hit_payload> trace(
const Vector3f &orig, const Vector3f &dir,
const std::vector<std::unique_ptr<Object> > &objects)
{
// 初始化最近相交距离为正无穷
float tNear = kInfinity;
std::optional<hit_payload> payload;
// 遍历场景中的每个物体,检查光线是否与其相交
for (const auto & object : objects)
{
// 临时存储当前物体的相交信息
float tNearK = kInfinity;
uint32_t indexK;
Vector2f uvK;
// 如果当前物体与光线相交且距离更近,则更新相交信息
if (object->intersect(orig, dir, tNearK, indexK, uvK) && tNearK < tNear)
{
payload.emplace();
// 更新命中的物体信息
payload->hit_obj = object.get();
payload->tNear = tNearK;
payload->index = indexK;
payload->uv = uvK;
// 更新最近的相交距离
tNear = tNearK;
}
}
// 返回最近的相交信息,如果没有相交则返回空值
return payload;
}
/*
* 实现基于Whitted风格的光线传输算法(E [S*] (D|G) L)
*
* 该函数用于计算由位置和方向定义的光线交点处的颜色。请注意,此函数是递归的(它会调用自身)。
*
* 如果相交对象的材质为反射或反射且折射,则我们计算反射/折射方向,并通过递归调用castRay()函数向场景投射两束新光线。
* 当表面透明时,我们使用菲涅尔方程的结果混合反射和折射颜色(它根据表面法线、入射视向量和表面折射率计算反射和折射的量)。
*
* 如果表面为漫反射/光泽,则我们使用Phong照明模型来计算交点处的颜色。
*
* @param orig 光线的原点
* @param dir 光线的方向
* @param scene 场景,包含所有物体和光源的信息
* @param depth 当前递归的深度
* @return 在给定点由光线照射的颜色
*/
Vector3f castRay(
const Vector3f &orig, const Vector3f &dir, const Scene& scene,
int depth)
{
// 如果递归深度超过最大深度,返回黑色
if (depth > scene.maxDepth) {
return Vector3f(0.0,0.0,0.0);
}
Vector3f hitColor = scene.backgroundColor; // 默认颜色,若没有击中任何物体
if (auto payload = trace(orig, dir, scene.get_objects()); payload)
{
Vector3f hitPoint = orig + dir * payload->tNear; // 光线与物体的交点
Vector3f N; // 法线向量
Vector2f st; // 纹理坐标
payload->hit_obj->getSurfaceProperties(hitPoint, dir, payload->index, payload->uv, N, st);
switch (payload->hit_obj->materialType) {
case REFLECTION_AND_REFRACTION:
{
// 计算反射和折射光线,进行递归光线投射,然后根据菲涅尔方程混合颜色
Vector3f reflectionDirection = normalize(reflect(dir, N));
Vector3f refractionDirection = normalize(refract(dir, N, payload->hit_obj->ior));
Vector3f reflectionRayOrig = (dotProduct(reflectionDirection, N) < 0) ?
hitPoint - N * scene.epsilon :
hitPoint + N * scene.epsilon;
Vector3f refractionRayOrig = (dotProduct(refractionDirection, N) < 0) ?
hitPoint - N * scene.epsilon :
hitPoint + N * scene.epsilon;
Vector3f reflectionColor = castRay(reflectionRayOrig, reflectionDirection, scene, depth + 1);
Vector3f refractionColor = castRay(refractionRayOrig, refractionDirection, scene, depth + 1);
float kr = fresnel(dir, N, payload->hit_obj->ior);
hitColor = reflectionColor * kr + refractionColor * (1 - kr);
break;
}
case REFLECTION:
{
// 计算反射光线并进行递归光线投射,根据菲涅尔反射率混合颜色
float kr = fresnel(dir, N, payload->hit_obj->ior);
Vector3f reflectionDirection = reflect(dir, N);
Vector3f reflectionRayOrig = (dotProduct(reflectionDirection, N) < 0) ?
hitPoint + N * scene.epsilon :
hitPoint - N * scene.epsilon;
hitColor = castRay(reflectionRayOrig, reflectionDirection, scene, depth + 1) * kr;
break;
}
default:
{
// 使用Phong照明模型计算漫反射和镜面反射颜色
Vector3f lightAmt = 0, specularColor = 0;
Vector3f shadowPointOrig = (dotProduct(dir, N) < 0) ?
hitPoint + N * scene.epsilon :
hitPoint - N * scene.epsilon;
// 遍历场景中的所有光源,计算每个光源对交点处颜色的贡献
for (auto& light : scene.get_lights()) {
Vector3f lightDir = light->position - hitPoint;
float lightDistance2 = dotProduct(lightDir, lightDir);
lightDir = normalize(lightDir);
float LdotN = std::max(0.f, dotProduct(lightDir, N));
auto shadow_res = trace(shadowPointOrig, lightDir, scene.get_objects());
bool inShadow = shadow_res && (shadow_res->tNear * shadow_res->tNear < lightDistance2);
lightAmt += inShadow ? 0 : light->intensity * LdotN;
Vector3f reflectionDirection = reflect(-lightDir, N);
specularColor += powf(std::max(0.f, -dotProduct(reflectionDirection, dir)),
payload->hit_obj->specularExponent) * light->intensity;
}
hitColor = lightAmt * payload->hit_obj->evalDiffuseColor(st) * payload->hit_obj->Kd + specularColor * payload->hit_obj->Ks;
break;
}
}
}
return hitColor;
}
/*
* 主渲染函数。
* 此函数遍历图像中的所有像素,生成主光线,并将这些光线投射到场景中。
* 帧缓冲区的内容将被保存到一个文件中。
*/
void Renderer::Render(const Scene& scene)
{
std::vector<Vector3f> framebuffer(scene.width * scene.height);
// 计算视野调整系数和图像宽高比
float scale = std::tan(deg2rad(scene.fov * 0.5f));
float imageAspectRatio = scene.width / (float)scene.height;
// Use this variable as the eye position to start your rays.
Vector3f eye_pos(0);
int m = 0;
for (int j = 0; j < scene.height; ++j)
{
for (int i = 0; i < scene.width; ++i)
{
// 生成主光线方向
float x = (2*((float)i+0.5)/scene.width-1.0f) * imageAspectRatio * scale;
float y = (1.0-2*((float)j+0.5)/scene.height) * scale;
Vector3f dir =normalize( Vector3f(x, y, -1)); // Don't forget to normalize this direction!
framebuffer[m++] = castRay(eye_pos, dir, scene, 0);
}
UpdateProgress(j / (float)scene.height);
}
// 将帧缓冲区内容保存到文件中
FILE* fp = fopen("binary.ppm", "wb");
(void)fprintf(fp, "P6\n%d %d\n255\n", scene.width, scene.height);
for (auto i = 0; i < scene.height * scene.width; ++i) {
static unsigned char color[3];
color[0] = (char)(255 * clamp(0, 1, framebuffer[i].x));
color[1] = (char)(255 * clamp(0, 1, framebuffer[i].y));
color[2] = (char)(255 * clamp(0, 1, framebuffer[i].z));
fwrite(color, 1, 3, fp);
}
fclose(fp);
}
Triangle.hpp :
Defined operations for configuring triangles, ray-triangle intersection, obtaining vertex information, and more.
#pragma once

#include "Object.hpp"

#include <cstring>
/**
 * 检测一条射线和一个三角形是否相交。
 *
 * @param v0 三角形的第一个顶点。
 * @param v1 三角形的第二个顶点。
 * @param v2 三角形的第三个顶点。
 * @param orig 射线的原点。
 * @param dir 射线的方向(单位向量)。
 * @param tnear 如果相交,存储最近的交点距离(从射线原点开始)。
 * @param u 在三角形上的参数值,表示交点相对于 v0 的位置。
 * @param v 在三角形上的参数值,表示交点相对于 v1 的位置。
 * @return 如果射线和三角形相交,返回 true;否则返回 false。
 */
bool rayTriangleIntersect(const Vector3f& v0, const Vector3f& v1, const Vector3f& v2, const Vector3f& orig,
                          const Vector3f& dir, float& tnear, float& u, float& v)
{
    // TODO: Implement this function that tests whether the triangle
    // that's specified bt v0, v1 and v2 intersects with the ray (whose
    // origin is *orig* and direction is *dir*)
    // Also don't forget to update tnear, u and v.

   // 计算三角形的边和射线的起点到三角形顶点的向量
    Vector3f e1=v1-v0;
    Vector3f e2=v2-v0;
    Vector3f s=orig-v0;

    // 计算两个叉积向量
    Vector3f s1=crossProduct(dir,e2);
    Vector3f s2=crossProduct(s,e1);

    // 计算 s1 和 e1 的点积,用于后续交点参数的计算
    float s1e1 = dotProduct(s1,e1);
    if (dotProduct(s1,e1)<=0) return false; // 如果 s1 和 e1 的点积小于等于 0,则射线方向与三角形法向量方向相反,不相交

    // 根据向量的点积计算交点参数 tnear、u 和 v
    tnear=dotProduct(s2,e2)/s1e1;
    u=dotProduct(s1,s)/s1e1;
    v=dotProduct(s2,dir)/s1e1;

    // 检查交点参数是否满足三角形的边界条件,如果满足则表示相交
    if(tnear>=0.0f&&u>=0.0f&&v>=0.0f&&(1.0f-u-v)>=0.0f){
        return true;
    }
    return false;

}

class MeshTriangle : public Object
{
public:
/**
 * 构造一个MeshTriangle对象。
 *
 * @param verts 指向包含顶点位置数据的Vector3f数组的指针。
 * @param vertsIndex 指向包含顶点索引数据的uint32_t数组的指针,用于定义三角形。
 * @param numTris 三角形的数量。
 * @param st 指向包含UV纹理坐标数据的Vector2f数组的指针。
 *
 * 此构造函数通过给定的顶点位置、顶点索引、三角形数量和UV纹理坐标初始化MeshTriangle对象。
 * 它会计算出最大的顶点索引以确定需要分配多少个顶点和UV坐标。
 * 然后,它会复制顶点位置、顶点索引和UV坐标到内部持有的数组中以供后续使用。
 */
    MeshTriangle(const Vector3f* verts, const uint32_t* vertsIndex, const uint32_t& numTris, const Vector2f* st)
    {
        // 计算顶点索引中的最大值,以确定需要为顶点和UV坐标分配多少空间。
    uint32_t maxIndex = 0;
    for (uint32_t i = 0; i < numTris * 3; ++i)
        if (vertsIndex[i] > maxIndex)
            maxIndex = vertsIndex[i];
    maxIndex += 1;

    // 分配内存以存储顶点位置,并复制数据。
    vertices = std::unique_ptr<Vector3f[]>(new Vector3f[maxIndex]);
    memcpy(vertices.get(), verts, sizeof(Vector3f) * maxIndex);

    // 分配内存以存储顶点索引,并复制数据。
    vertexIndex = std::unique_ptr<uint32_t[]>(new uint32_t[numTris * 3]);
    memcpy(vertexIndex.get(), vertsIndex, sizeof(uint32_t) * numTris * 3);

    // 存储三角形的数量。
    numTriangles = numTris;

    // 分配内存以存储UV纹理坐标,并复制数据。
    stCoordinates = std::unique_ptr<Vector2f[]>(new Vector2f[maxIndex]);
    memcpy(stCoordinates.get(), st, sizeof(Vector2f) * maxIndex);
    }

 /**
 * 检测一条射线与一组三角形的交点。
 *
 * @param orig 射线的原点
 * @param dir 射线的方向(单位向量)
 * @param tnear 返回最近的交点距离(射线原点到交点的距离)
 * @param index 返回与射线相交的三角形的索引
 * @param uv 在相交的三角形上的UV坐标
 * @return 如果射线与三角形组相交返回true,否则返回false
 *
 * 该函数遍历一组三角形,使用rayTriangleIntersect函数检测每个三角形与射线的交点。
 * 如果检测到交点且该交点比当前最接近的交点更近,则更新tnear、uv和index。
 */
    bool intersect(const Vector3f& orig, const Vector3f& dir, float& tnear, uint32_t& index,
                   Vector2f& uv) const override
    {
        bool intersect = false; // 初始时假定不相交
        for (uint32_t k = 0; k < numTriangles; ++k) // 遍历所有三角形
        {
            // 获取当前三角形的三个顶点
            const Vector3f& v0 = vertices[vertexIndex[k * 3]];
            const Vector3f& v1 = vertices[vertexIndex[k * 3 + 1]];
            const Vector3f& v2 = vertices[vertexIndex[k * 3 + 2]];

            float t, u, v; // 临时变量用于存储交点信息

            // 检测当前三角形与射线是否相交,并更新最近交点信息
            if (rayTriangleIntersect(v0, v1, v2, orig, dir, t, u, v) && t < tnear)
            {
                tnear = t;
                uv.x = u;
                uv.y = v;
                index = k;
                intersect |= true; // 更新相交状态
            }
        }

        return intersect; // 返回是否相交的结果
    }

   /**
     * 获取给定点在表面的属性,包括法向量和纹理坐标。
     *
     * @param p1 三角形的第一个顶点坐标
     * @param p2 三角形的第二个顶点坐标
     * @param p3 三角形的第三个顶点坐标
     * @param index 三角形的索引
     * @param uv 在三角形内的纹理坐标
     * @param N 输出的法向量
     * @param st 输出的纹理坐标
     */
    void getSurfaceProperties(const Vector3f&, const Vector3f&, const uint32_t& index, const Vector2f& uv, Vector3f& N,
                              Vector2f& st) const override
    {
        // 根据索引获取三角形的三个顶点
        const Vector3f& v0 = vertices[vertexIndex[index * 3]];
        const Vector3f& v1 = vertices[vertexIndex[index * 3 + 1]];
        const Vector3f& v2 = vertices[vertexIndex[index * 3 + 2]];

        // 计算两个边向量,并标准化
        Vector3f e0 = normalize(v1 - v0);
        Vector3f e1 = normalize(v2 - v1);

        // 计算并标准化法向量
        N = normalize(crossProduct(e0, e1));

        // 获取三个顶点的纹理坐标
        const Vector2f& st0 = stCoordinates[vertexIndex[index * 3]];
        const Vector2f& st1 = stCoordinates[vertexIndex[index * 3 + 1]];
        const Vector2f& st2 = stCoordinates[vertexIndex[index * 3 + 2]];

        // 根据给定的纹理坐标uv,计算最终的纹理坐标
        st = st0 * (1 - uv.x - uv.y) + st1 * uv.x + st2 * uv.y;
    }

     /**
     * 计算并返回漫反射颜色。
     * @param st 二维纹理坐标,用于评估漫反射颜色。
     * @return Vector3f 表示漫反射颜色的三维向量。
     */
    Vector3f evalDiffuseColor(const Vector2f& st) const override
    {
        // 设置比例因子以控制纹理周期
        float scale = 5;
        // 使用位异或操作根据纹理坐标生成二进制图案
        float pattern = (fmodf(st.x * scale, 1) > 0.5) ^ (fmodf(st.y * scale, 1) > 0.5);
        // 使用线性插值根据图案值在两种颜色之间选择漫反射颜色
        return lerp(Vector3f(0.815, 0.235, 0.031), Vector3f(0.937, 0.937, 0.231), pattern);
    }

    std::unique_ptr<Vector3f[]> vertices;
    uint32_t numTriangles;
    std::unique_ptr<uint32_t[]> vertexIndex;
    std::unique_ptr<Vector2f[]> stCoordinates;
};
Principles:
How to calculate rays and obtain color information of triangles on the rays?
Calculate the position of a pixel in world coordinates, then cast a ray from the camera position through the pixel position. Upon hitting an object, return the color value and store it in the buffer.
Because I wasn't previously familiar with how to calculate the position of a pixel in world coordinates, I referred to the following article:
Games101:作业5解析_games101作业5-程序员宅基地
使用光线追踪生成相机光线 (scratchapixel.com)j
explan:
Calculating the position of a pixel in world coordinates:
Raster space:
The coordinates are (i+0.5, j+0.5)
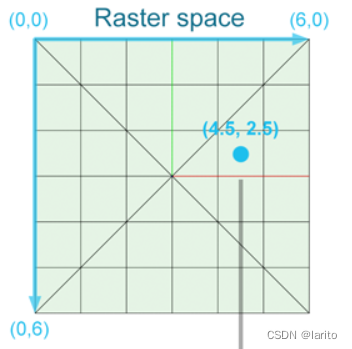
NDC space (mapped to 0 to 1):
Raster space x-coordinate / window width, Raster space y-coordinate / window height.
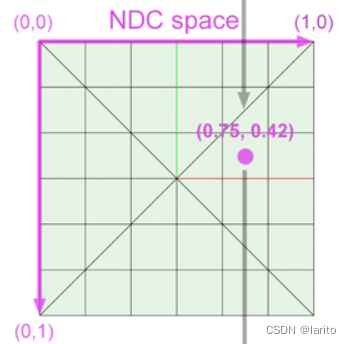
Screen space (mapping from 0 to 1 to -1 to 1):
For x-coordinate:
(2 * NDC space x-coordinate) - 1
But because the original NDC space y-coordinate is opposite to the screen space, for the y-coordinate:
1 - (2 * NDC space y-coordinate)
Because mapping to -1 to 1 causes compression, for example, if x:y is compressed from 1.4:1 to 1:1, you need to calculate the aspect ratio to scale x back up (if y is larger than x, you only need to multiply x to maintain the correct aspect ratio).
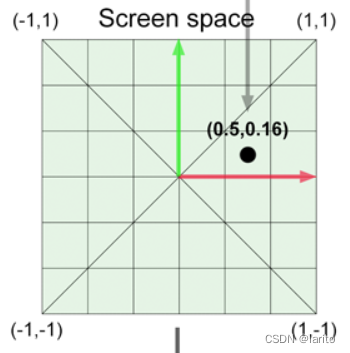
Finally, calculate tan(fov/2) to obtain the ratio of screen height to the distance from the camera to the screen as the scaling factor.
The resulting expression is as follows:
float imageAspectRatio = scene.width / (float)scene.height;
float scale = std::tan(deg2rad(scene.fov * 0.5f));
float x = (2*((float)i+0.5)/scene.width-1.0f) * imageAspectRatio * scale;
float y = (1.0-2*((float)j+0.5)/scene.height) * scale;
Moller-Trumbore:
Simply combine the ray equation and the barycentric representation of the triangle's points:
一文读懂射线与三角形相交算法Moller-Trumbore算法【收藏好文】 - 知乎 (zhihu.com)
Just implement the formulas.
Code:
Render():
/*
 * 主渲染函数。
 * 此函数遍历图像中的所有像素,生成主光线,并将这些光线投射到场景中。
 * 帧缓冲区的内容将被保存到一个文件中。
 */
void Renderer::Render(const Scene& scene)
{
    std::vector<Vector3f> framebuffer(scene.width * scene.height);
    // 计算视野调整系数和图像宽高比
    float scale = std::tan(deg2rad(scene.fov * 0.5f));
    float imageAspectRatio = scene.width / (float)scene.height;

    // Use this variable as the eye position to start your rays.
    Vector3f eye_pos(0);
    int m = 0;
    for (int j = 0; j < scene.height; ++j)
    {
        for (int i = 0; i < scene.width; ++i)
        {
            // 生成主光线方向
            float x = (2*((float)i+0.5)/scene.width-1.0f) * imageAspectRatio * scale;
            float y = (1.0-2*((float)j+0.5)/scene.height) * scale;


            Vector3f dir =normalize( Vector3f(x, y, -1)); // Don't forget to normalize this direction!
            framebuffer[m++] = castRay(eye_pos, dir, scene, 0);
        }
        UpdateProgress(j / (float)scene.height);
    }

    // 将帧缓冲区内容保存到文件中
    FILE* fp = fopen("binary.ppm", "wb");
    (void)fprintf(fp, "P6\n%d %d\n255\n", scene.width, scene.height);
    for (auto i = 0; i < scene.height * scene.width; ++i) {
        static unsigned char color[3];
        color[0] = (char)(255 * clamp(0, 1, framebuffer[i].x));
        color[1] = (char)(255 * clamp(0, 1, framebuffer[i].y));
        color[2] = (char)(255 * clamp(0, 1, framebuffer[i].z));
        fwrite(color, 1, 3, fp);
    }
    fclose(fp);
}
Note: If strange images appear, check whether Vector3f dir = normalize(Vector3f(x, y, -1)); is normalized.
rayTriangleIntersect():
/**
 * 检测一条射线和一个三角形是否相交。
 *
 * @param v0 三角形的第一个顶点。
 * @param v1 三角形的第二个顶点。
 * @param v2 三角形的第三个顶点。
 * @param orig 射线的原点。
 * @param dir 射线的方向(单位向量)。
 * @param tnear 如果相交,存储最近的交点距离(从射线原点开始)。
 * @param u 在三角形上的参数值,表示交点相对于 v0 的位置。
 * @param v 在三角形上的参数值,表示交点相对于 v1 的位置。
 * @return 如果射线和三角形相交,返回 true;否则返回 false。
 */
bool rayTriangleIntersect(const Vector3f& v0, const Vector3f& v1, const Vector3f& v2, const Vector3f& orig,
                          const Vector3f& dir, float& tnear, float& u, float& v)
{
    // TODO: Implement this function that tests whether the triangle
    // that's specified bt v0, v1 and v2 intersects with the ray (whose
    // origin is *orig* and direction is *dir*)
    // Also don't forget to update tnear, u and v.

   // 计算三角形的边和射线的起点到三角形顶点的向量
    Vector3f e1=v1-v0;
    Vector3f e2=v2-v0;
    Vector3f s=orig-v0;

    // 计算两个叉积向量
    Vector3f s1=crossProduct(dir,e2);
    Vector3f s2=crossProduct(s,e1);

    // 计算 s1 和 e1 的点积,用于后续交点参数的计算
    float s1e1 = dotProduct(s1,e1);
    if (dotProduct(s1,e1)<=0) return false; // 如果 s1 和 e1 的点积小于等于 0,则射线方向与三角形法向量方向相反,不相交

    // 根据向量的点积计算交点参数 tnear、u 和 v
    tnear=dotProduct(s2,e2)/s1e1;
    u=dotProduct(s1,s)/s1e1;
    v=dotProduct(s2,dir)/s1e1;

    // 检查交点参数是否满足三角形的边界条件,如果满足则表示相交
    if(tnear>=0.0f&&u>=0.0f&&v>=0.0f&&(1.0f-u-v)>=0.0f){
        return true;
    }
    return false;

}
Note: If strange images appear, check whether uv values are assigned.
Result:
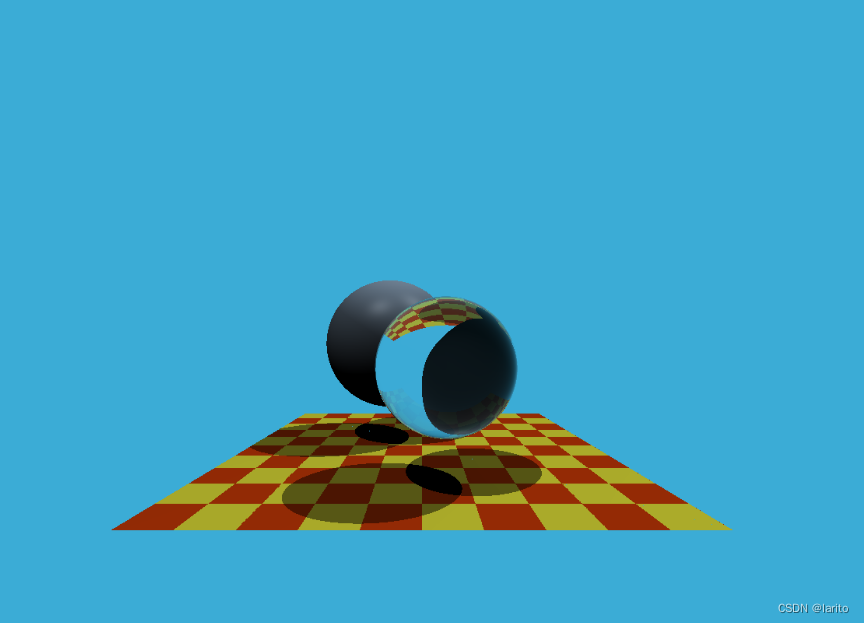
cool!
智能推荐
oracle 12c 集群安装后的检查_12c查看crs状态-程序员宅基地
文章浏览阅读1.6k次。安装配置gi、安装数据库软件、dbca建库见下:http://blog.csdn.net/kadwf123/article/details/784299611、检查集群节点及状态:[root@rac2 ~]# olsnodes -srac1 Activerac2 Activerac3 Activerac4 Active[root@rac2 ~]_12c查看crs状态
解决jupyter notebook无法找到虚拟环境的问题_jupyter没有pytorch环境-程序员宅基地
文章浏览阅读1.3w次,点赞45次,收藏99次。我个人用的是anaconda3的一个python集成环境,自带jupyter notebook,但在我打开jupyter notebook界面后,却找不到对应的虚拟环境,原来是jupyter notebook只是通用于下载anaconda时自带的环境,其他环境要想使用必须手动下载一些库:1.首先进入到自己创建的虚拟环境(pytorch是虚拟环境的名字)activate pytorch2.在该环境下下载这个库conda install ipykernelconda install nb__jupyter没有pytorch环境
国内安装scoop的保姆教程_scoop-cn-程序员宅基地
文章浏览阅读5.2k次,点赞19次,收藏28次。选择scoop纯属意外,也是无奈,因为电脑用户被锁了管理员权限,所有exe安装程序都无法安装,只可以用绿色软件,最后被我发现scoop,省去了到处下载XXX绿色版的烦恼,当然scoop里需要管理员权限的软件也跟我无缘了(譬如everything)。推荐添加dorado这个bucket镜像,里面很多中文软件,但是部分国外的软件下载地址在github,可能无法下载。以上两个是官方bucket的国内镜像,所有软件建议优先从这里下载。上面可以看到很多bucket以及软件数。如果官网登陆不了可以试一下以下方式。_scoop-cn
Element ui colorpicker在Vue中的使用_vue el-color-picker-程序员宅基地
文章浏览阅读4.5k次,点赞2次,收藏3次。首先要有一个color-picker组件 <el-color-picker v-model="headcolor"></el-color-picker>在data里面data() { return {headcolor: ’ #278add ’ //这里可以选择一个默认的颜色} }然后在你想要改变颜色的地方用v-bind绑定就好了,例如:这里的:sty..._vue el-color-picker
迅为iTOP-4412精英版之烧写内核移植后的镜像_exynos 4412 刷机-程序员宅基地
文章浏览阅读640次。基于芯片日益增长的问题,所以内核开发者们引入了新的方法,就是在内核中只保留函数,而数据则不包含,由用户(应用程序员)自己把数据按照规定的格式编写,并放在约定的地方,为了不占用过多的内存,还要求数据以根精简的方式编写。boot启动时,传参给内核,告诉内核设备树文件和kernel的位置,内核启动时根据地址去找到设备树文件,再利用专用的编译器去反编译dtb文件,将dtb还原成数据结构,以供驱动的函数去调用。firmware是三星的一个固件的设备信息,因为找不到固件,所以内核启动不成功。_exynos 4412 刷机
Linux系统配置jdk_linux配置jdk-程序员宅基地
文章浏览阅读2w次,点赞24次,收藏42次。Linux系统配置jdkLinux学习教程,Linux入门教程(超详细)_linux配置jdk
随便推点
matlab(4):特殊符号的输入_matlab微米怎么输入-程序员宅基地
文章浏览阅读3.3k次,点赞5次,收藏19次。xlabel('\delta');ylabel('AUC');具体符号的对照表参照下图:_matlab微米怎么输入
C语言程序设计-文件(打开与关闭、顺序、二进制读写)-程序员宅基地
文章浏览阅读119次。顺序读写指的是按照文件中数据的顺序进行读取或写入。对于文本文件,可以使用fgets、fputs、fscanf、fprintf等函数进行顺序读写。在C语言中,对文件的操作通常涉及文件的打开、读写以及关闭。文件的打开使用fopen函数,而关闭则使用fclose函数。在C语言中,可以使用fread和fwrite函数进行二进制读写。 Biaoge 于2024-03-09 23:51发布 阅读量:7 ️文章类型:【 C语言程序设计 】在C语言中,用于打开文件的函数是____,用于关闭文件的函数是____。
Touchdesigner自学笔记之三_touchdesigner怎么让一个模型跟着鼠标移动-程序员宅基地
文章浏览阅读3.4k次,点赞2次,收藏13次。跟随鼠标移动的粒子以grid(SOP)为partical(SOP)的资源模板,调整后连接【Geo组合+point spirit(MAT)】,在连接【feedback组合】适当调整。影响粒子动态的节点【metaball(SOP)+force(SOP)】添加mouse in(CHOP)鼠标位置到metaball的坐标,实现鼠标影响。..._touchdesigner怎么让一个模型跟着鼠标移动
【附源码】基于java的校园停车场管理系统的设计与实现61m0e9计算机毕设SSM_基于java技术的停车场管理系统实现与设计-程序员宅基地
文章浏览阅读178次。项目运行环境配置:Jdk1.8 + Tomcat7.0 + Mysql + HBuilderX(Webstorm也行)+ Eclispe(IntelliJ IDEA,Eclispe,MyEclispe,Sts都支持)。项目技术:Springboot + mybatis + Maven +mysql5.7或8.0+html+css+js等等组成,B/S模式 + Maven管理等等。环境需要1.运行环境:最好是java jdk 1.8,我们在这个平台上运行的。其他版本理论上也可以。_基于java技术的停车场管理系统实现与设计
Android系统播放器MediaPlayer源码分析_android多媒体播放源码分析 时序图-程序员宅基地
文章浏览阅读3.5k次。前言对于MediaPlayer播放器的源码分析内容相对来说比较多,会从Java-&amp;gt;Jni-&amp;gt;C/C++慢慢分析,后面会慢慢更新。另外,博客只作为自己学习记录的一种方式,对于其他的不过多的评论。MediaPlayerDemopublic class MainActivity extends AppCompatActivity implements SurfaceHolder.Cal..._android多媒体播放源码分析 时序图
java 数据结构与算法 ——快速排序法-程序员宅基地
文章浏览阅读2.4k次,点赞41次,收藏13次。java 数据结构与算法 ——快速排序法_快速排序法