尚硅谷Vue2.0+Vue3.0全套教程视频笔记 + 代码 [P101-135]_尚硅谷vue课件-程序员宅基地
技术标签: 前端 vue.js javascript
视频链接:尚硅谷Vue2.0+Vue3.0全套教程丨vuejs从入门到精通_哔哩哔哩_bilibili
P1-50:尚硅谷Vue2.0+Vue3.0全套教程视频笔记 + 代码 [P001-050]_小白桶子的博客-程序员宅基地
P51-100:尚硅谷Vue2.0+Vue3.0全套教程视频笔记 + 代码 [P051-100]_小白桶子的博客-程序员宅基地
P101-135:当前页面。
P101-110:
- P101 - vue-resource
课堂笔记:
(1)安装指令:npm i vue-resource
(2)这个库官方已不维护,转交的团队维护频率低,仅当了解,最好还是使用axios。
- P102 - 默认插槽
(总结在P104)本节部分代码:
App.vue页面:
<template>
    <div class="container">
        <Category title="美食">
            <img src="https://s3.ax1x.com/2021/01/16/srJlq0.jpg" alt=""/>
        </Category>

        <Category title="游戏">
            <ul>
                <li v-for="(g,index) in games" :key="index">{
   {g}}</li>
            </ul>
        </Category>

        <Category title="电影">
            <video controls src="http://clips.vorwaerts-gmbh.de/big_buck_bunny.mp4"></video>
        </Category>
    </div>
</template>

<script>
import Category from './components/Category.vue';
export default {
    name: "App",
    components: { Category },
    data() {
        return {
            foods:['火锅','烧烤','小龙虾','牛排'],
            games:['红色警戒','穿越火线','劲舞团','超级玛丽'],
            films:['《教父》','《拆弹专家》','《你好,李焕英》','《尚硅谷》']
        }
    },
}
</script>

<style>
.container{
    display: flex;
    justify-content: space-around;
}
img{
    width: 100%;
}
video{
    width: 100%;
}
</style>
Category.vue页面:
<template>
    <div class="category">
        <h3>{
   {title}}分类</h3>
        <!-- 定义一个插槽(挖个坑,等着组件的使用者进行填充) -->
        <slot>我是一个默认值,当使用者没有传递具体结构时,我会出现</slot>
        <!--
         -->
    </div>
</template>

<script>
export default {
    name:'Category',
    props:['title']
}
</script>

<style scoped>
.category{
    background-color: skyblue;
    width: 200px;
    height: 300px;
}
h3{
    text-align: center;
    background-color: orange;
}

</style>
- P103 - 具名插槽
(总结在P104)本节部分代码:
App.vue页面:
<template>
    <div class="container">
        <Category title="美食">
            <img slot="center" src="https://s3.ax1x.com/2021/01/16/srJlq0.jpg" alt=""/>
            <a slot="footer" href="http://www.atguigu.com">更多美食</a>
        </Category>

        <Category title="游戏">
            <ul slot="center">
                <li v-for="(g,index) in games" :key="index">{
   {g}}</li>
            </ul>
            <div class="foot" slot="footer">
                <a href="http://www.atguigu.com">单机游戏</a>
                <a href="http://www.atguigu.com">网络游戏</a>
            </div>
        </Category>

        <Category title="电影">
            <video slot="center" controls src="http://clips.vorwaerts-gmbh.de/big_buck_bunny.mp4"></video>
            <template v-slot:footer>
                <div class="foot">
                    <a href="http://www.atguigu.com">经典</a>
                    <a href="http://www.atguigu.com">热门</a>
                    <a href="http://www.atguigu.com">推荐</a>
                </div>
                <h4>欢迎前来观影</h4>
            </template>
        </Category>
    </div>
</template>

<script>
import Category from './components/Category.vue';
export default {
    name: "App",
    components: { Category },
    data() {
        return {
            foods:['火锅','烧烤','小龙虾','牛排'],
            games:['红色警戒','穿越火线','劲舞团','超级玛丽'],
            films:['《教父》','《拆弹专家》','《你好,李焕英》','《尚硅谷》']
        }
    },
}
</script>

<style>
.container,.foot{
    display: flex;
    justify-content: space-around;
}
img{
    width: 100%;
}
video{
    width: 100%;
}
h4{
    text-align: center;
}
</style>
Category.vue页面:
<template>
    <div class="category">
        <h3>{
   {title}}分类</h3>
        <!-- 定义一个插槽(挖个坑,等着组件的使用者进行填充) -->
        <slot name="center">我是一个默认值,当使用者没有传递具体结构时,我会出现1</slot>
        <slot name="footer">我是一个默认值,当使用者没有传递具体结构时,我会出现2</slot>
    </div>
</template>

<script>
export default {
    name:'Category',
    props:['title']
}
</script>

<style scoped>
.category{
    background-color: skyblue;
    width: 200px;
    height: 300px;
}
h3{
    text-align: center;
    background-color: orange;
}

</style>
- P104 - 作用域插槽
老师总结:
插槽:
1.作用:让父组件可以向子组件指定位置插入html结构,也是一种组件间通信的方式,适用于 父组件 ===>子组件。
2.分类:默认插槽、具名插槽、作用域插槽。
3.使用方式:
(1)默认插槽:
父组件中:
    <Category>
        <div>html结构1</div>
    </Category>
子组件中:
    <template>
        <div>
            <!-- 定义插槽 -->
            <slot>插槽默认内容...</slot>
        </div>
    </template>
(2)具名插槽:
父组件中:
    <Category>
        <template slot="footer">
            <div>html结构1</div>
        </template>
    </Category>
    <Category>
        <template v-slot:footer>
            <div>html结构2</div>
        </template>
    </Category>
子组件中:
    <template>
        <div>
            <!-- 定义插槽 -->
            <slot name="center">插槽默认内容...</slot>
            <slot name="footer">插槽默认内容...</slot>
        </div>
    </template>
(3)作用域插槽:
①理解:数据在组件的自身,但根据数据生成的结构需要组件的使用者来决定。(games数据在Category组件中,但使用数据所遍历出来的结构由App组件决定)
②具体编码:
父组件中:
    <Category>
        <template scope="scopeData">
            <!-- 生成的是ul列表 -->
            <ul>
                <li v-for="g in scopeData.games" :key="g">{
   {g}}</li>
            </ul>
        </template>
    </Category>
    <Category>
        <template scope="{games}">
            <!-- 生成的是ul列表 -->
            <h4 v-for="g in games" :key="g">{
   {g}}</h4>
        </template>
    </Category>
子组件中:
    <template>
        <div>
            <slot :games="games"></slot>
        </div>
    </template>

    <script>
    export default {
        name:'Category',
        //数据在子组件自身
        data() {
            return {
                games:['红色警戒','穿越火线','劲舞团','超级玛丽'],
            }
        },
    }
    </script>
本节部分代码:
App.vue页面:
<template>
    <div class="container">
        <Category title="游戏">
            <template scope="atguigu">
                <ul>
                    <li v-for="(g,index) in atguigu.games" :key="index">{
   {g}}</li>
                </ul>
            </template>
        </Category>
        <Category title="游戏">
            <template scope="{games}">
                <ol>
                    <li v-for="(g,index) in games" :key="index">{
   {g}}</li>
                </ol>
            </template>
        </Category>
        <Category title="游戏">
            <template scope="{games}">
                <h4 v-for="(g,index) in games" :key="index">{
   {g}}</h4>
            </template>
        </Category>
    </div>
</template>

<script>
import Category from './components/Category.vue';
export default {
    name: "App",
    components: { Category }
}
</script>

<style>
.container,.foot{
    display: flex;
    justify-content: space-around;
}
img{
    width: 100%;
}
video{
    width: 100%;
}
h4{
    text-align: center;
}
</style>
Category.vue页面:
<template>
    <div class="category">
        <h3>{
   {title}}分类</h3>
            <slot :games="games">我是默认的一些内容</slot>
    </div>
</template>

<script>
export default {
    name:'Category',
    props:['title'],
    data() {
        return {
            games:['红色警戒','穿越火线','劲舞团','超级玛丽'],
        }
    },
}
</script>

<style scoped>
.category{
    background-color: skyblue;
    width: 200px;
    height: 300px;
}
h3{
    text-align: center;
    background-color: orange;
}

</style>
- P105 - Vuex简介
课堂笔记:
(1)老师的课件图:
老师总结:
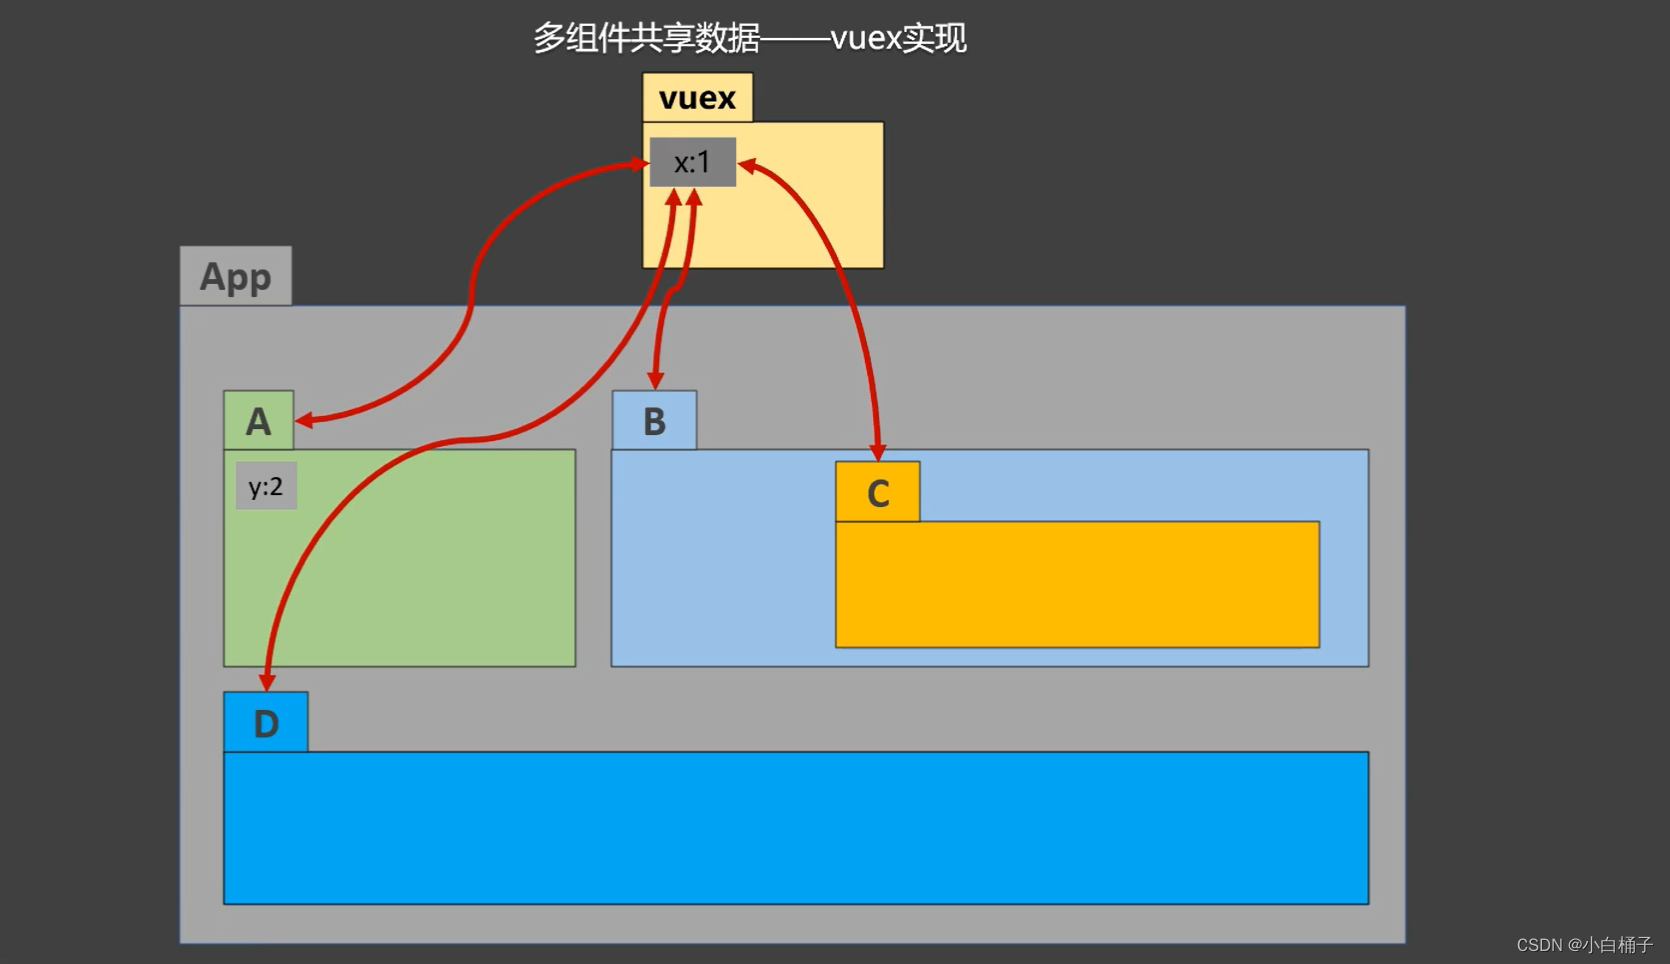
vuex是什么:
1.概念:专门在Vue中实现集中式状态(数据)管理的一个Vue插件,对Vue应用中对各组件的共享状态进行集中式的管理(读/写),也是一种组件间通信的方式,且适用于任意组件间通信。
2.Github地址:GitHub - vuejs/vuex: ️ Centralized State Management for Vue.js.
什么时候用Vuex:
1.多个组件依赖于同一状态
2.来自不同组件的行为需要变更同一状态
- P106 - 求和案例_纯vue版
课堂笔记:
(1)关于select的option值问题:
为什么value前面加冒号有效?不加就是字符串。加上冒号之后,引号里的内容都会当成JS表达式去分析,就变成了数字。
最好的做法还是在v-model中加number修饰符。但是上面那个方法也要清楚。
本节部分代码:
Count.vue页面:
<template>
    <div>
        <h1>当前求和为:{
   {sum}}</h1>
        <select v-model.number="n">
            <option value="1">1</option>
            <option value="2">2</option>
            <option value="3">3</option>
        </select>
        <button @click="increment">+</button>
        <button @click="decrement">-</button>
        <button @click="incrementOdd">当前求和为奇数再加</button>
        <button @click="incrementWait">等一等再加</button>
    </div>
</template>

<script>
export default {
    name:'Count',
    data() {
        return {
            n:1, //用户选择的数字
            sum:0 //当前的和
        }
    },
    methods: {
        increment(){
            this.sum += this.n
        },
        decrement(){
            this.sum -= this.n
        },
        incrementOdd(){
            if(this.sum % 2){
                this.sum += this.n
            }
        },
        incrementWait(){
            setTimeout(() => {
                this.sum += this.n
            }, 500);
        }
    },
}
</script>

<style scoped>
button{
    margin-left: 5px;
}

</style>
- P107 - Vuex工作原理图
课堂笔记:
(1)图:
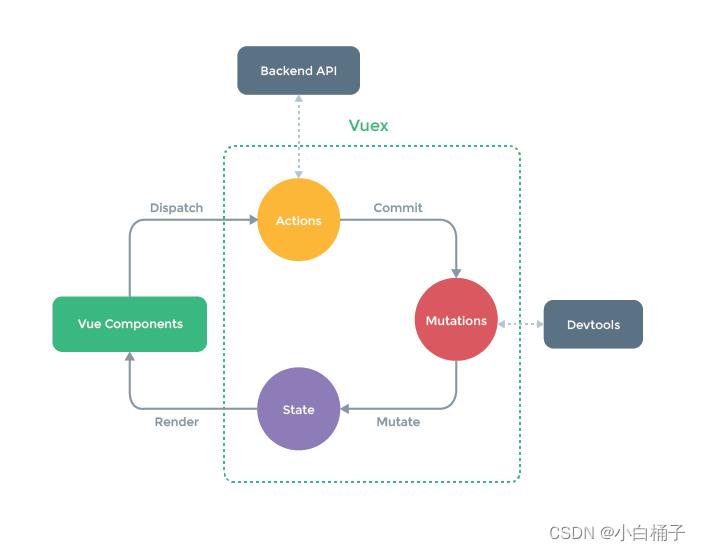
(2)图总流程简述:
①State:把数据交给Vuex其实就是把数据交给Vuex中的state。这个state的本质就是Object对象(本节的例子是{ ... sum:0 })。
②Vue Components:把数据递给Vue组件。在组件中调用API,为dispatch。
dispatch在调用的时候需要传两个参数,分别是动作类型和值(如dispatch( 'jia',2 ))。
③Actions:本质也是一个Object对象。
在调用了dispatch之后,Actions里面一定会有一个key,和该动作对应(如{ ... jia:function })。
这个函数一旦被调用,就会收到dispatch传的值(如2)。
在这个对应的函数中,自己调用commit(如commit( 'jia',2 ))。提交后继续往下走。
④Mutations:数据类型也是一个Object对象。
其中也会有很多key value,但是肯定会有之前传入的动作(如{ ... jia:function })。
这个函数会拿到两个东西,一个是整个state,还有一个是传过来的值(如2)。只要函数中写了“ state.sum += 2 ”,那么Mutate就会自动执行。
⑤再到State:最后State中的值变了(如{ ... sum:2})。通过Render重新渲染传给组件。
(3)图其它解析:
①为什么需要Actions,而不是直接传给Mutations来Mutate?
Actions对接Backend API(后端接口),它是用来执行异步操作的。
②如果已经有了数据的话,官方是允许Vue Components直接Commit给Mutations的。
③Devtools是vuex官方开发的浏览器插件。
④图中没画出来的是,Vuex中的Actions、Mutations、State都需要经过store管理。dispatch、commit都是由store提供的。
(4)老师的比喻,助理解:
Vue Components是客人,Actions是服务员,Mutations是后厨团队,State就是最终上的菜。
客人张嘴说话就是dispatch,客人点单蛋炒饭一份,就相当于dispatch( 'jia',2 )。
服务员收到后,将具体的单交给后厨团队就是commit。
后厨收到菜单后做菜就是Mutate。
最后做出菜Statue,给客人上菜。
如果客人跟后厨很熟(不需要服务员的菜单Backend API调用数据),也可以直接跳过服务员Actions,跟后厨讲一下,上菜就好了。
- P108 - 搭建Vuex环境
课堂笔记:
(1)Vuex安装指令:npm i vuex@3
(如果直接npm i vuex,那么安装的是vuex4,只能在Vue3中使用)
老师总结:
搭建vuex环境
1.创建文件:src/store/index.js
// 引入Vue核心库
import Vue from 'vue'
// 引入Vuex
import Vuex from 'vuex'
// 应用Vuex插件
Vue.use(Vuex)

// 准备actions对象——用于响应组件中的动作
const actions = {}
// 准备mutations对象——用于操作数据(state)
const mutations = {}
// 准备state对象——用于存储数据
const state = {}

// 创建并暴露store
export default new Vuex.Store({
    actions,mutations,state
})
2.在main.js中创建vm时传入store配置项
......
// 引入store
import store from './store'
......

// 创建vm
new Vue({
    el:'#app',
    render: h => h(App),
    store
})
- P109 - 求和案例_vuex版
无
本节部分代码:
store.js页面:
// 该文件用于创建Vuex中最为核心的store
// 引入Vue
import Vue from 'vue'
// 引入Vuex
import Vuex from 'vuex'
// 应用Vuex插件
Vue.use(Vuex)

// 准备actions——用于响应组件中的动作
const actions = {
    /* jia(context,value){
        // console.log('actions中的jia被调用了',context,value)
        context.commit('JIA',value)
    },
    jian(context,value){
        // console.log('actions中的jian被调用了',context,value)
        context.commit('JIAN',value)
    }, */
    jiaOdd(context,value){
        if(context.state.sum % 2){
            context.commit('JIA',value)
        }
    },
    jiaWait(context,value){
        setTimeout(() =>{
            context.commit('JIA',value)
        },500)
    },
}
// 准备mutations——用于操作数据(state)
const mutations = {
    JIA(state,value){
        // console.log('mutations中的JIA被调用了',state,value)
        state.sum += value
    },
    JIAN(state,value){
        // console.log('mutations中的JIAN被调用了',state,value)
        state.sum -= value
    }

}
// 准备state——用于存储数据
const state = {
    sum:0 //当前的和
}

// 创建并暴露store
export default new Vuex.Store({
    actions,mutations,state
})
Count.vue页面:
<template>
<div>
<h1>当前求和为:{
{$store.state.sum}}</h1>
<select v-model.number="n">
<option value="1">1</option>
<option value="2">2</option>
<option value="3">3</option>
</select>
<button @click="increment">+</button>
<button @click="decrement">-</button>
<button @click="incrementOdd">当前求和为奇数再加</button>
<button @click="incrementWait">等一等再加</button>
</div>
</template>
<script>
export default {
name:'Count',
data() {
return {
n:1, //用户选择的数字
}
},
methods: {
increment(){
this.$store.commit('JIA',this.n)
},
decrement(){
this.$store.commit('JIAN',this.n)
},
incrementOdd(){
this.$store.dispatch('jiaOdd',this.n)
},
incrementWait(){
setTimeout(() => {
this.$store.dispatch('jiaWait',this.n)
}, 500);
}
},
}
</script>
<style scoped>
button{
margin-left: 5px;
}
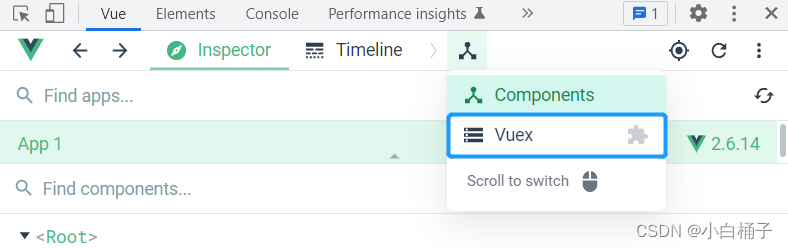
</style>- P110 - vuex开发者工具的使用
课堂笔记:
(1)vue控制台切换:
老师视频里是这样的:
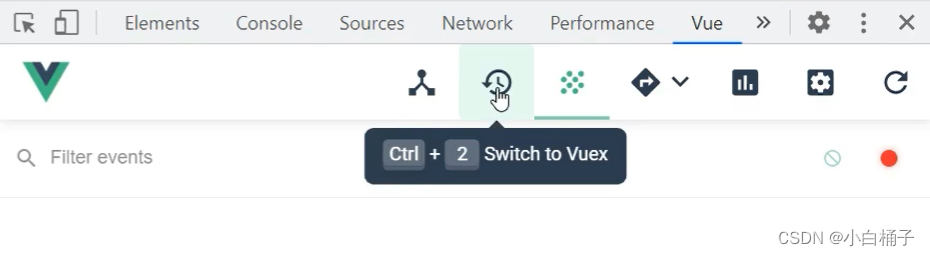
我这里的更新了,和老师的不一样,直接选这个:
P111-120:
- P111 - getters配置项
课堂笔记:
(1)state和getters的关系就像data和computed的关系。
(2)不是说数据处理必须要用这个,在数据处理逻辑复杂,且需要复用的情况下推荐使用。
老师总结:
1.概念:当state中的数据需要经过加工后再使用时,可以使用getters加工。
2.在store.js中追加getters配置:
......
const getters = {
    bigSum(state){
        return state.sum*10
    }
}
......
// 创建并暴露store
export default new Vuex.Store({
    actions,mutations,state,getters
})
3.组件中读取数据:$store.getters.bigSum
- P112 - mapState和mapGetters
课堂笔记:
(1)ES6中的 ... 为扩展运算符,能将 [ 数组 ] 或对象转换为逗号分隔的参数序列。
老师总结:
四个map方法的使用(前两个):
1.mapState方法:用于帮助我们映射state中的数据为计算属性
computed:{
    // 借助mapState生成计算属性,从state中读取数据。(对象写法)
    ...mapState({sum:'sum',school:'school',subject:'subject'}),

    // 借助mapState生成计算属性,从state中读取数据。(数组写法)
    ...mapState(['sum','school','subject']),
},
2.mapGetters方法:用于帮助我们映射getters中的数据为计算属性
computed:{
    // 借助mapGetters生成计算属性,从getters中读取数据。(对象写法)
    ...mapGetters({bigSum:'bigSum'}),

    // 借助mapGetters生成计算属性,从getters中读取数据。(数组写法)
    ...mapGetters(['bigSum'])
},
(代码在P116)
- P113 - mapActions与mapMutations
老师总结:
四个map方法的使用(后两个):
3.mapActions方法:用于帮助我们生成与actions对话的方法,即:包含$store.dispatch(xxx)的函数。
methods:{
    // 借助mapActions生成对应的方法,方法中会调用commit去练习mutations(对象写法)
    ...mapActions({incrementOdd:'jiaOdd',incrementWait:'jiaWait'}),

    // 借助mapActions生成对应的方法,方法中会调用commit去练习mutations(数组写法)
    ...mapActions(['jiaOdd','jiaWait']),
}
4.mapMutations方法:用于帮助我们生成与mutations对话的方法,即:包含$store.commit(xxx)的函数。
methods:{
    // 借助mapMutations生成对应的方法,方法中会调用commit去练习mutations(对象写法)
    ...mapMutations({increment:'JIA',decrement:'JIAN'}),

    // 借助mapMutations生成对应的方法,方法中会调用commit去练习mutations(数组写法)
    ...mapMutations(['JIA','JIAN']),
}
备注:mapActions与mapMutations使用时,若需要传递参数,需要:在模板中绑定事件时传递好参数,否则参数是事件对象。
(代码在P116)
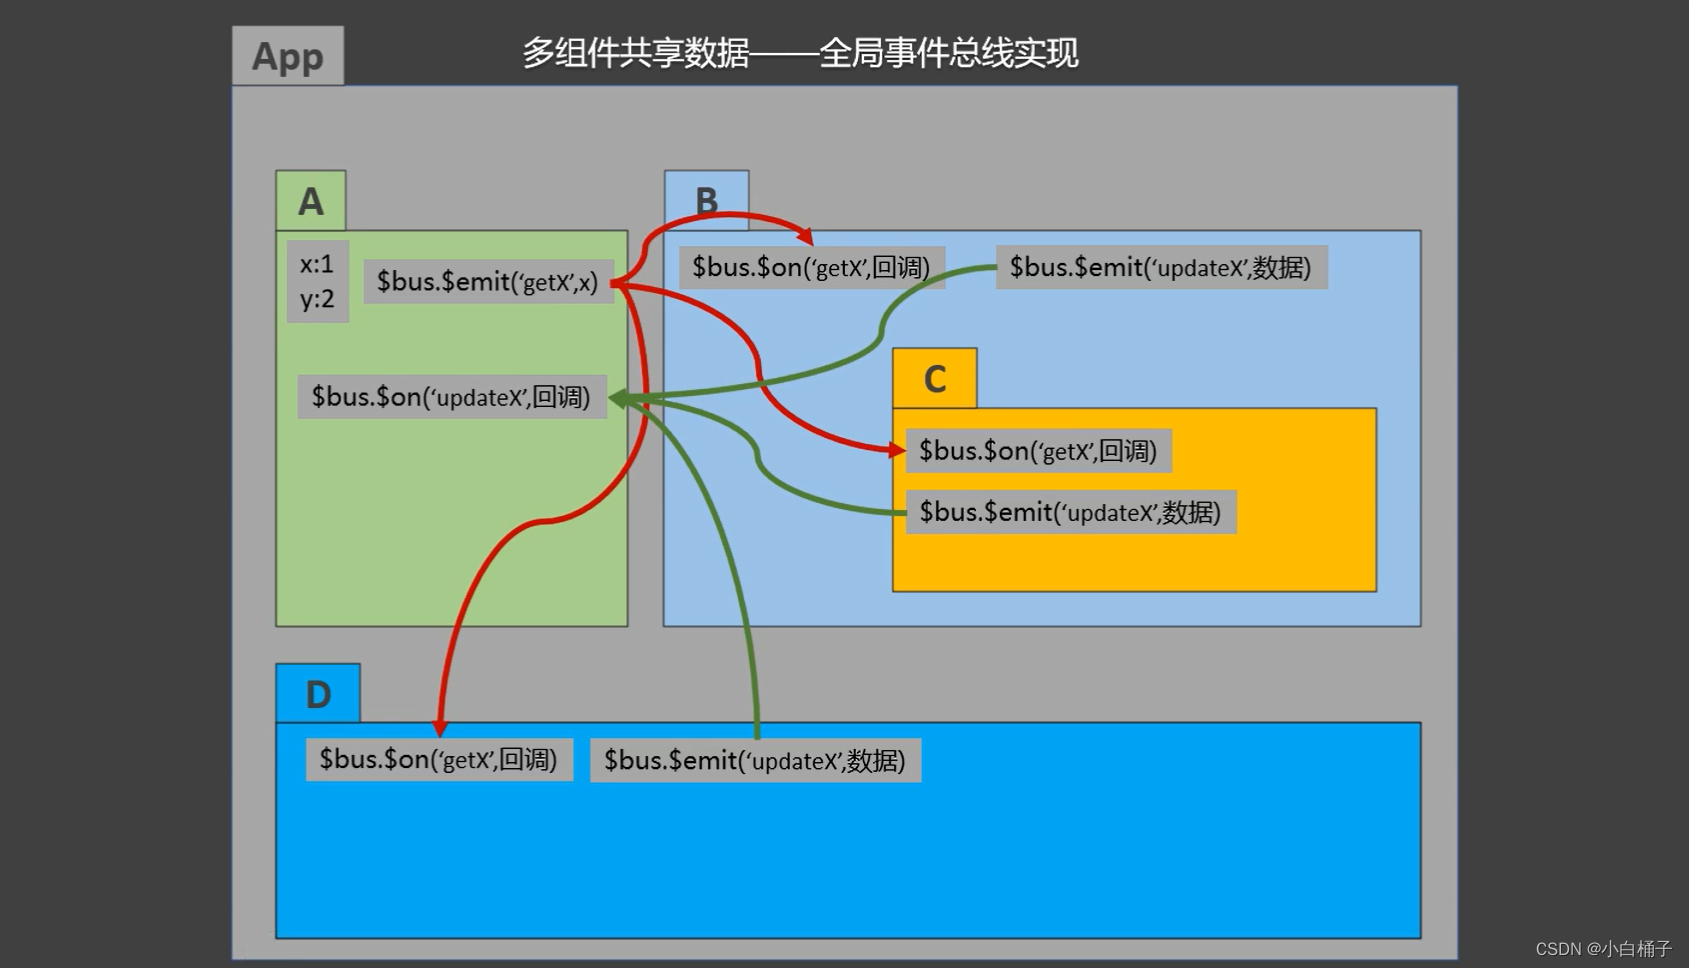
- P114 - 多组件共享数据
无
(代码在P116)
- P115 - vuex模块化+namespace_1
无
(代码在P116)
- P116 - vuex模块化+namespace_2
课堂笔记:
(1)老师的小语录链接:
https://api.uixsj.cn/hitokoto/get?type=social
老师总结:
模块化+命名空间
1.目的:让代码更好维护,让多种数据分析更加明确。
2.修改store.js
const countAbout = {
    namespaced:true,//开启命名空间
    state:{x:1},
    mutations:{......},
    actions:{......},
    getters:{
        bigSum(state){
            return state.sum*10
        }
    }
}

const personAbout = {
    namespaced:true,//开启命名空间
    state:{......},
    mutations:{......},
    actions:{......}
}

const store = new Vuex.Store({
    modules:{
        countAbout,
        personAbout
    }

})
3.开启命名空间后,组件中读取state数据:
//方式一:自己直接读取
this.$store.state.personAbout.list
//方式二:借助mapState读取
...mapState('countAbout',['sum','school','subject']),
4.开启命名空间后,组件中读取getters数据:
//方式一:自己直接读取
this.$store.getters['personAbout/firstPersonName']
//方式二:借助mapGetters读取
...mapGetters('countAbout',['bigSum'])
5.开启命名空间后,组件中调用dispatch:
//方式一:自己直接读取
this.$store.dispatch('personAbout/addPersonWang',personObj)
//方式二:借助mapGetters读取
...mapActions('countAbout',{incrementOdd:'jiaOdd',incrementWait:'jiaWait'}),
6.开启命名空间后,组件中调用commit:
//方式一:自己直接读取
this.$store.commit('personAbout/ADD_PERSON',personObj)
//方式二:借助mapGetters读取
...mapMutations('countAbout',{increment:'JIA',decrement:'JIAN'}),本节部分代码(求和案例_vuex升级版):
store/index.js页面:
// 该文件用于创建Vuex中最为核心的store
// 引入Vue
import Vue from 'vue'
// 引入Vuex
import Vuex from 'vuex'
import countOptions from './count'
import personOptions from './person'
// 应用Vuex插件
Vue.use(Vuex)

// 创建并暴露store
export default new Vuex.Store({
    modules:{
        countAbout:countOptions,
        personAbout:personOptions
    }

})
store/count.js页面:
// 求和相关的配置
export default {
    namespaced:true,
    actions:{
        jiaOdd(context,value){
            if(context.state.sum % 2){
                context.commit('JIA',value)
            }
        },
        jiaWait(context,value){
            setTimeout(() =>{
                context.commit('JIA',value)
            },500)
        },
    },
    mutations:{
        JIA(state,value){
            // console.log('mutations中的JIA被调用了',state,value)
            state.sum += value
        },
        JIAN(state,value){
            // console.log('mutations中的JIAN被调用了',state,value)
            state.sum -= value
        },
    },
    state:{
        sum:0, //当前的和
        school:'尚硅谷',
        subject:'前端',
    },
    getters:{
        bigSum(state){
            return state.sum*10
        }
    },
}
store/person.js页面:
import axios from "axios"
import { nanoid } from "nanoid"

// 人员管理相关的配置
export default {
    namespaced:true,
    actions:{
        addPersonWang(context,value){
            if(value.name.indexOf('王') === 0){
                context.commit('ADD_PERSON',value)
            }else{
                alert('添加的人必须姓王')
            }
        },
        addPersonServer(context){
           axios.get('https://api.uixsj.cn/hitokoto/get?type=social').then(
               response => {
                    context.commit('ADD_PERSON',{id:nanoid(),name:response.data})
               },
               error => {
                   alert(error.message)
               }
           )
        }
    },
    mutations:{
        ADD_PERSON(state,value){
            state.personList.unshift(value)
        }
    },
    state:{
        personList:[
            {id:'001',name:'张三'}
        ]
    },
    getters:{
        firstPersonName(state){
            return state.personList[0].name
        }
    },
}
Count.vue页面:
<template>
    <div>
        <h1>当前求和为:{
   {sum}}</h1>
        <h3>当前求和放大10倍为:{
   {bigSum}}</h3>
        <h3>我在{
   {school}},学习{
   {subject}}</h3>
        <h3 style="color:red;">Person组件的总人数是:{
   {personList.length}}</h3>
        <select v-model.number="n">
            <option value="1">1</option>
            <option value="2">2</option>
            <option value="3">3</option>
        </select>
        <button @click="increment(n)">+</button>
        <button @click="decrement(n)">-</button>
        <button @click="incrementOdd(n)">当前求和为奇数再加</button>
        <button @click="incrementWait(n)">等一等再加</button>
    </div>
</template>

<script>
import {mapGetters, mapState,mapActions,mapMutations} from 'vuex'
export default {
    name:'Count',
    data() {
        return {
            n:1, //用户选择的数字

        }
    },
    computed:{
        // 借助mapState生成计算属性,从state中读取数据。(数组写法)
        ...mapState('countAbout',['sum','school','subject']),
        ...mapState('personAbout',['personList']),
        // 借助mapGetters生成计算属性,从getters中读取数据。(数组写法)
        ...mapGetters('countAbout',['bigSum'])

    },
    methods: {
        // 借助mapMutations生成对应的方法,方法中会调用commit去练习mutations(对象写法)
        ...mapMutations('countAbout',{increment:'JIA',decrement:'JIAN'}),
        // 借助mapActions生成对应的方法,方法中会调用commit去练习mutations(对象写法)
        ...mapActions('countAbout',{incrementOdd:'jiaOdd',incrementWait:'jiaWait'}),

    }
}
</script>

<style scoped>
button{
    margin-left: 5px;
}

</style>
Person.vue页面:
<template>
  <div>
      <h1>人员列表</h1>
      <h3 style="color:red;">Count组件求和为:{
   {sum}}</h3>
      <h3>列表中第一个人的名字是:{
   {firstPersonName}}</h3>
      <input type="text" placeholder="请输入名字" v-model="name"/>
      <button @click="add">添加</button>
      <button @click="addWang">添加一个姓王的人</button>
      <button @click="addPersonServer">添加一个人,名字随机</button>
      <ul>
          <li v-for="p in personList" :key="p.id">{
   {p.name}}</li>
      </ul>
  </div>
</template>

<script>
import {nanoid} from 'nanoid'
export default {
    name:'Person',
    data() {
        return {
            name:''
        }
    },
    computed:{
        personList(){
            return this.$store.state.personAbout.personList
        },
        sum(){
            return this.$store.state.countAbout.sum
        },
        firstPersonName(){
            return this.$store.getters['personAbout/firstPersonName']
        }
    },
    methods: {
        add(){
            const personObj = {id:nanoid(),name:this.name}
            this.$store.commit('personAbout/ADD_PERSON',personObj)
            // console.log(personObj)
            this.name = ''
        },
        addWang(){
            const personObj = {id:nanoid(),name:this.name}
            this.$store.dispatch('personAbout/addPersonWang',personObj)
            this.name = ''

        },
        addPersonServer(){
            this.$store.dispatch('personAbout/addPersonServer')
        }
    },
}
</script>

<style>

</style>
- P117 - 路由的简介
课堂笔记:
(1)老师课件截图:

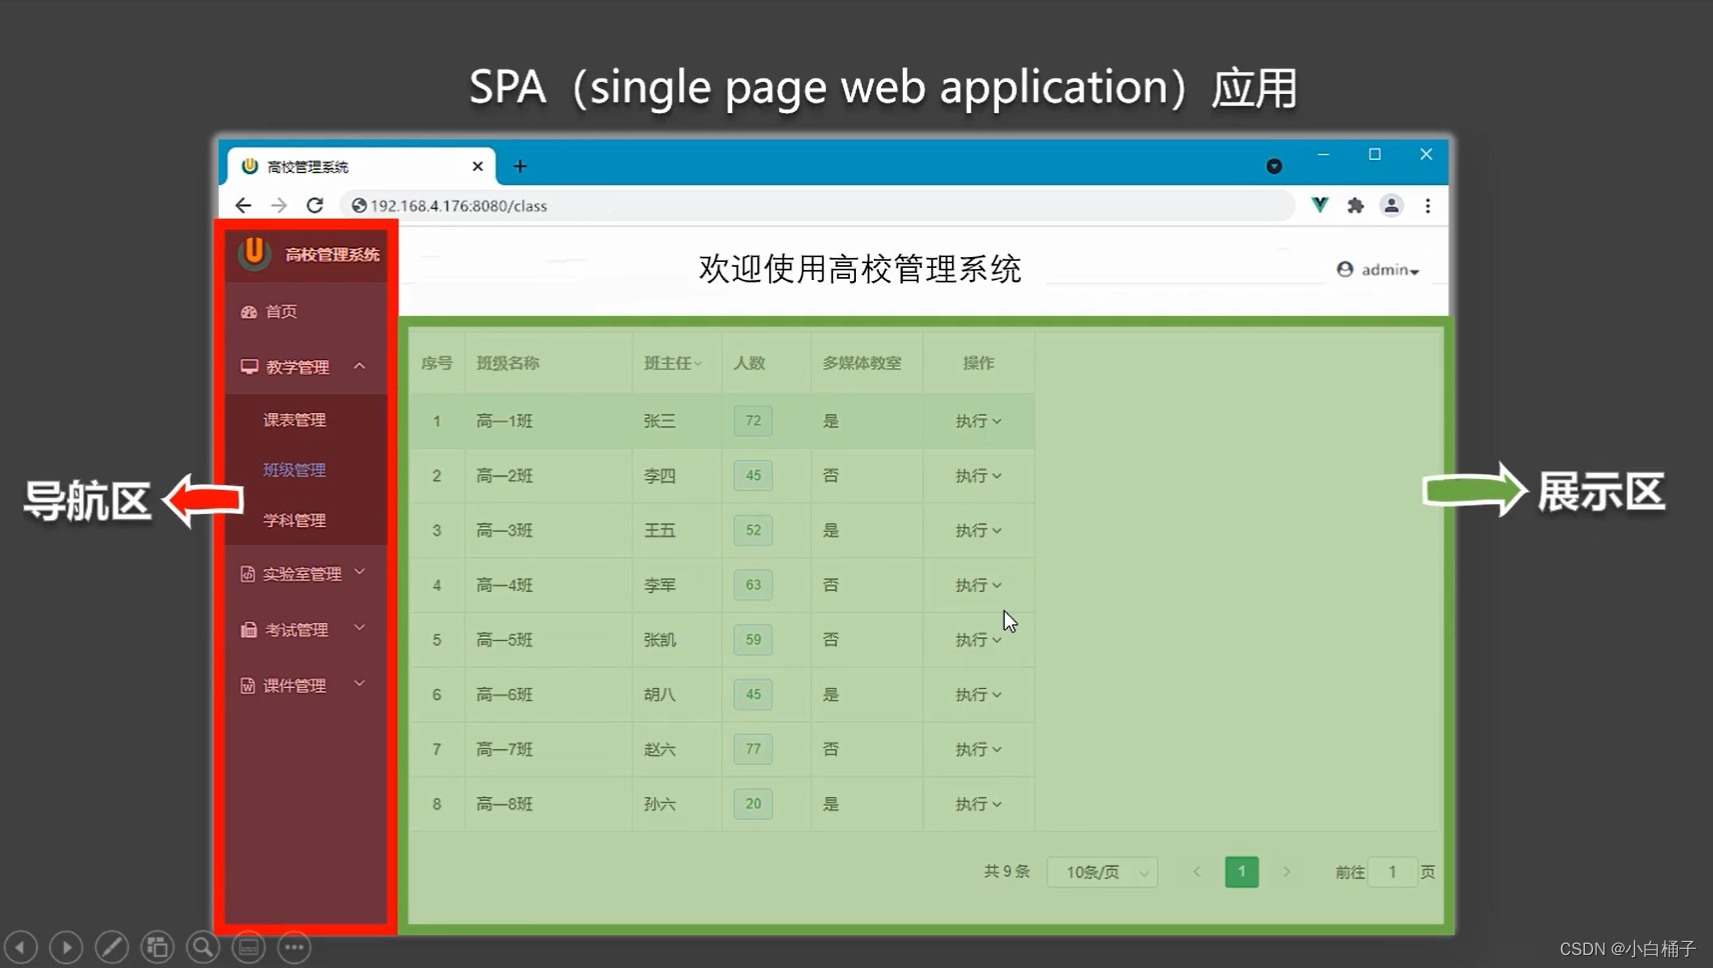
老师总结:
1.vue-router的理解:
vue的一个插件库,专门用来实现SPA应用。
2.对SPA应用的理解:
(1)单页Web应用(single page web application, SPA)。
(2)整个应用只有一个完整的页面。
(3) 点击页面中的导航链接不会刷新页面,只会做页面的局部更新。
(4)数据需要通过 ajax 请求获取。
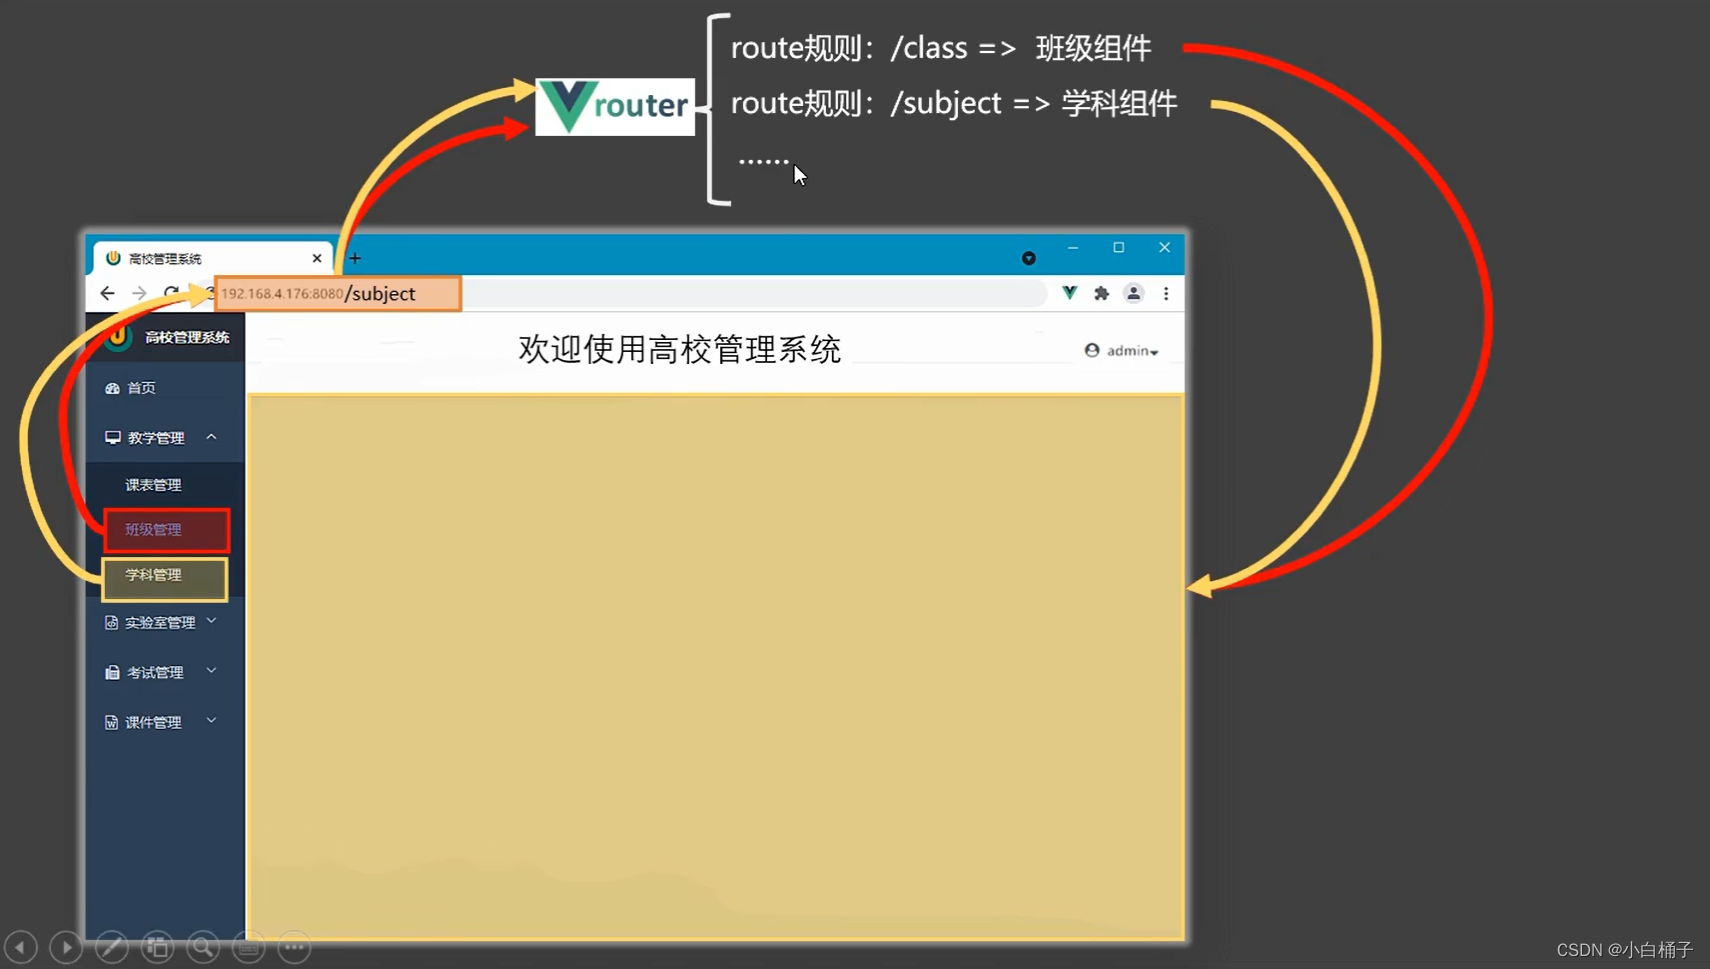
3.路由的理解:
(1)什么是路由?
① 一个路由就是一组映射关系(key - value)
② key 为路径, value 可能是 function 或 componen
(2)路由分类
① 后端路由:
1)理解:value 是 function, 用于处理客户端提交的请求。
2)工作过程:服务器接收到一个请求时, 根据请求路径找到匹配的函数来处理请求, 返回响应数据。
② 前端路由:
1)理解:value 是 component,用于展示页面内容。
2)工作过程:当浏览器的路径改变时, 对应的组件就会显示。
(important!从这节开始,路由系列一般不贴代码,老师的笔记里做法部分的代码写的很全,再贴代码就有点冗余了)
- P118 - 路由基本使用
课堂笔记:
(1)Vuex安装指令:npm i vue-router@3
(如果直接npm i vue-router,那么安装的是vue-router4,只能在Vue3中使用)
(2)router-link标签最终转换到页面上就是a标签。
老师总结:
路由
理解:一个路由(route)就是一组映射关系(key - value),多个路由需要路由器(router)进行管理。
前端路由:key是路径,value是组件。
1.基本使用:
(1)安装vue-router,命令:npm i vue-router
(2)应用插件:Vue.use(VueRouter)
(3)编写router配置项:
// 引入VueRouter
import VueRouter from "vue-router";
// 引入路由组件
import About from '../components/About'
import Home from '../components/Home'

// 创建router实例对象,去管理一组一组的路由规则
const router = new VueRouter({
    routes:[
        {
            path:'/about',
            component:About
        },
        {
            path:'/home',
            component:Home
        }
    ]
})
// 暴露router
expot default router
(4)实现切换(active-class可配置高亮样式)
<router-link active-class="active" to="/about">About</router-link>(5)指定展示位置
<router-view></router-view>- P119 - 几个注意点
老师总结:
2.几个注意点
(1)路由组件通常存放在pages文件夹,一般组件通常存放在components文件夹。
(2)通过切换,“隐藏”了的路由组件,默认是被销毁掉的,需要的时候再去挂载。
(3)每个组件都有自己的$route属性,里面存储着自己的路由信息。
(4)整个应用中只有一个router,可以通过组件的$router属性获取到。
- P120 - 嵌套路由
老师总结:
3.多级路由
(1)配置路由规则,使用children配置项:
routes:[
    {
        path:'/about',
        component:About
    },
    {
        path:'/home',
        component:Home,
        children:[ //通过children配置子级路由
            {
                path:'news', //此处一定不要写‘/news’
                component:News,
            },
            {
                path:'message', //此处一定不要写‘/message’
                component:Message,
            }
        ]
    }
]
(2)跳转(要写完整路径):
<router-link to="/home/news">News</router-link>P121-130:
- P121 - 路由的query参数
课堂笔记:
(老师写了,但是视频没放出来,也没找到这个课件,所以我自己总结了一下)
路由的query参数
(1)作用:跳转的时候传递参数
(2)如何使用:
①跳转路由并携带query参数,有两种写法:
<!-- 跳转路由并携带query参数,to的字符串写法 -->
<router-link :to="`/home/message/detail?id=${m.id}&title=${m.title}`">{
   {m.title}}</router-link>

<!-- 跳转路由并携带query参数,to的对象写法 -->
<router-link :to="{
    path:'/home/message/detail',
    query:{
        id:m.id,
        title:m.title
    }
}">
    {
   {m.title}}
</router-link>
②用$route.query接收参数:
<li>消息编号:{
   {$route.query.id}}</li>
<li>消息标题:{
   {$route.query.title}}</li>
- P122 - 命名路由
老师总结:
5.命名路由
(1)作用:可以简化路由的跳转。
(2)如何使用:
①给路由命名:
{
    path:'/demo',
    component:Demo,
    children:[
        {
            path:'test',
            component:Test,
            children:[
                {
                    name:'hello',
                    path:'detail',
                    component:Detail,
                }
            ]
        }
    ]
}
②简化跳转:
<!-- 简化前,需要写完整的路径 -->
<router-link to="demo/test/welcome">跳转</router-link>

<!-- 简化后,直接通过名字跳转 -->
<router-link :to="{name:'hello'}">跳转</router-link>

<!-- 简化写法配合传递参数 -->
<router-link :to="{
        name:'hello',
        query:{
            id:666,
            title:'你好'
        }
    }"
>跳转</router-link>
- P123 - 路由的params参数
老师总结:
6.路由的params参数
(1)配置路由,声明接收params参数
{
    path:'/home',
    component:Home,
    children:[
        {
            path:'news',
            component:News,
        },
        {
            path:'message',
            component:Message,
            children:[
                {
                    name:'xiangqing',
                    path:'detail/:id/:title', //使用占位符声明接收params参数
                    component:Detail,
                }
            ]
        }
    ]
}
(2)传递参数
<!-- 跳转路由并携带params参数,to的字符串写法 -->
<router-link :to="`/home/message/detail/666/你好`">{
   {m.title}}</router-link>

<!-- 跳转路由并携带params参数,to的对象写法 -->
<router-link :to="{
    name:'xiangqing',
    params:{
        id:666,
        title:'你好'
    }
}">
    {
   {m.title}}
</router-link>
特别注意:路由携带params参数时,若使用to的对象写法,则不能使用path配置项,必须使用name配置!
(3)接收参数
$route.params.id
$route.params.title
- P124 - 路由的props配置
老师总结:
7.路由的props配置
作用:让路由组件更方便的收到参数
{
    name:'xiangqing',
    path:'detail',
    component:Detail,

    // props的第一种写法,值为对象,该对象中的所有key-value都会以props的形式传给Detail组件
    // props:{a:1,b:'hello'}

    // props的第二种写法,值为布尔值,若布尔值为真,就会把该路由组件收到的所有params参数,以props的形式传给Detail组件
    // props:true

    // props的第三种写法,值为函数,该函数返回的对象中每一组key-value都会通过props传给Detail组件
    props({$route}){
        return {
            id:$route.query.id,
            title:$route.query.title
        }
    }
}
- P125 - router-link的replace属性
老师总结:
8. router-link的replace属性
(1)作用:控制路由跳转时操作浏览器历史记录的模式
(2)浏览器的历史记录有两种写入方式,分别为push和replace,push是追加历史记录,replace是替换当前记录。路由跳转时候默认为push。
(3)如何开启replace模式:
<router-link replace ...... >News</router-link>- P126 - 编程式路由导航
老师总结:
9.编程式路由导航
(1)作用:不借助router-link实现路由跳转,让路由跳转更加灵活
(2)具体编码:
//$routere的两个API
this.$router.push({
    name:'xiangqing',
    params:{
        id:xxx,
        title:xxx
    }
})

this.$router.replace({
    name:'xiangqing',
    params:{
        id:xxx,
        title:xxx
    }
})

this.$router.forward() //前进
this.$router.back() //后退
this.$router.go(3) //可前进也可后退
- P127 - 缓存路由组件
老师总结:
10.缓存路由组件
(1)作用:让不展示的路由组件保持挂载,不被销毁。
(2)具体编码:
<!-- 缓存多个路由组件 -->
<keep-alive :include="['News','Message']">
    <router-view></router-view>
</keep-alive>

<!-- 缓存一个路由组件 -->
<keep-alive include="News">
    <router-view></router-view>
</keep-alive>
- P128 - 两个新的生命周期钩子
课堂笔记:
(1)$nextTick(真实DOM出来之后再回调,回顾P90)和activated、deactivated是生命周期中不在图中的剩下三个。
老师总结:
11.两个新的生命周期钩子
(1)作用:路由组件所独有的两个钩子,用于捕获路由组件的激活状态。
(2)具体名字:
① activated 路由组件被激活时触发。
② deactivated 路由组件失活时触发。
- P129 - 全局前置_路由守卫
无(老师总结和P130整合在一起)
- P130 - 全局后置_路由守卫
课堂笔记:
(1)$route中的meta:路由元信息。
老师总结:
12.路由守卫
(1)作用:对路由进行权限控制
(2)分类:全局守卫、独享守卫、组件内守卫
(3)全局守卫:
// 全局前置路由守卫——初始化时执行、每次路由切换前被调用
router.beforeEach((to,from,next) => {
    console.log('beforeEach',to,from)
    if(to.meta.isAuth){ //判断当前路由是否需要进行权限控制
        if(localStorage.getItem('school')==='atguigu'){ //权限控制的具体规则
            next() //放行
        }else{
            alert('暂无权限查看')
            // next({name:'guanyu'})
        }
    }else{
        next() //放行
    }
})

// 全局后置路由守卫——初始化时执行、每次路由切换之后被调用
router.afterEach((to,from) => {
    console.log('afterEach',to,from)
    if(to.meta.title){
        document.title = to.meta.title //修改网页的title
    }else{
        document.title = 'vue_test'
    }

})
P131-135:
- P131 - 独享路由守卫
老师总结:
(4)独享守卫:
beforeEnter:(to, from, next) => {
    console.log('beforeEnter',to, from)
    if(to.meta.isAuth){ //判断当前路由是否需要进行权限控制
        if(localStorage.getItem('school')==='atguigu'){
            next()
        }else{
            alert('学校名不对,没有查看权限!')
        }
    }else{
        next()
    }
}
- P132 - 组件内路由守卫
老师总结:
(5)组件内守卫:
// 进入守卫:通过路由规则,进入该组件时被调用
beforeRouteEnter (to, from, next){
},
// 离开守卫:通过路由规则,离开该组件时被调用
beforeRouteLeave (to, from, next){
},
- P133 - history模式与hash模式
课堂笔记:
(1)哈希值(如 http://localhost:8080/#/home/message 中的 #/home/message 就是哈希值)最大的特点就是,不会随着http请求发送给服务器。
(2)打包指令:npm run build
(生成的东西需要放到服务器中部署才能用。)
(3)课中的nodeJS的express(仅了解不需要掌握),可以看这个:NodeJS之Express基础_不起眼的皮皮虾的博客-程序员宅基地_express nodejs
(4)中间件 connect-history-api-fallback
安装指令:npm i connect-history-api-fallback
后端引入(必须得在静态资源前引入)调用:
const history = require('npm i connect-history-api-fallback');
......
app.use(history())(5)nginx也可以实现,起到中间代理作用(仅了解)。
老师总结:
13.路由器的两种工作模式
(1)对于一个url来说,什么是hash值?——#及其后面的内容就是hash值。
(2)hash值不会包含在HTTP请求中,即:hash值不会带给服务器。
(3)hash模式:
①地址中永远带着#号,不美观。
②若以后将地址通过第三方手机app分享,若app校验严格,则地址会被标记为不合法。
③兼容性较好。
(4)history模式:
①地址干净,美观。
②兼容性和hash模式相比略差。
③应用部署上线时需要后端人员支持,解决刷新页面服务端404的问题。
- P134 - element-ui基本使用
课堂笔记:
(1)安装指令:npm i element-ui -S
老师总结:
Vue UI组件库
1.移动端常用 UI 组件库
(1)Vant Vant 3 - Mobile UI Components built on Vue
(2)Cube UI cube-ui Document
(3)Mint UI Mint UI
2.PC 端常用 UI 组件库
(1)Element UI Element - The world's most popular Vue UI framework
(2)IView UI iView / View Design 一套企业级 UI 组件库和前端解决方案
本节部分代码:
main.js页面:
// 引入Vue
import Vue from 'vue'
// 引入App
import App from './App.vue'

// 完整引入
// 引入ElementUI组件库
import ElementUI from 'element-ui'
// 引入ElementUI全部样式
import 'element-ui/lib/theme-chalk/index.css'
// 关闭Vue的生产提示
Vue.config.productionTip = false
// 应用ElementUI
Vue.use(ElementUI)

// 创建vm
new Vue({
    el:'#app',
    render: h => h(App),
})
- P135 - element-ui按需引入
课堂笔记:
(1)按需引入指令:npm install babel-plugin-component -D
(npm xxx -D 代表着安装开发依赖。)
(2)报错解决:
如果报 not found ’xxx' 的错,那就在指令中输入: npm i xxx
如果是跟老师一样的问题,那需要在babel.config.js页面的presets配置项中,将原先的 es2015 修改成 @babel/preset-env
~ ❀ ✿ ~ Vue2.0 完 结 撒 花 ~ ✿ ❀ ~
——————————————————————————————————————
——————————————原创不易,转载请声明——————————————
智能推荐
c# 调用c++ lib静态库_c#调用lib-程序员宅基地
文章浏览阅读2w次,点赞7次,收藏51次。四个步骤1.创建C++ Win32项目动态库dll 2.在Win32项目动态库中添加 外部依赖项 lib头文件和lib库3.导出C接口4.c#调用c++动态库开始你的表演...①创建一个空白的解决方案,在解决方案中添加 Visual C++ , Win32 项目空白解决方案的创建:添加Visual C++ , Win32 项目这......_c#调用lib
deepin/ubuntu安装苹方字体-程序员宅基地
文章浏览阅读4.6k次。苹方字体是苹果系统上的黑体,挺好看的。注重颜值的网站都会使用,例如知乎:font-family: -apple-system, BlinkMacSystemFont, Helvetica Neue, PingFang SC, Microsoft YaHei, Source Han Sans SC, Noto Sans CJK SC, W..._ubuntu pingfang
html表单常见操作汇总_html表单的处理程序有那些-程序员宅基地
文章浏览阅读159次。表单表单概述表单标签表单域按钮控件demo表单标签表单标签基本语法结构<form action="处理数据程序的url地址“ method=”get|post“ name="表单名称”></form><!--action,当提交表单时,向何处发送表单中的数据,地址可以是相对地址也可以是绝对地址--><!--method将表单中的数据传送给服务器处理,get方式直接显示在url地址中,数据可以被缓存,且长度有限制;而post方式数据隐藏传输,_html表单的处理程序有那些
PHP设置谷歌验证器(Google Authenticator)实现操作二步验证_php otp 验证器-程序员宅基地
文章浏览阅读1.2k次。使用说明:开启Google的登陆二步验证(即Google Authenticator服务)后用户登陆时需要输入额外由手机客户端生成的一次性密码。实现Google Authenticator功能需要服务器端和客户端的支持。服务器端负责密钥的生成、验证一次性密码是否正确。客户端记录密钥后生成一次性密码。下载谷歌验证类库文件放到项目合适位置(我这边放在项目Vender下面)https://github.com/PHPGangsta/GoogleAuthenticatorPHP代码示例://引入谷_php otp 验证器
【Python】matplotlib.plot画图横坐标混乱及间隔处理_matplotlib更改横轴间距-程序员宅基地
文章浏览阅读4.3k次,点赞5次,收藏11次。matplotlib.plot画图横坐标混乱及间隔处理_matplotlib更改横轴间距
docker — 容器存储_docker 保存容器-程序员宅基地
文章浏览阅读2.2k次。①Storage driver 处理各镜像层及容器层的处理细节,实现了多层数据的堆叠,为用户 提供了多层数据合并后的统一视图②所有 Storage driver 都使用可堆叠图像层和写时复制(CoW)策略③docker info 命令可查看当系统上的 storage driver主要用于测试目的,不建议用于生成环境。_docker 保存容器
随便推点
网络拓扑结构_网络拓扑csdn-程序员宅基地
文章浏览阅读834次,点赞27次,收藏13次。网络拓扑结构是指计算机网络中各组件(如计算机、服务器、打印机、路由器、交换机等设备)及其连接线路在物理布局或逻辑构型上的排列形式。这种布局不仅描述了设备间的实际物理连接方式,也决定了数据在网络中流动的路径和方式。不同的网络拓扑结构影响着网络的性能、可靠性、可扩展性及管理维护的难易程度。_网络拓扑csdn
JS重写Date函数,兼容IOS系统_date.prototype 将所有 ios-程序员宅基地
文章浏览阅读1.8k次,点赞5次,收藏8次。IOS系统Date的坑要创建一个指定时间的new Date对象时,通常的做法是:new Date("2020-09-21 11:11:00")这行代码在 PC 端和安卓端都是正常的,而在 iOS 端则会提示 Invalid Date 无效日期。在IOS年月日中间的横岗许换成斜杠,也就是new Date("2020/09/21 11:11:00")通常为了兼容IOS的这个坑,需要做一些额外的特殊处理,笔者在开发的时候经常会忘了兼容IOS系统。所以就想试着重写Date函数,一劳永逸,避免每次ne_date.prototype 将所有 ios
如何将EXCEL表导入plsql数据库中-程序员宅基地
文章浏览阅读5.3k次。方法一:用PLSQL Developer工具。 1 在PLSQL Developer的sql window里输入select * from test for update; 2 按F8执行 3 打开锁, 再按一下加号. 鼠标点到第一列的列头,使全列成选中状态,然后粘贴,最后commit提交即可。(前提..._excel导入pl/sql
Git常用命令速查手册-程序员宅基地
文章浏览阅读83次。Git常用命令速查手册1、初始化仓库git init2、将文件添加到仓库git add 文件名 # 将工作区的某个文件添加到暂存区 git add -u # 添加所有被tracked文件中被修改或删除的文件信息到暂存区,不处理untracked的文件git add -A # 添加所有被tracked文件中被修改或删除的文件信息到暂存区,包括untracked的文件...
分享119个ASP.NET源码总有一个是你想要的_千博二手车源码v2023 build 1120-程序员宅基地
文章浏览阅读202次。分享119个ASP.NET源码总有一个是你想要的_千博二手车源码v2023 build 1120
【C++缺省函数】 空类默认产生的6个类成员函数_空类默认产生哪些类成员函数-程序员宅基地
文章浏览阅读1.8k次。版权声明:转载请注明出处 http://blog.csdn.net/irean_lau。目录(?)[+]1、缺省构造函数。2、缺省拷贝构造函数。3、 缺省析构函数。4、缺省赋值运算符。5、缺省取址运算符。6、 缺省取址运算符 const。[cpp] view plain copy_空类默认产生哪些类成员函数