According to official documentation, ShaderMask is a widget that applies a mask generated by a shader to its child.
根据官方文档, ShaderMask是一个小部件,可将着色器生成的蒙版应用于其子级。
What does this mean ? What is a Shader ? What does Mask mean ?
这是什么意思 ? 什么是Shader ? Mask是什么意思?
I’ll try to explain its meaning with an example. Let’s say, for instance, to paint a house, you need two basic things:
我将尝试通过一个例子来解释它的含义。 例如,假设要粉刷一栋房子,您需要两个基本的条件:
- Color 颜色
- Paint tools (Brush, ladder and so on) 油漆工具(画笔,梯子等)
The tools such as brush which is used to apply color on the walls of a house, is nothing but a shader. The color that is being applied, is a mask and the house (wall) of course is a widget. So, in simple terms, ShaderMask is a widget that is used to apply effects / color on it’s child.
诸如刷子之类的用于在房屋墙壁上shader不过是shader 。 所应用的颜色是mask , 房子 (墙)当然是widget 。 因此,简单来说, ShaderMask是一个小部件,用于在其子级上应用效果/颜色。
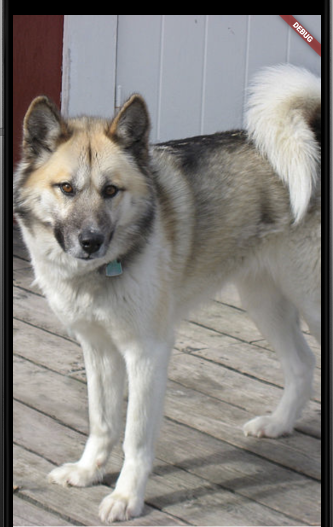
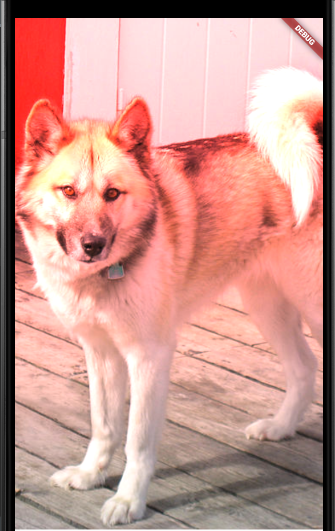
Let’s now see an example of wrapping a widget with ShaderMask and what all properties and methods are offered by ShaderMask to achieve the effect we want on it’s child. We will have a simple Container with bounds along with an image as it’s child, as below:
让我们现在看看包装与小窗口的一个例子ShaderMask什么所有属性和方法是通过提供ShaderMask来实现我们想要它的孩子的影响。 我们将有一个带有边界的简单Container以及一个子图像,如下所示:
body: Center(
  child: Container(
    width: double.infinity,
    height: double.infinity,
    child: Image.asset('assets/jpg.jpg', fit: BoxFit.cover)
  )
)
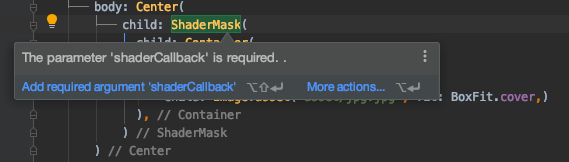
When we wrap Container with ShaderMask, we also need to add required parameter named shaderCallback
用ShaderMask包装Container时,还需要添加名为shaderCallback必需参数
shaderCallback as the name indicates, is the callback that accepts bounds for Rect (stands for Rectangle) that helps to create the shader for the given bounds, ie, the process of identifying the area where to start coloring.
shaderCallback是接受Rect bounds (代表Rectangle)的回调,该回调有助于为给定边界创建shader ,即,确定开始着色的区域的过程。
Since we need to give effects to the child (or wall), we can make use of Gradients class to apply colors / effects. This is usually done using:
由于我们需要给孩子(或墙壁)添加效果,因此可以利用Gradients类来应用颜色/效果。 通常使用以下命令完成此操作:
- LinearGradient 线性渐变
- RadialGradient 径向渐变
- SweepGradient 扫描渐变
Let’s take a look at them one by one and see how we can apply effects to the child.
让我们一一看一下,看看如何将效果应用于孩子。
LinearGradient
线性渐变
This accepts begin and end as two optional bounds followed by color that accepts list of colors which will be applied to the child. Note that, begin and end accepts only Alignment objects, so we need to pass regular alignments that indicates how the effect will be aligned, as below:
这接受begin和end作为两个可选边界,其后跟随color接受将应用于子项的颜色列表。 请注意, begin和end仅接受Alignment对象,因此我们需要传递常规对齐方式,以指示效果的对齐方式,如下所示:
shaderCallback: (Rect bounds) {

  return LinearGradient(
      begin: Alignment.topCenter,
      end: Alignment.bottomCenter,
      colors: [
        Colors.red,
        Colors.black]
  )
Here, the callback implementation isn’t complete yet, that means, we have dipped the brush in the color and are ready to paint the wall, but, we haven’t received a go-ahead to get started with the task. The last piece of this implementation is another method named createShaders() that accepts the bounds on which the colors are to be applied. Let’s make that call:
在这里,回调实现尚未完成,这意味着我们已经将画笔浸入了颜色并准备为墙粉刷,但是,我们还没有获得批准开始执行该任务。 该实现的最后一部分是另一个名为createShaders()方法,该方法接受要在其上应用颜色的bounds 。 让我们打电话:
shaderCallback: (Rect bounds) {
return LinearGradient(
begin: Alignment.topCenter,
end: Alignment.bottomCenter,
colors: [
Colors.red,
Colors.black]
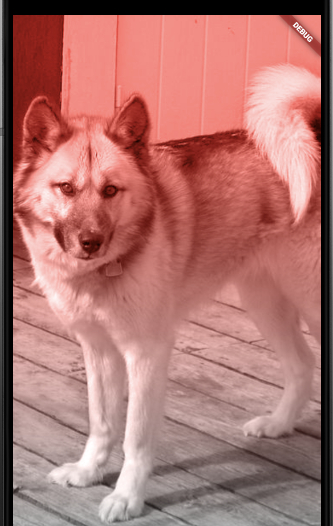
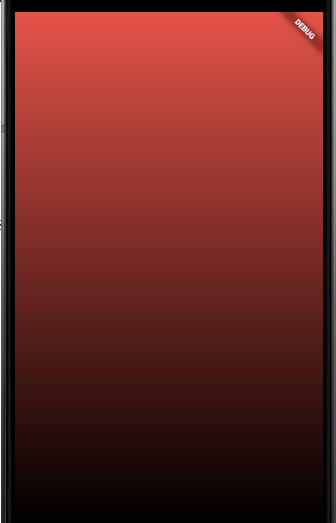
).createShader(bounds);This method tells ShaderMask to start applying / fill the colors on the child in the given rect bounds. Now, if we run this, we’ll see:
此方法告诉ShaderMask开始在给定的rect范围内应用/填充子项上的颜色。 现在,如果运行此命令,我们将看到:

Here, we just applied gradient on an image and ShaderMask spanned those colors across the Container . But this is not enough for us to make use of ShaderMask. We also want to apply some effects on the image to make it more enhance, meaningful and appealing, right ?
在这里,我们仅在图像上应用了渐变, ShaderMask这些颜色跨越了Container 。 但这还不足以让我们使用ShaderMask. 我们还想对图像应用一些效果,以使其更加增强,有意义和吸引人,对吗?
How ? Using blendmode property.
怎么样 ? 使用blendmode属性。
When we take picture from our phone, there’s an option to edit it and add more effects to it, like, increase brightness, add contrast, add shadows and so on. On the same lines, we can apply similar effects to the image using blendmode property. It offers various options to apply effects on the image. Let’s see few of them.
当我们从手机上拍摄照片时,可以选择对其进行编辑并为其添加更多效果,例如增加亮度 ,添加对比度 ,添加阴影等。 在同一行上,我们可以使用blendmode属性将类似的效果应用于图像。 它提供了各种选项以在图像上应用效果。 让我们看看其中的几个。
BlendMode
混合模式
BlendMode effects work on the concept of source and destination . All types of blend mode effects are applied based on these two terms. You can read about these terms in detail here.
BlendMode效果适用于source和destination的概念。 基于这两个术语,将应用所有类型的混合模式效果。 您可以在此处详细了解这些术语。
BlendMode.color: This property mode simply paints the image with the given colors.
BlendMode.color:此属性模式仅使用给定的颜色绘制图像。
BlendMode.colorBurn: This property paints the image with invert effects based on colors provided.
BlendMode.colorBurn:此属性根据提供的颜色用反转效果绘制图像。
BlendMode.colorDodge: This property paints the image with brightness based on the colors provided.
BlendMode.colorDodge:此属性根据提供的颜色为图像绘制亮度。
BlendMode.clear: This property removes the
sourceanddestinationand shows a transparent screen.BlendMode.clear:此属性删除
source和destination并显示透明屏幕。
BlendMode.src: Shorthand for
source. This property shows the original / source widget on which the image is to be painted. In this case,ContainerBlendMode.src:
source简写。 此属性显示要在其上绘制图像的原始/源窗口小部件。 在这种情况下,Container
Variants of this blendmode are: srcIn, srcOut, srcOver, srcAtTop
此blendmode的变体是:srcIn,srcOut,srcOver,srcAtTop
BlendMode.dst: Shorthand for destination. This property shows the original destination (image) only.
BlendMode.dst:目标的简写。 此属性仅显示原始目的地(图像)。
Variants of this blendmode are: dstIn, dstOut, dstOver, dstAtTop
此blendmode的变体是:dstIn,dstOut,dstOver,dstAtTop
There are few more modes that I’ll skip (for sake of length of this article) and will include them in my github repo here.
有几个模式,我将跳过(本文的长度的缘故),将包括他们在我的GitHub库在这里 。
RadialGradient:
径向渐变:
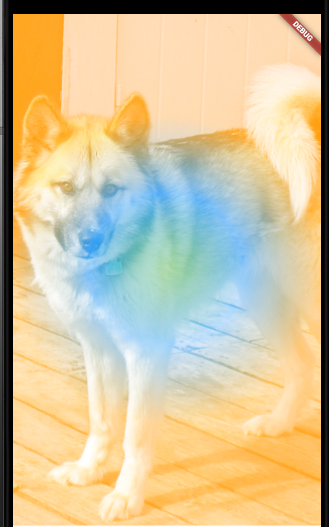
This shows the gradient / color effects in concentric circles. Along with various blend modes, we can change appearance of the image as we need. Let’s see few examples:
这显示了同心圆中的渐变/颜色效果。 随着各种blend modes ,我们可以根据需要更改图像的外观。 让我们看几个例子:
body: Center(
  child: ShaderMask(
    shaderCallback: (Rect bounds) {

      return RadialGradient(
          colors: [
            Colors.green,
            Colors.blue,
            Colors.orange]
      ).createShader(bounds);
    }, blendMode: BlendMode.screen,
    child: Container(
        width: double.infinity,
        height: double.infinity,
        child: Image.asset('assets/jpg.jpg', fit: BoxFit.cover)
    )
  )
)
return RadialGradient(
        colors: [Colors.green, Colors.blue, Colors.orange],
    ).createShader(bounds);
},blendMode: BlendMode.hardLight,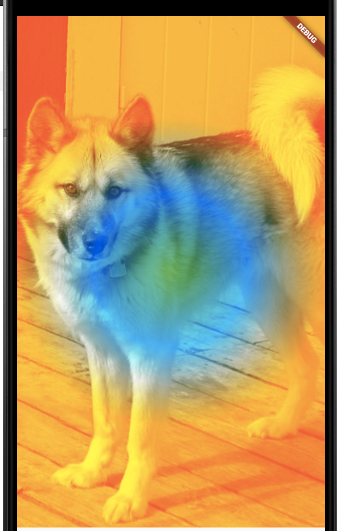
SweepGradient:
SweepGradient:
This shows the gradient / color effects in an arc. When it comes to arc, we think of angles, right ? Similarly, this gradient provides properties such as startAngle and endAngle to change appearance as required. Of course, the different blend modes can be used to enhance the effect. Below is one such example:
这显示了弧形中的渐变/颜色效果。 说到弧线,我们会想到角度,对吗? 同样,此渐变提供诸如startAngle和endAngle属性,以根据需要更改外观。 当然,可以使用不同的blend modes来增强效果。 下面是一个这样的示例:
return SweepGradient(
      colors: [Colors.indigo, Colors.blue, Colors.green,Colors.yellow,Colors.orange,Colors.red],
        startAngle: 0.1,
        endAngle: 1,
    ).createShader(bounds);
},blendMode: BlendMode.softLight,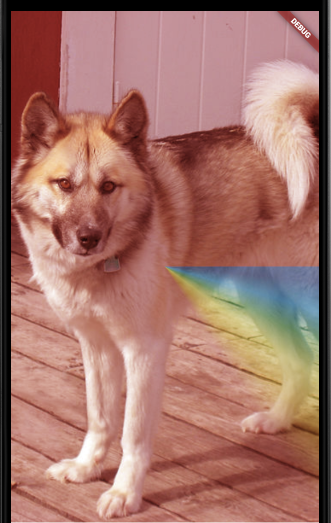
There are other properties that
Gradientclass provides specific toLinear,RadialandSweeptypes we saw above, such astileMode,focal,radius,center,stopsand so on. Since these are specific toGradientand notShaderMask, I used only the minimum basic properties for demo. I’d suggest you try out these properties to see how they help to enhance and change appearance of the image.还有其他性质
Gradient类提供特定于Linear,Radial和Sweep我们上面看到的类型,如tileMode,focal,radius,center,stops等。 由于这些是特定于Gradient而不是ShaderMask,因此我仅将最小基本属性用于demo。 我建议您尝试这些属性,以了解它们如何帮助增强和更改图像的外观。
Take a moment to note the impact blendMode values make on the appearance of the image. You may compare the effect by removing the blendmode property to see the image being painted and then putting back the blending again to see the difference / impact.
花一点时间注意blendMode值对图像外观的影响。 您可以通过删除blendmode属性来比较效果,以查看正在绘制的图像,然后再次放回混合以查看差异/影响。
Mimicking photo booth using ShaderMask
使用ShaderMask模拟照相亭
As we saw above various gradients along with blend modes to achieve desired effects on an image, let’s put all this together in a demo to mimic an app.
正如我们在各种渐变以及混合模式上看到的那样,可以在图像上实现所需的效果,让我们将所有这些放到一个演示中以模拟一个应用程序。
Photo booth is a fun little app that can be used to apply effects on a picture from camera, as below:
照相亭是一个有趣的小应用程序,可用于在相机的图片上应用效果,如下所示:
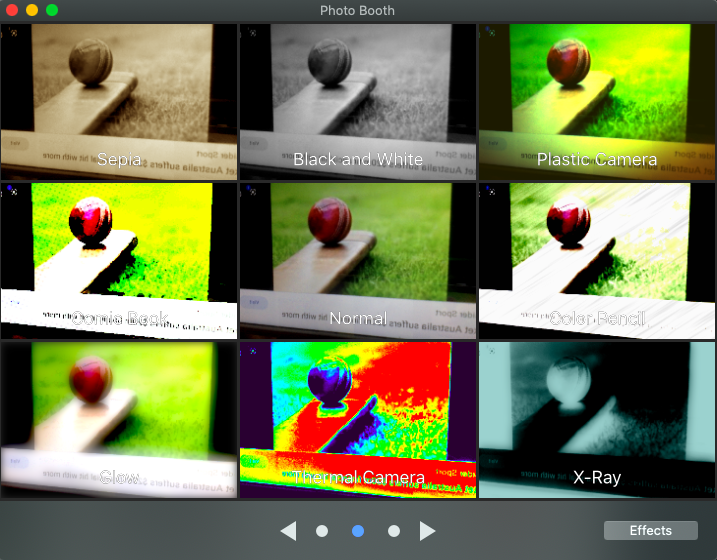
Let’s try to recreate some of these effects using Gradient and ShaderMask’s blend modes.
让我们尝试使用Gradient和ShaderMask's混合模式重新创建其中一些效果。
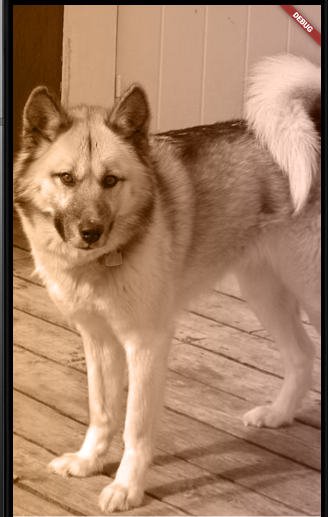
Sepia: This effect can be achieved by providing dark and light brown color and specifying
colorblend mode:棕褐色:可通过提供深棕色和浅棕色并指定
color混合模式来实现此效果:
body: Center(
  child: ShaderMask(
    shaderCallback: (Rect bounds) {

      return LinearGradient(
        colors: [Color(0xFF704214), Colors.brown],
      ).createShader(bounds);
    },blendMode: BlendMode.color,
    child: Container(
        width: double.infinity,
        height: double.infinity,
        child: Image.asset('assets/jpg.jpg', fit: BoxFit.cover)
    )
  )
)
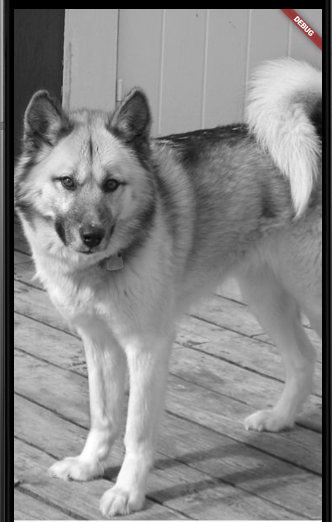
Black & White: This effect can be achieved by providing white and black color and specifying
hueblend mode:黑白:可以通过提供白色和黑色并指定
hue混合模式来实现此效果:
body: Center(
  child: ShaderMask(
    shaderCallback: (Rect bounds) {

      return LinearGradient(
        colors: [Colors.black, Colors.white],
      ).createShader(bounds);
    },blendMode: BlendMode.hue,
    child: Container(
        width: double.infinity,
        height: double.infinity,
        child: Image.asset('assets/jpg.jpg', fit: BoxFit.cover)
    )
  )
)
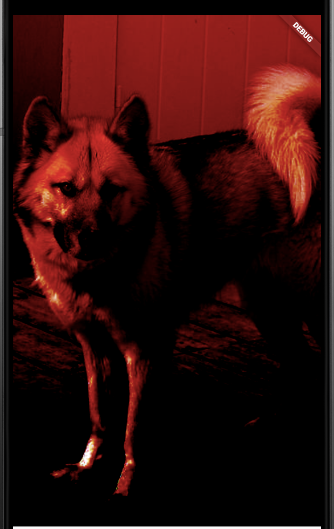
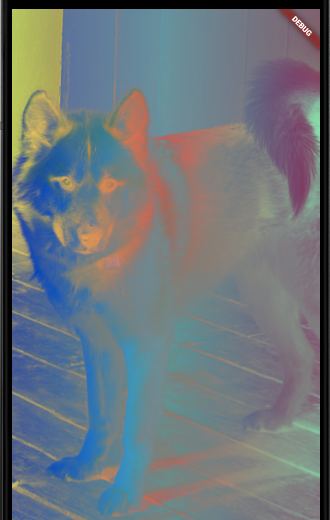
Thermal Camera: This type of effect is similar to scanning a normal picture through a Infrared radiation device and depending on colors we pass, we will see thermal variation of the picture. This effect can be achieved by providing
red,yellowandgreencolors along withexclusionblend mode.热像仪:这种效果类似于通过红外辐射设备扫描普通图片,并且根据我们通过的颜色,我们将看到图片的热变化。 通过提供
red,yellow和green以及exclusion混合模式可以实现此效果。
body: Center(
  child: ShaderMask(
    shaderCallback: (Rect bounds) {

      return LinearGradient(
        colors: [Colors.yellow, Colors.red, Colors.greenAccent],
      ).createShader(bounds);
    },blendMode: BlendMode.exclusion,
    child: Container(
        width: double.infinity,
        height: double.infinity,
        child: Image.asset('assets/jpg.jpg', fit: BoxFit.cover)
    )
  )
)
X-Ray: This property shows image in stark black and white with inverted effect. We can use combination of color hexa codes along with
differenceblend mode to achieve closest possible version of original x-ray effect:X射线:此属性以鲜明的黑白显示图像,并具有反转效果。 我们可以结合使用六色代码和
difference混合模式来获得最接近原始X射线效果的版本:
body: Center(
    child: ShaderMask(
        shaderCallback: (Rect bounds) {

          return LinearGradient(
            begin: Alignment.topLeft,
            end: Alignment.bottomRight,
            colors: [
              Color(0xFF191a1b),
              Color(0xFFc8dde7),
              Color(0xFFa8d3e3),
              Color(0xFF394346),
              Color(0xFF293135),
            ],
          ).createShader(bounds);
        },
        blendMode: BlendMode.difference,
        child: Container(
            width: double.infinity,
            height: double.infinity,
            child: Image.asset('assets/jpg.jpg', fit: BoxFit.cover))))
Although the effects may not be similar to what Photo Booth shows, my idea was to show that similar effects can be achieved using ShaderMask in combination with gradient and blend modes.
尽管效果可能与Photo Booth所显示的效果不同,但我的想法是表明可以将ShaderMask与渐变和混合模式结合使用来实现相似的效果。
In this article, we saw how ShaderMask widget can be helpful to apply color effects and change appearance of it’s child. Instead of image , we can use other widgets too, such as a Text .
在本文中,我们了解了ShaderMask小部件如何有助于应用颜色效果并更改其子级的外观。 除了image ,我们还可以使用其他小部件,例如Text 。
With this, I barely scratched the surface of ShaderMask and believe that the potential of using widget is huge by using various gradient properties in combination with blend modes.
这样,我几乎没有ShaderMask的表面,并相信通过将各种渐变属性与混合模式结合使用,使用小部件的潜力是巨大的。
That’s all I have for today. Thanks for reading and feel free to comment below your thoughts / suggestion / feedback on this topic.
这就是我今天要做的。 感谢您的阅读,并随时在您对这个主题的想法/建议/反馈下方发表评论。
I can be reached via Twitter and LinkedIn.
You may check out my Medium profile below for other articles I wrote on Flutter.
您可以在下面查看我的中型个人资料,以了解我在Flutter上撰写的其他文章。
翻译自: https://medium.com/flutter-community/an-overview-on-shadermask-89201539ba8d