.netcore入门19:aspnetcore集成Swagger并自定义登录登出功能_authorize swagger 自带登录-程序员宅基地
技术标签: c# .net
环境:
- .netcore 3.1
- vs 2019 16.5.1
- Swashbuckle.AspNetCore 5.3.1
实验代码下载: https://download.csdn.net/download/u010476739/12320053
一、关于swagger说明
在使用asp.net core 进行api开发完成后,书写api说明文档对于程序员来说想必是件很痛苦的事情吧,但文档又必须写,而且文档的格式如果没有具体要求的话,最终完成的文档则完全取决于开发者的心情。或者详细点,或者简单点。那么有没有一种快速有效的方法来构建api说明文档呢?答案是肯定的, Swagger就是最受欢迎的REST APIs文档生成工具之一!
swagger官网:https://swagger.io/
参考:ASP.NET Core WebApi使用Swagger生成api说明文档看这篇就够了
二、简单webapi项目集成swagger
2.1 准备webapi项目
这里新建一个空白的webapi项目即可。
2.2 引入swagger的包
 <ItemGroup>
   <PackageReference Include="Swashbuckle.AspNetCore" Version="5.6.3" />
 </ItemGroup>
其实这个包里没有任何代码,只是打包了另外四个包的依赖:
- Swashbuckle.AspNetCore.Swagger
- Swashbuckle.AspNetCore.SwaggerGen
- Swashbuckle.AspNetCore.SwaggerUI
- Microsoft.Extensions.ApiDescription.Server
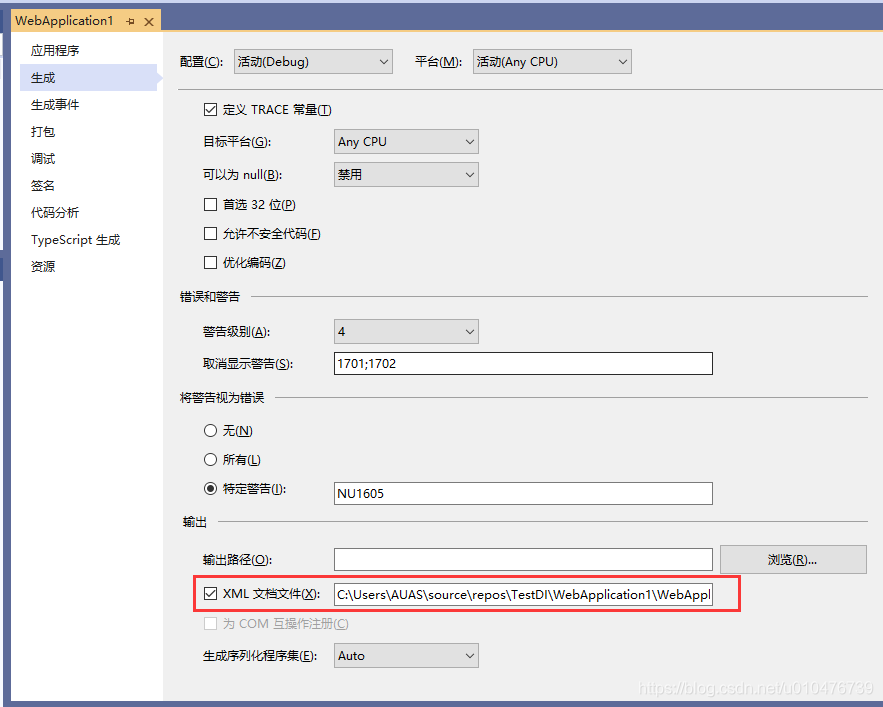
2.3 在工程属性上开启xml文档生成
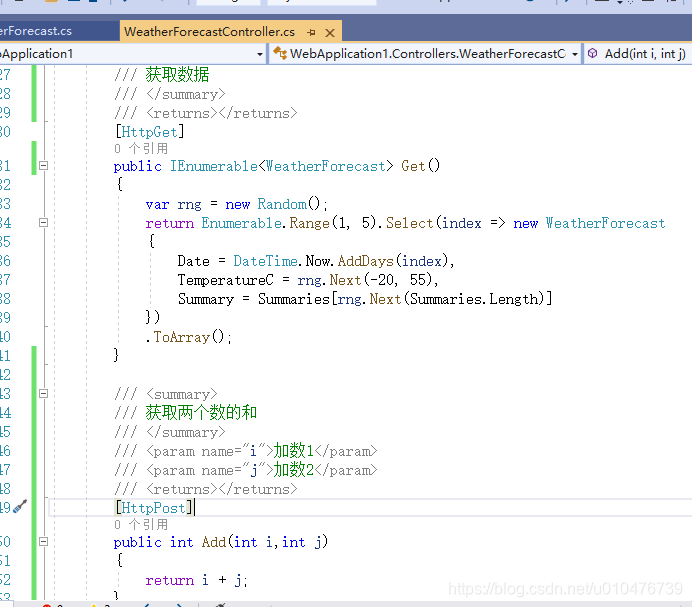
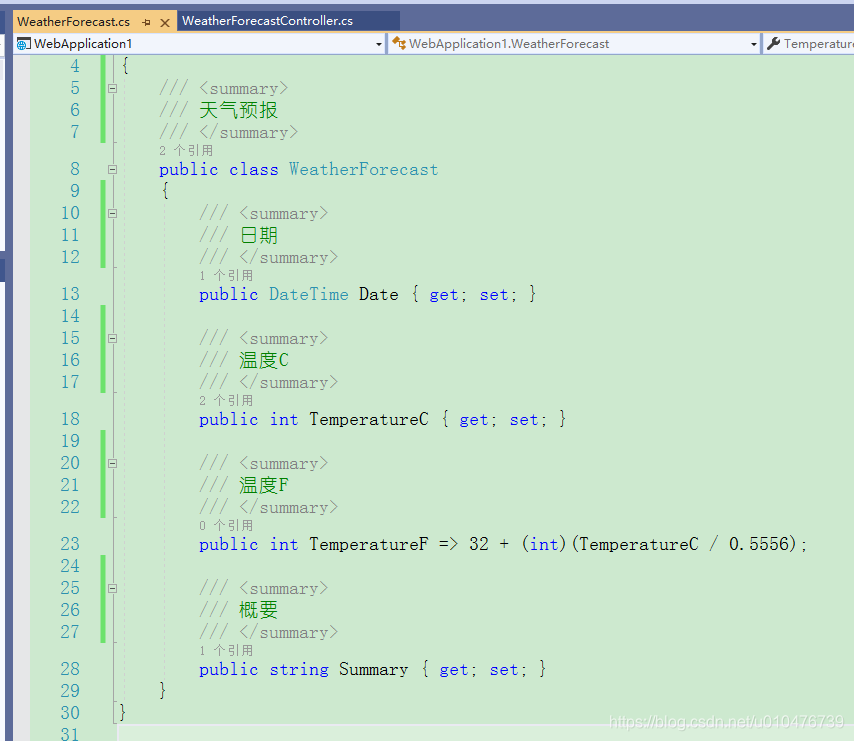
2.4 在方法和模型上添加注释
2.5 向容器中注册swagger服务
private readonly IWebHostEnvironment webHostEnvironment;
public Startup(IConfiguration configuration,IWebHostEnvironment webHostEnvironment)
{

    Configuration = configuration;
    this.webHostEnvironment= webHostEnvironment;
}
public IConfiguration Configuration {
     get; }

// This method gets called by the runtime. Use this method to add services to the container.
public void ConfigureServices(IServiceCollection services)
{

    services.AddSwaggerGen(options =>
    {

        options.SwaggerDoc("v1", new Microsoft.OpenApi.Models.OpenApiInfo {
     Title = "My API", Version = "v1" });
        var xmlPath = Path.Combine(webHostEnvironment.ContentRootPath, Assembly.GetExecutingAssembly().GetName().Name + ".xml");
        if (File.Exists(xmlPath))
        {

            options.IncludeXmlComments(xmlPath, true);
        }
    });
    services.AddControllers();
}
说明:
注意上面代码中有指定生成的xml文档的地址,如果不指定的话,浏览器也会显示接口以及参数名称,但是就不会显示你写的注释,所以一定要手动将xml文档的地址配置上去。
2.6 注册swagger中间件
public void Configure(IApplicationBuilder app, IWebHostEnvironment env)
{

    if (env.IsDevelopment())
    {

        app.UseDeveloperExceptionPage();
    }
    app.UseHttpsRedirection();
    app.UseSwagger();
    app.UseSwaggerUI(options =>
    {

        options.SwaggerEndpoint("/swagger/v1/swagger.json", "My API V1");
        //如果不想带/swagger路径访问的话,就放开下面的注释
        //options.RoutePrefix = string.Empty;
    });
    app.UseRouting();
    app.UseEndpoints(endpoints =>
    {

        endpoints.MapControllers();
    });
}
2.7 直接调试运行
浏览器中输入: http://localhost:5000/swagger

由上图可以看到Action的方法描述都列出来了,此时可以点击右侧Try it out按钮,然后输入要传递到后台的参数以进行测试。
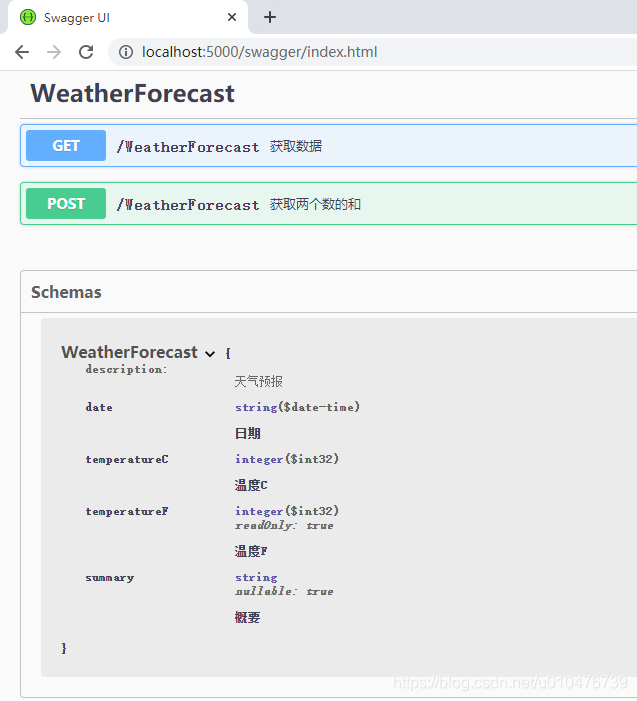
由上图可以看到Schemas中显示了模型WeatherForecast,之所以显示它是因为有方法的参数或返回值引用到了这个模型。
2.8 隐藏某个控制器或Action不显示
如果你不想针对某个控制器或某个方法就在上面打上标记[ApiExplorerSettings(IgnoreApi = true)]就行,这样浏览器页面中就不会出现这个控制器或方法了,如下图:
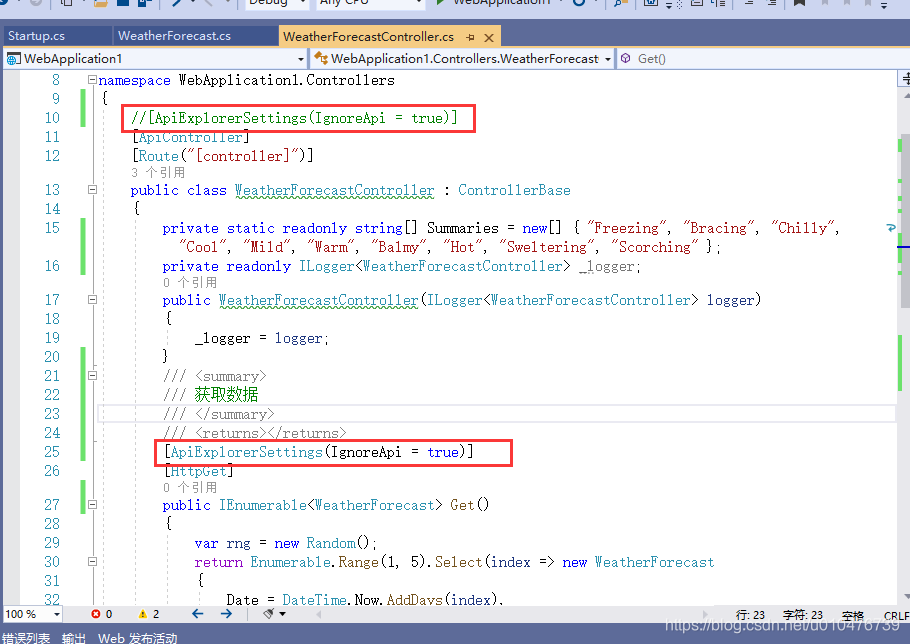
同理,如果这个方法不显示的话,那么因它而显示的模型也不会再显示了
三、带身份认证的webapi项目集成swagger
上面是最简单的一个示例。一般我们做后台管理系统都是要有身份认证的,如果我们在swagger上测试后台方法那么我们必须在swagger页面上登录了才行!,下面以cookie认证为例说明。对cookie认证原理不清楚的可以参考:
.netcore入门10:分析aspnetcore自带的cookie认证原理
.netcore入门11:aspnetcore自带cookie的认证期限分析
.netcore入门12:aspnetcore中cookie认证之服务端保存认证信息
3.1 给webapi应用添加Cookie认证(先不管Swagger)
3.1.1 在startup.cs中注入认证服务、在管道中加入中间件
最终的代码如下:
public void ConfigureServices(IServiceCollection services)
{

	services.AddControllers();
	services.AddAuthentication(CookieAuthenticationDefaults.AuthenticationScheme)
		.AddCookie();
    services.AddAuthorization();
}

public void Configure(IApplicationBuilder app, IWebHostEnvironment env)
{

	  if (env.IsDevelopment())
      {

          app.UseDeveloperExceptionPage();
      }
      app.UseAuthentication();
      app.UseRouting();
      app.UseAuthorization();
      app.UseEndpoints(endpoints =>
      {

          endpoints.MapControllers();
      });
}
3.1.2 添加AuthController
/// <summary>
/// cookie身份认证
/// </summary>
[Route("api/[controller]/[action]")]
[ApiController]
public class AuthController : ControllerBase
{

    private readonly IConfiguration configuration;

    public AuthController(IConfiguration configuration)
    {

        this.configuration = configuration;
    }

    /// <summary>
    /// 登录方法
    /// </summary>
    /// <param name="username">用户名</param>
    /// <param name="password">用户密码</param>
    /// <returns></returns>
    [HttpPost]
    public async Task<object> Login([FromForm]string username, [FromForm]string password)
    {

        if (HttpContext.User.Identity.IsAuthenticated)
        {

            return Ok(new
            {

                Success = false,
                Data = "不允许重复登录!"
            });
        }
        if (username == "admin" && password == "1")
        {

            var claims = new Claim[] {
     new Claim("id", "1") };
            var identity = new ClaimsIdentity(claims, CookieAuthenticationDefaults.AuthenticationScheme);
            var principal = new ClaimsPrincipal(identity);
            await HttpContext.SignInAsync(principal);
            return new
            {

                success = true,
                data = "登录成功!"
            };
        }
        else
        {

            return new
            {

                success = false,
                data = "登录失败!"
            };
        }
    }

    /// <summary>
    /// 登出
    /// </summary>
    /// <returns></returns>
    [HttpGet]
    [Authorize]
    public async Task<object> LogOut()
    {

        await HttpContext.SignOutAsync();
        return Ok(new
        {

            Success = true,
            Data = "注销成功!"
        });
    }
}
3.2 swagger集成cookie认证
首先看一下集成后的效果:
这里的弹框需要自定义,cookie本身并不支持,所以我们在集成的时候要手写这个文档页面(/swagger/ui/index.html)。
3.2.1 给swagger添加安全描述信息
最终改造后的ConfigureServices方法如下:
public void ConfigureServices(IServiceCollection services)
{

     services.AddSwaggerGen(options =>
     {

         //定义api文档
         options.SwaggerDoc("v1", new Microsoft.OpenApi.Models.OpenApiInfo {
     Title = "My API", Version = "v1" });
         //包含vs生成的注释文档
         var xmlPath = Path.Combine(webHostEnvironment.ContentRootPath, Assembly.GetExecutingAssembly().GetName().Name + ".xml");
         if (File.Exists(xmlPath))
         {

             options.IncludeXmlComments(xmlPath, true);
         }
         //描述安全信息
         options.AddSecurityDefinition(CookieAuthenticationDefaults.AuthenticationScheme, new OpenApiSecurityScheme()
         {

             Name = CookieAuthenticationDefaults.AuthenticationScheme,
             Scheme = CookieAuthenticationDefaults.AuthenticationScheme
         });
     });
     services.AddControllers();
     services.AddAuthentication(CookieAuthenticationDefaults.AuthenticationScheme).AddCookie();
     services.AddAuthorization();
 }
3.2.2 在http的管道设置中,给swaggerui指定主页
最终改造后的Configure方法如下:
public void Configure(IApplicationBuilder app, IWebHostEnvironment env)
{

     if (env.IsDevelopment())
     {

         app.UseDeveloperExceptionPage();
     }
     app.UseStaticFiles();
     app.UseHttpsRedirection();
     app.UseSwagger();
     app.UseSwaggerUI(options =>
     {

         options.SwaggerEndpoint("/swagger/v1/swagger.json", "My API V1");
         //如果不想带/swagger路径访问的话,就放开下面的注释
         //options.RoutePrefix = string.Empty;
         //使用自定义的页面(主要是增加友好的身份认证体验)
         string path = Path.Combine(env.WebRootPath, "swagger/ui/index.html");
         if (File.Exists(path)) options.IndexStream = () => new MemoryStream(File.ReadAllBytes(path));
     });

     app.UseAuthentication();
     app.UseRouting();
     app.UseAuthorization();
     app.UseEndpoints(endpoints =>
     {

         endpoints.MapControllers();
     });
 }
3.2.3 建立wwwroot文件夹,并准备swagger/ui/index.html文件
本案例使用的是webapi项目,没有自带wwwroot文件夹,所以需要自己建个文件夹,最终目录结构如下图:

我们上一步指定webapi的接口文档的首页是index.html页面,现在我们就来编辑它:
index.html:
<!DOCTYPE html>
<html lang="en">

<head>
    <meta charset="UTF-8">
    <title>%(DocumentTitle)</title>
    <link href="https://fonts.googleapis.com/css?family=Open+Sans:400,700|Source+Code+Pro:300,600|Titillium+Web:400,600,700"
          rel="stylesheet">
    <link rel="stylesheet" type="text/css" href="./swagger-ui.css">
    <link rel="icon" type="image/png" href="./favicon-32x32.png" sizes="32x32" />
    <link rel="icon" type="image/png" href="./favicon-16x16.png" sizes="16x16" />
    <style>
        html {

            box-sizing: border-box;
            overflow: -moz-scrollbars-vertical;
            overflow-y: scroll;
        }

        *,
        *:before,
        *:after {

            box-sizing: inherit;
        }

        body {

            margin: 0;
            background: #fafafa;
        }
    </style>
    %(HeadContent)
</head>

<body>
    <div id="swagger-ui"></div>
    <script src="swagger-ui-bundle.js"></script>
    <script src="swagger-ui-standalone-preset.js"></script>
    <script src="ui/auth.js"></script>
    <script>
        window.onload = function () {

            var configObject = JSON.parse('%(ConfigObject)');
            // Apply mandatory parameters
            configObject.dom_id = "#swagger-ui";
            configObject.presets = [SwaggerUIBundle.presets.apis, SwaggerUIStandalonePreset];
            configObject.layout = "StandaloneLayout";
            configObject.requestInterceptor = function (request) {

                //do something
                return request;
            };
            if (!configObject.hasOwnProperty("oauth2RedirectUrl")) {

                configObject.oauth2RedirectUrl = window.location + "oauth2-redirect.html"; // use the built-in default
            }
            function getAuthorizeButtonText() {

                return auth.hasLogin() ? 'Logout' : 'Authorize';
            }
            function getAuthorizeButtonCssClass() {

                return auth.hasLogin() ? 'cancel' : 'authorize';
            }
            configObject.plugins = [
                function (system) {

                    return {

                        components: {

                            authorizeBtn: function () {

                                return system.React.createElement("button",
                                    {

                                        id: "authorize",
                                        className: "btn " + getAuthorizeButtonCssClass(),
                                        style: {

                                            lineHeight: "normal"
                                        },
                                        onClick: function () {

                                            var authorizeButton = document.getElementById('authorize');
                                            auth.logout(function () {

                                                authorizeButton.innerText = getAuthorizeButtonText();
                                                authorizeButton.className = 'btn ' + getAuthorizeButtonCssClass();
                                            });
                                            if (!auth.hasLogin()) {

                                                auth.openAuthDialog(function () {

                                                    authorizeButton.innerText = getAuthorizeButtonText();
                                                    authorizeButton.className = 'btn ' + getAuthorizeButtonCssClass();
                                                    auth.closeAuthDialog();
                                                });
                                            }
                                        }
                                    }, getAuthorizeButtonText());
                            }
                        }
                    }
                }
            ];
            // Build a system
            SwaggerUIBundle(configObject);
        }
    </script>
</body>

</html>
从index.html页面中我们看到,我们根据后台接口的定义渲染了文档并创建了认证按钮(Authorize),并且给这个按钮绑定了事件。
下面看下前端认证的代码脚本(auth.js):
auth.js:
var auth = window.auth || {
    };
//这个'tokenCookieName '可以删除,本来我是想把登录返回的cookie值在localstorage中再存一份
auth.tokenCookieName = "aspnetcore.authauth";
auth.loginUrl = "/api/Auth/Login";
auth.logoutUrl = "/api/Auth/Logout";
auth.logout = function (callback) {

    var xhr = new XMLHttpRequest();
    xhr.onreadystatechange = function () {

        if (xhr.readyState === XMLHttpRequest.DONE) {

            if (xhr.status === 200) {

                var res = JSON.parse(xhr.responseText);
                if (!res.success) {

                    console.warn(res.data);
                    return;
                }
                localStorage.removeItem("auth.hasLogin");
                callback();
            } else {

                console.warn("Logout failed !");
            }
        }
    };
    xhr.open('Get', auth.logoutUrl, true);
    xhr.send();
}
auth.hasLogin = function () {

    return localStorage.getItem("auth.hasLogin");
}
auth.openAuthDialog = function (loginCallback) {

    auth.closeAuthDialog();
    var authAuthDialog = document.createElement('div');
    authAuthDialog.className = 'dialog-ux';
    authAuthDialog.id = 'auth-auth-dialog';
    document.getElementsByClassName("swagger-ui")[1].appendChild(authAuthDialog);
    // -- backdrop-ux
    var backdropUx = document.createElement('div');
    backdropUx.className = 'backdrop-ux';
    authAuthDialog.appendChild(backdropUx);
    // -- modal-ux
    var modalUx = document.createElement('div');
    modalUx.className = 'modal-ux';
    authAuthDialog.appendChild(modalUx);
    // -- -- modal-dialog-ux
    var modalDialogUx = document.createElement('div');
    modalDialogUx.className = 'modal-dialog-ux';
    modalUx.appendChild(modalDialogUx);
    // -- -- -- modal-ux-inner
    var modalUxInner = document.createElement('div');
    modalUxInner.className = 'modal-ux-inner';
    modalDialogUx.appendChild(modalUxInner);
    // -- -- -- -- modal-ux-header
    var modalUxHeader = document.createElement('div');
    modalUxHeader.className = 'modal-ux-header';
    modalUxInner.appendChild(modalUxHeader);
    var modalHeader = document.createElement('h3');
    modalHeader.innerText = 'Authorize';
    modalUxHeader.appendChild(modalHeader);
    // -- -- -- -- modal-ux-content
    var modalUxContent = document.createElement('div');
    modalUxContent.className = 'modal-ux-content';
    modalUxInner.appendChild(modalUxContent);
    modalUxContent.onkeydown = function (e) {

        if (e.keyCode === 13) {

            //try to login when user presses enter on authorize modal
            auth.login(loginCallback);
        }
    };

    //Inputs
    createInput(modalUxContent, 'userName', 'Username or email address');
    createInput(modalUxContent, 'password', 'Password', 'password');

    //Buttons
    var authBtnWrapper = document.createElement('div');
    authBtnWrapper.className = 'auth-btn-wrapper';
    modalUxContent.appendChild(authBtnWrapper);

    //Close button
    var closeButton = document.createElement('button');
    closeButton.className = 'btn modal-btn auth btn-done button';
    closeButton.innerText = 'Close';
    closeButton.style.marginRight = '5px';
    closeButton.onclick = auth.closeAuthDialog;
    authBtnWrapper.appendChild(closeButton);

    //Authorize button
    var authorizeButton = document.createElement('button');
    authorizeButton.className = 'btn modal-btn auth authorize button';
    authorizeButton.innerText = 'Login';
    authorizeButton.onclick = function () {

        auth.login(loginCallback);
    };
    authBtnWrapper.appendChild(authorizeButton);
}
auth.closeAuthDialog = function () {

    if (document.getElementById('auth-auth-dialog')) {

        document.getElementsByClassName("swagger-ui")[1].removeChild(document.getElementById('auth-auth-dialog'));
    }
}
auth.login = function (callback) {

    var usernameOrEmailAddress = document.getElementById('userName').value;
    if (!usernameOrEmailAddress) {

        alert('Username or Email Address is required, please try with a valid value !');
        return false;
    }

    var password = document.getElementById('password').value;
    if (!password) {

        alert('Password is required, please try with a valid value !');
        return false;
    }
    var xhr = new XMLHttpRequest();
    xhr.onreadystatechange = function () {

        if (xhr.readyState === XMLHttpRequest.DONE) {

            if (xhr.status === 200) {

                var res = JSON.parse(xhr.responseText);
                if (!res.success) {

                    alert(res.data);
                    return;
                }
                localStorage.setItem("auth.hasLogin", true);
                callback();
            } else {

                alert('Login failed !');
            }
        }
    };
    xhr.open('POST', auth.loginUrl, true);
    xhr.setRequestHeader('Content-type', 'application/x-www-form-urlencoded');
    xhr.send("username=" + encodeURIComponent(usernameOrEmailAddress) + "&password=" + password);
}
function createInput(container, id, title, type) {

    var wrapper = document.createElement('div');
    wrapper.className = 'wrapper';
    container.appendChild(wrapper);
    var label = document.createElement('label');
    label.innerText = title;
    wrapper.appendChild(label);
    var section = document.createElement('section');
    section.className = 'block-tablet col-10-tablet block-desktop col-10-desktop';
    wrapper.appendChild(section);
    var input = document.createElement('input');
    input.id = id;
    input.type = type ? type : 'text';
    input.style.width = '100%';
    section.appendChild(input);
}
从auth.js脚本中我们可以看到:后台登录的接口地址、登出的接口地址,以及登录、登出的逻辑。
3.3 浏览器测试
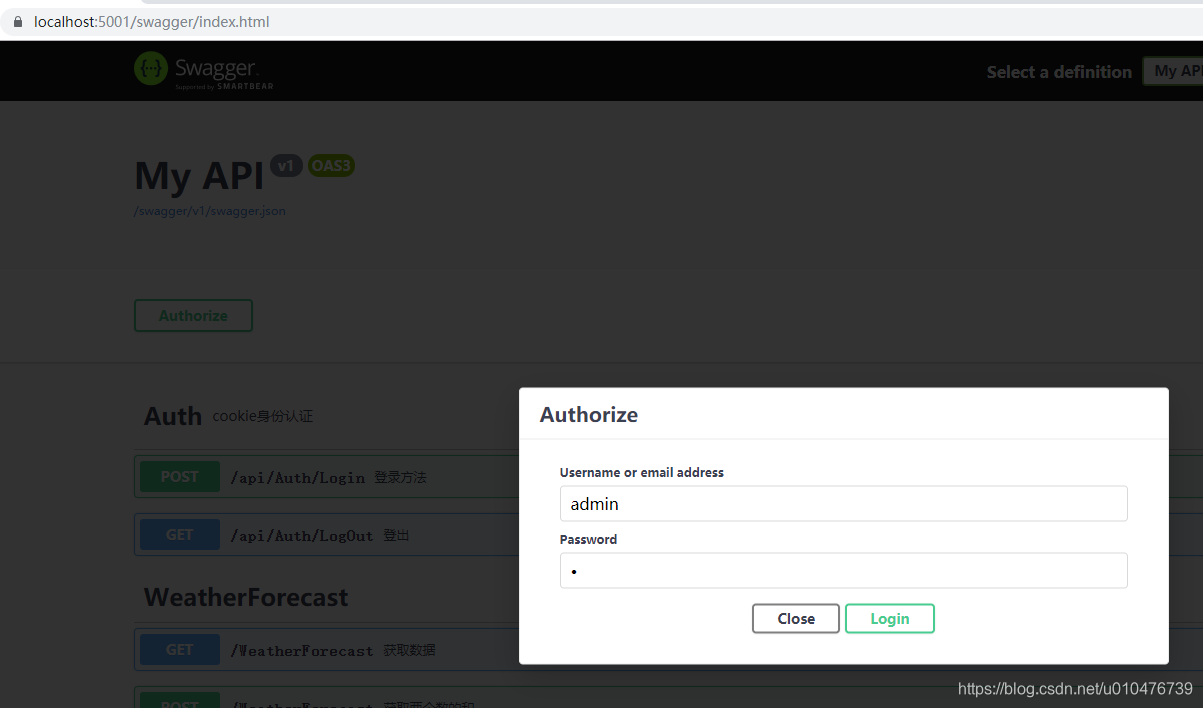
调试运行后,在浏览器输入:https://localhost:5001/swagger/index.html,可以看到按钮Authorize,,点击后如下:
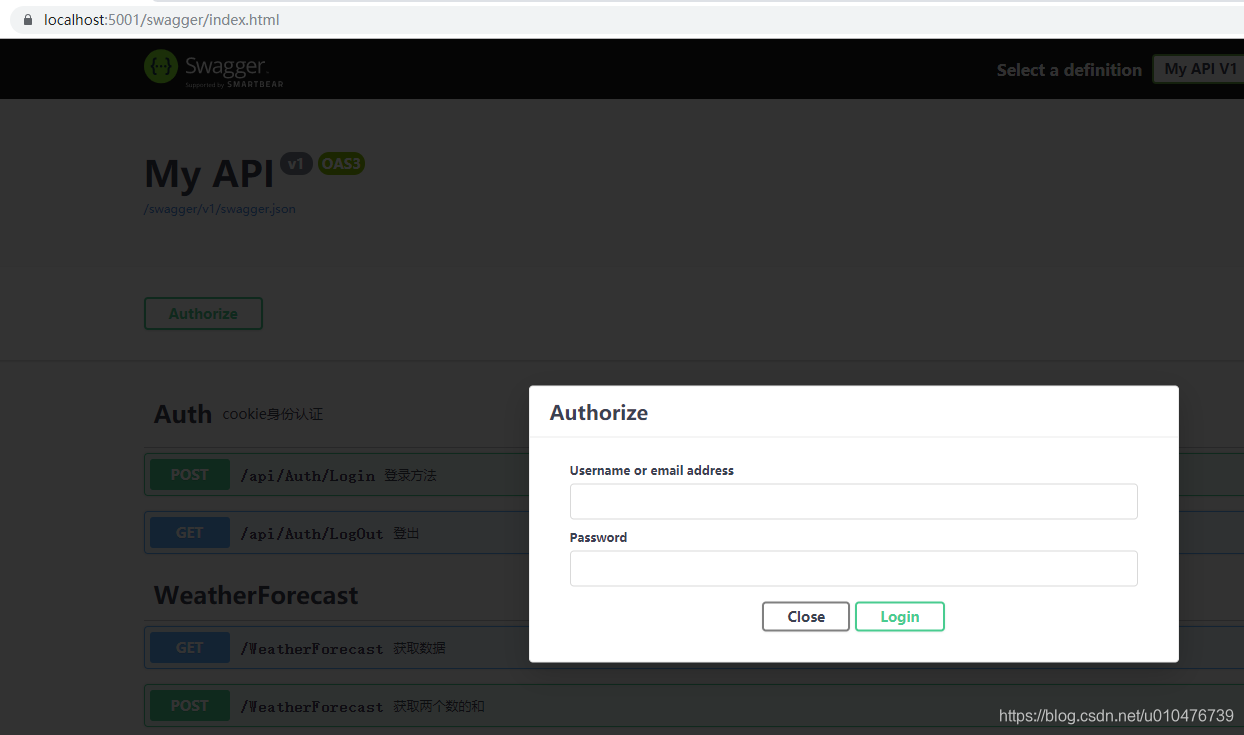
输入用户名和密码:(admin 1),回车:
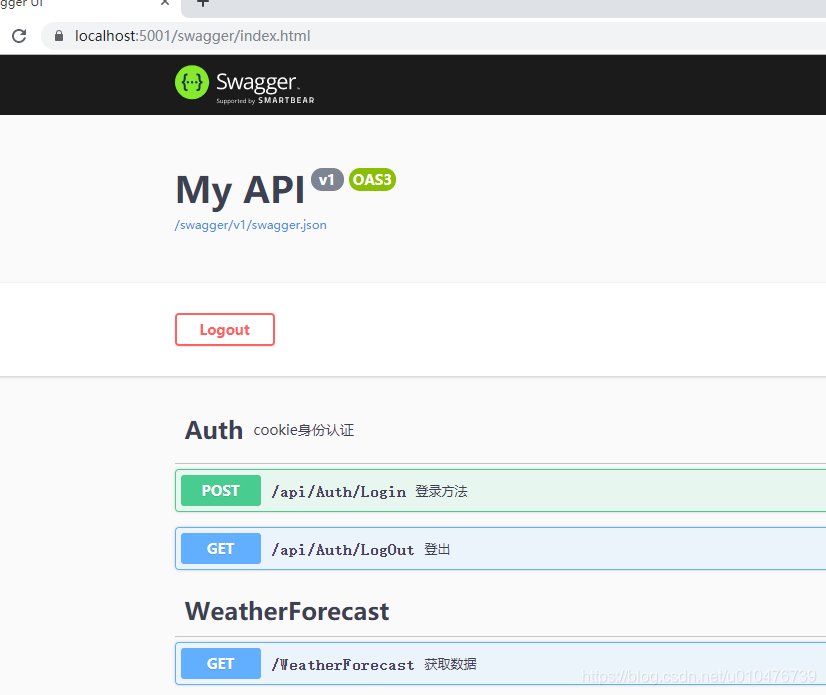
可以看到,已经显示登录了,此时你可以打开调试,观察cookie和localstore:

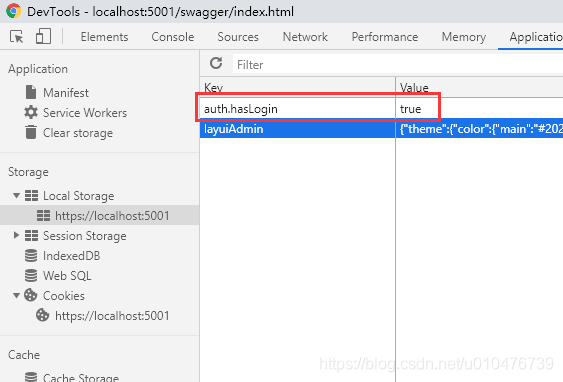
从上图中看到,认证后的cookie已保存,并且将是否登录的标记也保存到了localstorage(为什么要存储这个标记?因为这个cookie是httponly的,js操作不了。。。),此时你刷新这个页面会看到一直显示登录状态。
当我们在登录状态时,点击Logout按钮,我们就退出登录了,此时再查看cookie和localstorage中的存储,我们会发现,认证时产生的cookie和标记都被清理了。
四、扩展
从上面的介绍我们知道了怎么给webapi的接口页面定制登录和登出功能,但一般登录时都会有验证码之类的其他选项,此时你只需要在登录对话框上添加自己需要的即可。
智能推荐
linux里面ping www.baidu.com ping不通的问题_linux桥接ping不通baidu-程序员宅基地
文章浏览阅读3.2w次,点赞16次,收藏90次。对于这个问题我也是从网上找了很久,终于解决了这个问题。首先遇到这个问题,应该确认虚拟机能不能正常的上网,就需要ping 网关,如果能ping通说明能正常上网,不过首先要用命令route -n来查看自己的网关,如下图:第一行就是默认网关。现在用命令ping 192.168.1.1来看一下结果:然后可以看一下电脑上面百度的ip是多少可以在linux里面ping 这个IP,结果如下:..._linux桥接ping不通baidu
android 横幅弹出权限,有关 android studio notification 横幅弹出的功能没有反应-程序员宅基地
文章浏览阅读512次。小妹在这里已经卡了2-3天了,研究了很多人的文章,除了低版本api 17有成功外,其他的不是channel null 就是没反应 (channel null已解决)拜托各位大大,帮小妹一下,以下是我的程式跟 gradle, 我在这里卡好久又没有人可问(哭)public class MainActivity extends AppCompatActivit..._android 权限申请弹窗 横屏
CNN中padding参数分类_cnn “相同填充”(same padding)-程序员宅基地
文章浏览阅读1.4k次,点赞4次,收藏6次。valid padding(有效填充):完全不使用填充。half/same padding(半填充/相同填充):保证输入和输出的feature map尺寸相同。full padding(全填充):在卷积操作过程中,每个像素在每个方向上被访问的次数相同。arbitrary padding(任意填充):人为设定填充。..._cnn “相同填充”(same padding)
Maven的基础知识,java技术栈-程序员宅基地
文章浏览阅读790次,点赞29次,收藏28次。手绘了下图所示的kafka知识大纲流程图(xmind文件不能上传,导出图片展现),但都可提供源文件给每位爱学习的朋友一个人可以走的很快,但一群人才能走的更远。不论你是正从事IT行业的老鸟或是对IT行业感兴趣的新人,都欢迎扫码加入我们的的圈子(技术交流、学习资源、职场吐槽、大厂内推、面试辅导),让我们一起学习成长![外链图片转存中…(img-Qpoc4gOu-1712656009273)][外链图片转存中…(img-bSWbNeGN-1712656009274)]
getFullYear()和getYear()有什么区别_getyear和getfullyear-程序员宅基地
文章浏览阅读469次。Date对象取得年份有getYear和getFullYear两种方法经 测试var d=new Date;alert(d.getYear())在IE中返回 2009,在Firefox中会返回109。经查询手册,getYear在Firefox下返回的是距1900年1月1日的年份,这是一个过时而不被推荐的方法。而alert(d.getFullYear())在IE和FF中都会返回2009。因此,无论何时都应使用getFullYear来替代getYear方法。例如:2016年用 getFullYea_getyear和getfullyear
Unix传奇 (上篇)_unix传奇pdf-程序员宅基地
文章浏览阅读182次。Unix传奇(上篇) 陈皓 了解过去,我们才能知其然,更知所以然。总结过去,我们才会知道我们明天该如何去规划,该如何去走。在时间的滚轮中,许许多的东西就像流星一样一闪而逝,而有些东西却能经受着时间的考验散发着经久的魅力,让人津津乐道,流传至今。要知道明天怎么去选择,怎么去做,不是盲目地跟从今天各种各样琳琅满目前沿技术,而应该是去 —— 认认真真地了解和回顾历史。 Unix是目前还在存活的操作系_unix传奇pdf
随便推点
ACwing 哈希算法入门:_ac算法 哈希-程序员宅基地
文章浏览阅读308次。哈希算法:将字符串映射为数字形式,十分巧妙,一般运用为进制数,进制据前人经验,一般为131,1331时重复率很低,由于字符串的数字和会很大,所以一般为了方便,一般定义为unsigned long long,爆掉时,即为对 2^64 取模,可以对于任意子序列的值进行映射为数字进而进行判断入门题目链接:AC代码:#include<bits/stdc++.h>using na..._ac算法 哈希
VS配置Qt和MySQL_在vs中 如何装qt5sqlmysql模块-程序员宅基地
文章浏览阅读952次,点赞13次,收藏27次。由于觉得Qt的编辑界面比较丑,所以想用vs2022的编辑器写Qt加MySQL的项目。_在vs中 如何装qt5sqlmysql模块
【渝粤题库】广东开放大学 互联网营销 形成性考核_画中画广告之所以能有较高的点击率,主要由于它具有以下特点-程序员宅基地
文章浏览阅读1k次。选择题题目:下面的哪个调研内容属于经济环境调研?()题目:()的目的就是加强与客户的沟通,它是是网络媒体也是网络营销的最重要特性。题目:4Ps策略中4P是指产品、价格、顾客和促销。题目:网络市场调研是目前最为先进的市场调研手段,没有任何的缺点或不足之处。题目:市场定位的基本参数有题目:市场需求调研可以掌握()等信息。题目:在开展企业网站建设时应做好以下哪几个工作。()题目:对企业网站首页的优化中,一定要注意下面哪几个方面的优化。()题目:()的主要作用是增进顾客关系,提供顾客服务,提升企业_画中画广告之所以能有较高的点击率,主要由于它具有以下特点
爬虫学习(1):urlopen库使用_urlopen the read operation timed out-程序员宅基地
文章浏览阅读1k次,点赞2次,收藏5次。以爬取CSDN为例子:第一步:导入请求库第二步:打开请求网址第三步:打印源码import urllib.requestresponse=urllib.request.urlopen("https://www.csdn.net/?spm=1011.2124.3001.5359")print(response.read().decode('utf-8'))结果大概就是这个样子:好的,继续,看看打印的是什么类型的:import urllib.requestresponse=urllib.r_urlopen the read operation timed out
分享读取各大主流邮箱通讯录(联系人)、MSN好友列表的的功能【升级版(3.0)】-程序员宅基地
文章浏览阅读304次。修正sina.com/sina.cn邮箱获取不到联系人,并精简修改了其他邮箱代码,以下就是升级版版本的介绍:完整版本,整合了包括读取邮箱通讯录、MSN好友列表的的功能,目前读取邮箱通讯录支持如下邮箱:gmail(Y)、hotmail(Y)、 live(Y)、tom(Y)、yahoo(Y)(有点慢)、 sina(Y)、163(Y)、126(Y)、yeah(Y)、sohu(Y) 读取后可以发送邮件(完..._通讯录 应用读取 邮件 的相关
云计算及虚拟化教程_云计算与虚拟化技术 教改-程序员宅基地
文章浏览阅读213次。云计算及虚拟化教程学习云计算、虚拟化和计算机网络的基本概念。此视频教程共2.0小时,中英双语字幕,画质清晰无水印,源码附件全课程英文名:Cloud Computing and Virtualization An Introduction百度网盘地址:https://pan.baidu.com/s/1lrak60XOGEqMOI6lXYf6TQ?pwd=ns0j课程介绍:https://www.aihorizon.cn/72云计算:概念、定义、云类型和服务部署模型。虚拟化的概念使用 Type-2 Hyperv_云计算与虚拟化技术 教改