Unity shader 实现图片带圆角和边线border_unity图片圆角-程序员宅基地
1 前言
基本诉求:想要一张图,显示时有圆角,且还能有boarder。图可以是纯色,也可以是图片。
在android,绘制这样的图非常简单,在xml声明一下就行。
<?xml version="1.0" encoding="utf-8"?>
<shape xmlns:android="http://schemas.android.com/apk/res/android">
    <solid android:color="#FFFFFFFF"/>
    <corners android:radius="25dp"/>
    <stroke android:width="3dp" android:color="#FFff0000"/>
</shape>
圆角一般设置一个半径radius,边线border一般设置线宽&颜色即可。

在Unity,就麻烦一些,要借助shader或者脚本实现,本文着重讨论一下用shader怎么实现。
2 圆角的实现
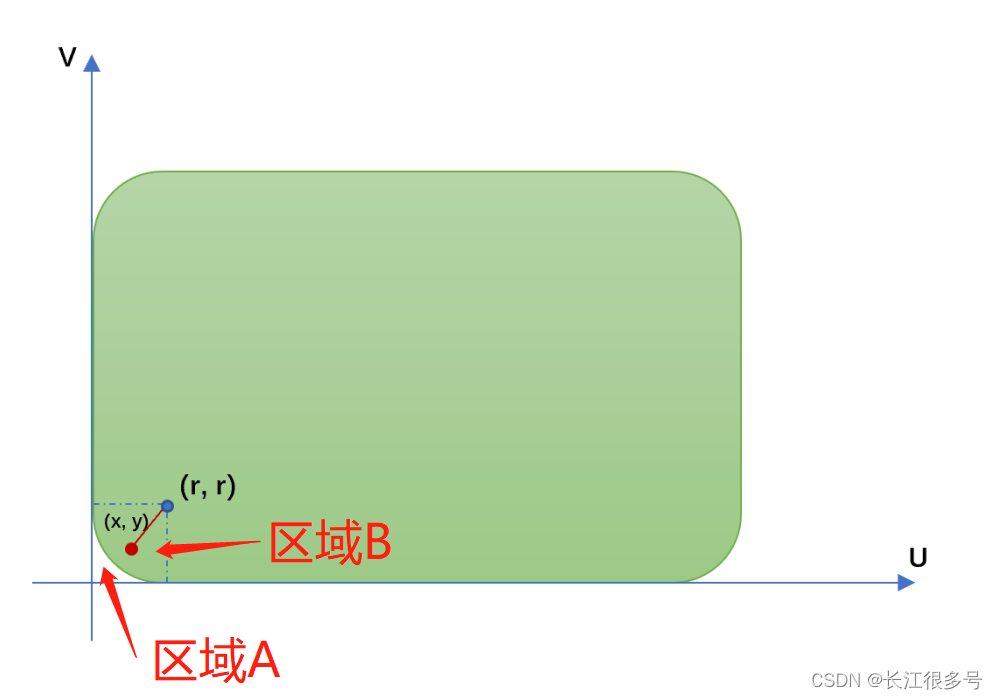
先研究左下角怎么抠掉。
当x < r 且 y < r,则可以分为上图的区域A和区域B,其中区域A是需要设置alpha = 0的区域。区域B则保持纹理颜色。
怎么找出区域A呢?
首先,圆角的中心点,坐标为(r, r),则这个区域内的任意一点(x, y), 距离中心点的距离arc_size为

如果arc_size大于圆的半径r,则是在区域A,否则,在区域B。
开根号浪费计算,可以都加个平方。
即,从代码上,可以这么写:
//左下角
if (x < r && y < r)
{

    arc_size = (x - r) * (x - r) + (y - r) * (y - r);
    if (arc_size > r * r) {

        color.a = 0;
    }
}
补充一点,是x的范围是0~width, y的范围是0 ~ height。
由于shader的顶点坐标是归一化的,即0到1,所以需要归一化坐标,乘于view的宽和高。
 float x = IN.texcoord.x * width;
 float y = IN.texcoord.y * height;
3 border的实现
边界,可以分8个区域,具体如下

分两种,一种是拐弯区域,一种是直线区域。
3.1 拐弯区域
以左下角为例子,我们放大区域看看。
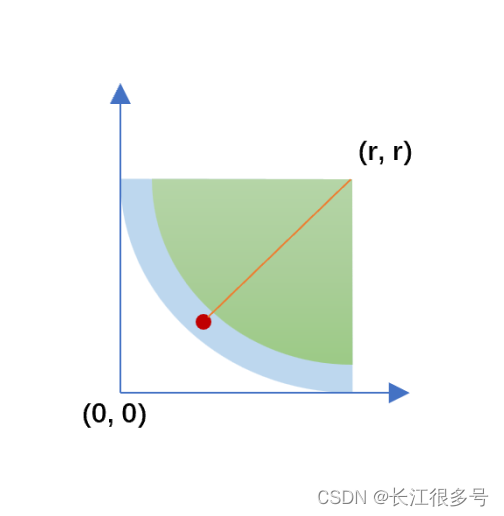
分三部分,一个是镂空区域,一个是线区域,一个是线内区域。3者距离中心点不一样,所以我们还是可以根据某个点距离中心点(r, r) 来判断。
来,上代码:
half4 color = IN.color;
if (x < r && y < r)//左下角区域
{

    //离中心点的距离(的平方)
	arc_size = (x - r) * (x - r) + (y - r) * (y - r);
	if (arc_size > r * r) {
    //超过圆的半径,则透明度为0
		color.a = 0;
	} else if (border_width > 0 && arc_size > (r - border_width) * (r - border_width)) {

	    //要求有边线,且距离大于r - border_width, 为线的实际区域
		color = border_color;
	}
}
3.2 直线区域
直线就比较简单了,以下边中间的线为例子。区域范围是x > r && x < (width - r)。
现在,只需要保证y < border_width,则是线的实际区域,否则,为原始像素。
所以,代码如下
half4 color = IN.color;
//....
if (border_width > 0) {

	//下边直线区域
	if (x > r && x < (width - r) && y < border_width) {

		color = border_color;
	}
}
4 完整shader代码
Shader "Custom/UI/RoundConorNew"
{

    Properties
    {

        [PerRendererData] _MainTex("Sprite Texture", 2D) = "white" {
    }

        _StencilComp("Stencil Comparison", Float) = 8
        _Stencil("Stencil ID", Float) = 0
        _StencilOp("Stencil Operation", Float) = 0
        _StencilWriteMask("Stencil Write Mask", Float) = 255
        _StencilReadMask("Stencil Read Mask", Float) = 255
        _ColorMask("Color Mask", Float) = 15

        _RoundedRadius("Rounded Radius", Range(0, 256)) = 64
        _Width("View Width", Float) = 200
        _Height("View Height", Float) = 200
        _BorderWidth("Border Width", Float) = 1
        _BorderColor("Boader Color", Color) = (1, 0, 0, 1)
    }

        SubShader
        {

            Tags
            {

                "Queue" = "Transparent"
                "IgnoreProjector" = "True"
                "RenderType" = "Transparent"
                "PreviewType" = "Plane"
                "CanUseSpriteAtlas" = "True"
            }

            Stencil
            {

                Ref[_Stencil]
                Comp[_StencilComp]
                Pass[_StencilOp]
                ReadMask[_StencilReadMask]
                WriteMask[_StencilWriteMask]
            }

            Cull Off
            Lighting Off
            ZWrite Off
            ZTest[unity_GUIZTestMode]
            Blend SrcAlpha OneMinusSrcAlpha
            ColorMask[_ColorMask]

            Pass
            {

                CGPROGRAM
    #pragma vertex vert
    #pragma fragment frag

    #include "UnityCG.cginc"
    #include "UnityUI.cginc"

    #pragma multi_compile __ UNITY_UI_ALPHACLIP

                struct appdata_t
                {

    float4 vertex   :
                    POSITION;
    float4 color    :
                    COLOR;
    float2 texcoord :
                    TEXCOORD0;
                };

                struct v2f
                {

    float4 vertex   :
                    SV_POSITION;
    fixed4 color :
                    COLOR;
    half2 texcoord  :
                    TEXCOORD0;
    float4 worldPosition :
                    TEXCOORD1;
                };


                fixed4 _TextureSampleAdd;
                float4 _ClipRect;

                float _RoundedRadius;
                float _Width;
                float _Height;
                float _BorderWidth;
                float4 _BorderColor;

                float4 _MainTex_TexelSize;//纹理的大小,可能没有纹理,只有顶点颜色

                v2f vert(appdata_t IN)
                {

                    v2f OUT;
                    OUT.worldPosition = IN.vertex;
                    OUT.vertex = UnityObjectToClipPos(OUT.worldPosition);

                    OUT.texcoord = IN.texcoord;

                    OUT.color = IN.color;
                    return OUT;
                }

                sampler2D _MainTex;

                fixed4 frag(v2f IN) : SV_Target
                {

                    half4 color = IN.color;
                    if (_MainTex_TexelSize.z > 0) {

                        //有纹理,则颜色从纹理读取, 并叠加顶点颜色
                        color = (tex2D(_MainTex, IN.texcoord)) * IN.color;
                    }
                    //float width = _MainTex_TexelSize.z;
                    //float height = _MainTex_TexelSize.w;

                    float width = _Width;
                    float height = _Height;

                    if (width <= 0 && _MainTex_TexelSize.z > 0)
                    {

                        //如果没定义宽度,而纹理又定义了宽度,则从纹理宽度读取
                        width = _MainTex_TexelSize.z;
                    }
                    if (height <= 0 && _MainTex_TexelSize.w > 0)
                    {

                        //同上
                        height = _MainTex_TexelSize.w;
                    }

                    float border_width = _BorderWidth;
                    half4 border_color = _BorderColor;

                    float x = IN.texcoord.x * width;
                    float y = IN.texcoord.y * height;

                    float r = _RoundedRadius;

                    float arc_size = 0;

                    //左下角
                    if (x < r && y < r)
                    {

                        arc_size = (x - r) * (x - r) + (y - r) * (y - r);
                        if (arc_size > r * r) {

                            color.a = 0;
                        } else if (border_width > 0 && arc_size > (r - border_width) * (r - border_width)) {

                            color = border_color;
                        }
                    }

                    //左上角
                    if (x < r && y >(height - r))
                    {

                        arc_size = (x - r) * (x - r) + (y - (height - r)) * (y - (height - r));
                        if (arc_size > r * r) {

                            color.a = 0;
                        }
                        else if (border_width > 0 && arc_size > (r - border_width) * (r - border_width)) {

                            color = border_color;
                        }
                    }

                    //右下角
                    if (x > (width - r) && y < r)
                    {

                        arc_size = (x - (width - r)) * (x - (width - r)) + (y - r) * (y - r);
                        if (arc_size > r * r) {

                            color.a = 0;
                        }
                        else if (border_width > 0 && arc_size > (r - border_width) * (r - border_width)) {

                            color = border_color;
                        }
                    }

                    //右上角
                    if (x > (width - r) && y > (height - r))
                    {

                        arc_size = (x - (width - r)) * (x - (width - r)) + (y - (height - r)) * (y - (height - r));
                        if (arc_size > r * r) {

                            color.a = 0;
                        } else if (border_width > 0 && arc_size > (r - border_width) * (r - border_width)) {

                            color = border_color;
                        }
                    }


                    if (border_width > 0) {

                        //下边直线区域
                        if (x > r && x < (width - r) && y < border_width) {

                            color = border_color;
                        }
                        //上边直线区域
                        if (x > r && x < (width - r) && (height - y) < border_width) {

                            color = border_color;
                        }
                        //左边直线区域
                        if (y > r && y < (height - r) && x < border_width) {

                            color = border_color;
                        }
                        //右边直线区域
                        if (y > r && y < (height - r) && x > (width - border_width)) {

                            color = border_color;
                        }
                    }

                    return color;
                }
                ENDCG
            }
        }
}
5 shader使用方式
5.1 创建shader
在Unity 开发环境中,Assets的某个子目录下,右键,Create - Shader - Unlit Shader,将创建一个不带光照的shader文件,但无所谓,我们都要删除。双击打开,把上面第4节的代码黏贴覆盖。
5.2 创建材质Material
右键,Create - Material,新建一个材质。
然后,材质的shader选择为Custom/UI/RoundConorNew,也就是5.1新建的shader名字。
接着,调整参数,主要有5个参数需要关心:
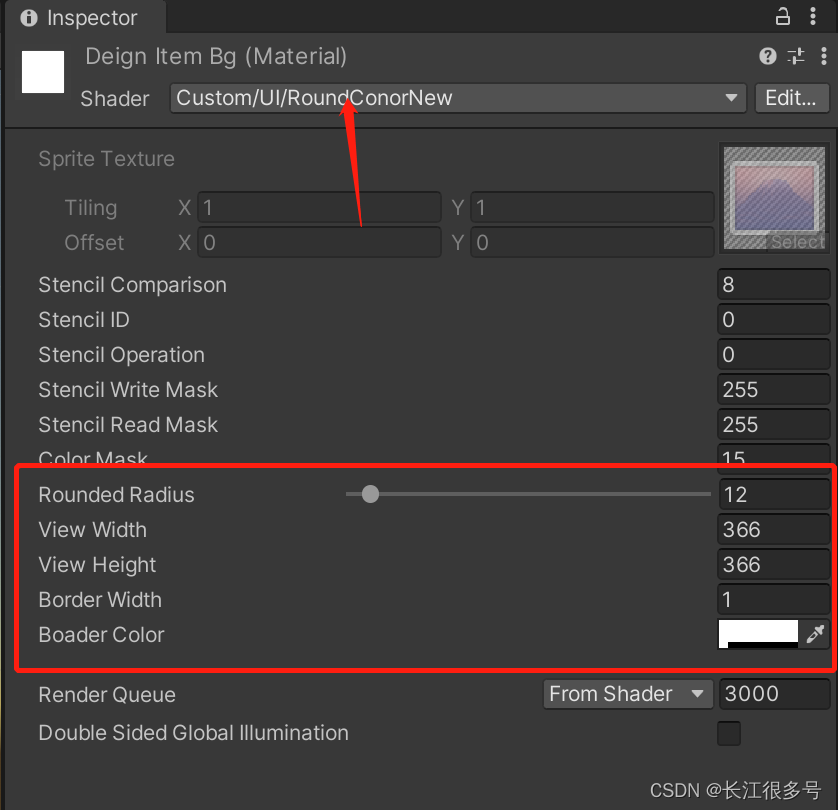
Rounded Radius就是圆角的半径。
View Width & View Height 是目标UI的宽高。
Border Width是边线宽度。
Border Color是边线颜色。
如果不要边线,把Border Width设置为0即可。
5.3 应用
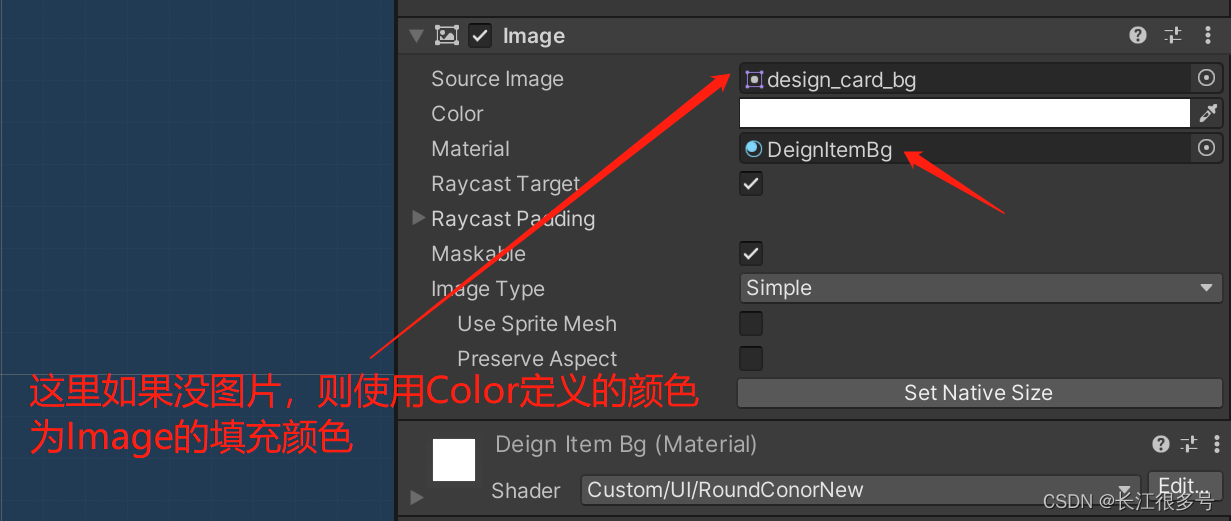
在Unity的中,新建一个Image,然后把材质选为上面5.2新建的材质即可。
智能推荐
Python 函数定义及调用(1)_python中函数返回一个可能不存在的变量该怎么写-程序员宅基地
文章浏览阅读875次,点赞10次,收藏2次。1、函数的功能:(1)代码的一种组织形式;(2)一个函数一般完成一项特定的功能。2、函数使用(1)函数需要先定义(2)使用函数,俗称调用3、函数定义的一般规则(1)def 关键字,后跟一个空格;(2)函数名,自己定义,起名需要遵循便令命名规则,约定俗成,大驼峰命名方法;(3)后面括号和冒号不能省,括号内可以由参数;(4)函数内所有代码缩进。..._python中函数返回一个可能不存在的变量该怎么写
探索高效数据结构与算法:elarity/data-structure-php-clanguage-程序员宅基地
文章浏览阅读323次,点赞5次,收藏8次。探索高效数据结构与算法:elarity/data-structure-php-clanguage项目地址:https://gitcode.com/elarity/data-structure-php-clanguage在这个数字化的时代,对数据结构和算法的理解是每个开发者不可或缺的技能。今天我们要推荐的是一个开源项目——elarity/data-structure-php-clanguage,...
2008最新全套计算机毕业设计_计算机毕业设计下载-程序员宅基地
文章浏览阅读3k次,点赞3次,收藏6次。计算机应用,计算机信息管理, 计算机网络, 计算机软件, 计算机科学与技术毕业设计网主要向广大计算机专业的各类本、专科毕业生(包括全日制正规高校、自考、各级电大、夜大、函授、成人教育等类型的计算机应用,计算机信息管理, 计算机网络, 计算机软件, 计算机科学与技术,电子商务等方向),提供计算机毕业设计论文参考资料(包括计算机论文、计算机毕业论文、计算机毕业设计)、免费的计算_计算机毕业设计下载
计算机网络---考前最后一背_幕布 计算机网络-程序员宅基地
文章浏览阅读4.6k次,点赞8次,收藏66次。1. 计算机网络向用户提供的最重要的两大功能:连通和共享。2. 计算机网络就是为数据交换提供服务的,是作为提供数据发送、传输、接收服务的基础设施。3. 定义了通信实体之间交换的报文的格式和传输顺序,以及在报文发送和/或接收或者其他事件方面所采取的行动(响应)。协议的基本要素:语法、语义和同步4. 网络按照其位置和提供的功能,可以划分为两个大的部分:位于网路边缘的资源子网,和网络核心通信子网。5. ETF 组织发布网络标准化文档的形式是 RFC 文档。6. 端到_幕布 计算机网络
【ElasticSearch系列-08】ElasticSearch处理对象间的关联关系_xcontentfactory.jsonbuilder().startobject() .start-程序员宅基地
文章浏览阅读973次,点赞27次,收藏29次。深入理解es对象间的关联关系_xcontentfactory.jsonbuilder().startobject() .startobject 对象类型
tp6加载静态资源文件_tp6访问静态资源-程序员宅基地
文章浏览阅读7.1k次。1.应用目录下新建config目录,在config目录下新建template.php文件2.return [ 'tplreplacestring' => [ 'STATIC'=>'/static', ],];3.将姿态资源文件放入public 目录下即可..._tp6访问静态资源
随便推点
【Python Practice】汇总-程序员宅基地
文章浏览阅读420次。所有练习题,来自这个仓库:https://github.com/darkprinx/100-plus-Python-programming-exercises-extended习题汇总 Day 1- Question 1-3 Day 2- Question 4-9 Day 3- Question 10-13 Day 4- Question 14-15 Day 5- Question 16-17 Day 6- Question 18-19 Day 7- Que._python practice
各种递归算法-程序员宅基地
文章浏览阅读90次。斐波那契数列定义:斐波那契数列指的是这样一个数列 1, 1, 2, 3, 5, 8, 13, 21, 34, 55, 89, 144, 233,377,610,987,1597,2584,4181,6765,10946,17711,28657,46368........,这个数列从第3项开始,每一项都等于前两项之和。斐波那契数列又称黄金分割数列、因数学家列昂纳多·斐波那契(Le..._适用于递归实现的算法有
python高斯噪声怎么去除_用Python识别验证码-程序员宅基地
文章浏览阅读300次。很多网站登录都需要输入验证码,如果要实现自动登录就不可避免的要识别验证码。最近学习了一下图像处理相关的知识,并用Python实现了基于KNN的验证码识别。准备工作这里我们使用opencv做图像处理,所以需要安装下面两个库pip3 install opencv-pythonpip3 install numpy识别原理我们采取一种有监督式学习的方法来识别验证码,包含以下几个步骤图片处理 - 对图片进..._python 高斯噪音识别
2017级算法模拟上机准备篇(序列DP 进阶_1)-程序员宅基地
文章浏览阅读92次。进阶版的序列DP 从一道题的优化开始ModricWang的序列问题题目描述:给定一个序列,求出这个序列中的最长上升子序列的长度。这道题的本质还是求解一个最长上升子序列的问题相对与之前提到过的O(n^2)的算法 我们可以重新整理思路用O(nlogn)的思路来写,用贪心和二分优化之前的算法我们设置新的DP数组//dp[i]代表的是当前长度为i的上升子序列的末尾元素的大...
XSS攻击基础防御_xxs全防1.0免费-程序员宅基地
文章浏览阅读3.4k次。XSS攻击听说过,没见过,后来通过查资料了解一点,这篇文章中,主要是针对XSS攻击做一个基本的防御,我也不知道能不能防的住,防不住在加规则,中国式解决问题:哪疼医那。哈哈由于公司用的是 SpringMVC,因此,这次就主要基于 SpringMVC 来解决这些漏洞。当然,其实这些解决方案都是大同小异,对于什么环境来说根本无所谓。了解了原理,什么环境、什么语言都可以运用自如了。废话就不多说了,直接上解..._xxs全防1.0免费
如何将JPG格式的图片转化为带地理坐标的TIFF格式-程序员宅基地
文章浏览阅读1.9k次。2019独角兽企业重金招聘Python工程师标准>>> ..._图片转为tif格式怎么附加坐标