Android中PopupWindow的基本使用_安卓 实现 显示在某个控件下面的浮动框-程序员宅基地
技术标签: 弹出窗口 滑动popupwindow PopuWindown和Listview Android基础知识 LayoutInflater PopupWindow
PopupWindow在界面弹出一窗口,效果相信大家常常看到,不废话,下面代码,有简单的先来。
分三种使用方式:
1.直接相对某个控件弹出
实现代码:
布局:popu_bg.xml
<LinearLayout xmlns:android="http://schemas.android.com/apk/res/android"
    xmlns:tools="http://schemas.android.com/tools"
    android:layout_width="100dp"
    android:layout_height="wrap_content"
    android:background="@drawable/aa" >
    <LinearLayout
        android:id="@+id/show"
        android:layout_width="match_parent"
        android:layout_height="wrap_content"
        android:gravity="center_vertical"
        android:orientation="vertical" >
        <TextView
            android:id="@+id/menu_start_chart"
            android:layout_width="match_parent"
            android:layout_height="wrap_content"
            android:gravity="center"
            android:text="item1"
            android:textColor="@android:color/white"
            android:textSize="15sp" />
        <View
            android:layout_width="match_parent"
            android:layout_height="1dp"
            android:background="#999999" />
        <TextView
            android:id="@+id/menu_scan"
            android:layout_width="match_parent"
            android:layout_height="wrap_content"
            android:gravity="center"
            android:text="item2"
            android:textColor="@android:color/white"
            android:textSize="15sp" />

        <View
            android:layout_width="match_parent"
            android:layout_height="1dp"
            android:background="#999999" />

        <TextView
            android:id="@+id/menu_scan"
            android:layout_width="match_parent"
            android:layout_height="wrap_content"
            android:gravity="center"
            android:text="item3"
            android:textColor="@android:color/white"
            android:textSize="15sp" />
    </LinearLayout>

</LinearLayout>
btn2=(Button)findViewById(R.id.btn2);
		btn2.setOnClickListener(new OnClickListener() {
			@Override
			public void onClick(View v) {
				showPopuwindown(v);
			}
		});
protected void showPopuwindown(View v) {
// TODO Auto-generated method stub
if(popupWindow==null){
infate=LayoutInflater.from(MainActivity.this);
view=infate.inflate(R.layout.popu_bg,null);
//创建PopupWindow构造函数,同时必须设置宽高参数,否则不显示
popupWindow = new PopupWindow(view, LayoutParams.WRAP_CONTENT,
LayoutParams.WRAP_CONTENT);
//初始化PopupWindow的View
popupWindow.setContentView(view);
}
//setFocusable设置PopupWindow的焦点
//如果PopupWindow中有Editor的话,focusable要为true
popupWindow.setFocusable(true);
popupWindow.setOutsideTouchable(true);
//想要让点击PopupWindow之外的地方PopupWindow消失你需要
//调用setBackgroundDrawable(new BitmapDrawable());
popupWindow.setBackgroundDrawable(new BitmapDrawable());
//在btn2下面显示
popupWindow.showAsDropDown(btn2);
popupWindow.update();
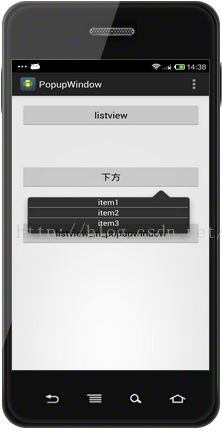
}2.在弹出的PopupWindow里添加listview进行滑动效果
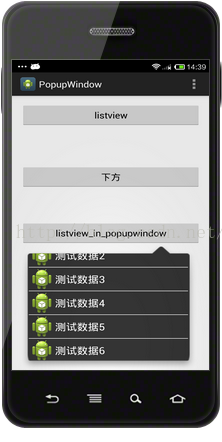
此效果点击按钮是弹出Popuwindow,内嵌一个listview,可以进行滑动,像微信右上角+一样,点击其中的item,Popuwindow消失,执行相应发操作,在这里一个toast提示。
布局代码:
<LinearLayout xmlns:android="http://schemas.android.com/apk/res/android"
    xmlns:tools="http://schemas.android.com/tools"
    android:layout_width="100dp"
    android:layout_height="140dp"
    android:background="@drawable/aa" >
    <ListView
        android:id="@+id/listview_bg"
        android:layout_width="match_parent"
        android:layout_height="wrap_content"
        android:divider="@android:color/white"
        android:dividerHeight="1dp"
         >
    </ListView>
</LinearLayout>
protected void showPopuwindownListview(View v) {
		// TODO Auto-generated method stub
		if(popupWindow1==null){
			LayoutInflater infate1=(LayoutInflater) getSystemService(Context.LAYOUT_INFLATER_SERVICE);
			listView=infate1.inflate(R.layout.listview_popu_bg,null);
			lv=(ListView)listView.findViewById(R.id.listview_bg);
			adapter=new MyAdater(MainActivity.this, getData());
			lv.setAdapter(adapter);
			popupWindow1 = new PopupWindow(listView);
			popupWindow1.setWidth(LayoutParams.WRAP_CONTENT);
			popupWindow1.setHeight(LayoutParams.WRAP_CONTENT);

			popupWindow1.setContentView(listView);
		}
		popupWindow1.setFocusable(true);
		popupWindow1.setOutsideTouchable(true);
		popupWindow1.setBackgroundDrawable(new BitmapDrawable());
		popupWindow1.showAsDropDown(btn3);
		popupWindow1.update();
		lv.setOnItemClickListener(new OnItemClickListener() {

			@Override
			public void onItemClick(AdapterView<?> parent, View view, int position, long id) {
				// TODO Auto-generated method stub
				Toast.makeText(MainActivity.this, adapter.getItem(position), Toast.LENGTH_SHORT).show();
				popupWindow1.dismiss();
			}
		});
	}

	 private List<String> getData(){

		  List<String> data = new ArrayList<String>();
         data.add("测试数据1");
         data.add("测试数据2");
         data.add("测试数据3");
         data.add("测试数据4");
         data.add("测试数据5");
         data.add("测试数据6");
         return data;
     }
class MyAdater extends BaseAdapter{
List<String> list=new ArrayList<String>();
public Context context;
private LayoutInflater infate;
public MyAdater(Context context,List<String> list) {
// TODO Auto-generated constructor stub
this.context=context;
this.list=list;
infate=LayoutInflater.from(context);
}
@Override
public int getCount() {
// TODO Auto-generated method stub
return list.size();
}
@Override
public String getItem(int position) {
// TODO Auto-generated method stub
return list.get(position);
}
@Override
public long getItemId(int position) {
// TODO Auto-generated method stub
return 0;
}
@Override
public View getView(int position, View convertView, ViewGroup parent) {
// TODO Auto-generated method stub
ViewHold hold=null;
if(convertView==null){
hold=new ViewHold();
convertView = infate.inflate(R.layout.item,null);
hold.tv=(TextView)convertView.findViewById(R.id.tv_name);
convertView.setTag(hold);
}
hold=(ViewHold) convertView.getTag();
hold.tv.setText(list.get(position));
return convertView;
}
class ViewHold{
ImageView iv;
TextView tv;
}
}3.在listview的点击每个item,在相应的item处弹出PopupWindow

QQ消息有这效果,长按消息列表中的每条信息,就会在此条消息上方弹出-置顶|删除
布局就是和2一样,listview+item,然后就是PopupWindow的布局
list_tip_menu.xml
<LinearLayout xmlns:android="http://schemas.android.com/apk/res/android"
    xmlns:tools="http://schemas.android.com/tools"
    android:layout_width="match_parent"
    android:layout_height="match_parent"
    android:gravity="center"
   >
    <LinearLayout
        android:id="@+id/w"
        android:layout_width="180dp"
        android:layout_height="60dp"
        android:gravity="center"
        android:orientation="vertical"
        android:background="#6d6d6d" >

        <TextView
            android:id="@+id/tip_show"
            android:layout_width="match_parent"
            android:layout_height="60dp"
            android:gravity="center"
            android:paddingLeft="5dp"
            android:paddingRight="5dp"
            android:text="测试数据w"
            android:textColor="@android:color/holo_orange_light"
            android:textSize="18sp" />
    </LinearLayout>

</LinearLayout>
protected void onCreate(Bundle savedInstanceState) {
super.onCreate(savedInstanceState);
setContentView(R.layout.activity_popuwindow);
lv=(ListView)findViewById(R.id.listview);
adapter=new MyAdater(this, getData());
lv.setAdapter(adapter);
lv.setOnItemLongClickListener(new OnItemLongClickListener() {
@Override
public boolean onItemLongClick(AdapterView<?> parent, View view, int position, long id) {
// TODO Auto-generated method stub
if(popupWindow==null){
infate=PopuwindowActivity.this.getLayoutInflater();
tipView =infate.inflate(R.layout.list_tip_menu, null);
tv=(TextView)tipView.findViewById(R.id.tip_show);
//PopupWindow(View contentView, int width, int height)
//contentView为要显示的view,
//width和height为宽和高,值为像素值,也可以是MATCHT_PARENT和WRAP_CONTENT
popupWindow=new PopupWindow(tipView, 200, 60);
}
tv.setText(adapter.getItem(position));
popupWindow.setFocusable(true);
popupWindow.setOutsideTouchable(true);
popupWindow.setBackgroundDrawable(new BitmapDrawable());
//相对view下方的位置,可以设置负值向相反方向移动,默认左上角为(0,0)
// popupWindow.showAsDropDown(view, view.getWidth()/2,0-(3*view.getHeight())/2 );
int[] location = new int[2];
view.getLocationOnScreen(location);
//在点击的item上方中间 view为item,根据view,popuWindown计算的他们的宽长,从而确定位置
popupWindow.showAtLocation(view, Gravity.NO_GRAVITY,
location[0]+view.getWidth()/2-popupWindow.getWidth()/2,
location[1]-popupWindow.getHeight());
//左方
// popupWindow.showAtLocation(view, Gravity.NO_GRAVITY, location[0]-popupWindow.getWidth(), location[1]);
//右边
//popupWindow.showAtLocation(view, Gravity.NO_GRAVITY, location[0]+v.getWidth(), location[1]);
popupWindow.update();
return true;
}
});
}
private List<String> getData() {
// TODO Auto-generated method stub
List<String> datas = new ArrayList<String>();
for (int i = 0; i < 100; i++) {
datas.add("test数据"+i);
}
return datas;
}1> LayoutInflater 实例的三种方式
1.LayoutInflater inflater = getLayoutInflater(); //调用Activity的getLayoutInflater()
2.LayoutInflater localinflater =(LayoutInflater)context.getSystemService(Context.LAYOUT_INFLATER_SERVICE);
3. LayoutInflater inflater = LayoutInflater.from(context);
 /**
     * Obtains the LayoutInflater from the given context.
     */
    public static LayoutInflater from(Context context) {
        LayoutInflater LayoutInflater =
                (LayoutInflater) context.getSystemService(Context.LAYOUT_INFLATER_SERVICE);
        if (LayoutInflater == null) {
            throw new AssertionError("LayoutInflater not found.");
        }
        return LayoutInflater;
    }
Activity 的 getLayoutInflater() 方法是调用 PhoneWindow 的getLayoutInflater()方法,源码:
public PhoneWindow(Context context) {
		   super(context);
		   mLayoutInflater = LayoutInflater.from(context);

		 }
所以最终本质都是调用的是 (LayoutInflater) context.getSystemService(Context.LAYOUT_INFLATER_SERVICE);
2>popupWindow = new PopupWindow(view, LayoutParams.WRAP_CONTENT,LayoutParams.WRAP_CONTENT);这里的 WRAP_CONTENT也可以换成MATCH_PARENT,或是具体数值,它指的是popuwindow的大小,也就是contentview的大小,注意popupwindow根据这个大小显示你的View,如果你的View本身是从xml得到的,那么xml的第一层view的大小属性将被忽略。所以这相当于popupWindow的width和height属性直接和第一层View相对应。
要设置具体数值,得额外在添加一层,如上布局LinearLayout中又加了LinearLayout进行宽高属性设置。
4.在3情况下,改下代码,在adapter中设置监听,添加一些方法:
在adapter中:
	@Override
	public View getView(int position, View convertView, ViewGroup parent) {
		// TODO Auto-generated method stub
		ViewHold hold=null;
		if(convertView==null){
			hold=new ViewHold();
			convertView = infate.inflate(R.layout.item,null);
			hold.tv=(TextView)convertView.findViewById(R.id.tv_name);
			convertView.setTag(hold);
		}
		hold=(ViewHold) convertView.getTag();
		hold.tv.setText(list.get(position));
		final String content = list.get(position);
		hold.tv.setOnLongClickListener(new OnLongClickListener() {
			@Override
			public boolean onLongClick(View v) {
				// TODO Auto-generated method stub
				if(onPressLongItemClik!=null){
					onPressLongItemClik.longPress(v,content);
					return true;
				}
				return false;
			}
		});
		return convertView;
	}
	public void setOnPressLongItemClik(OnPressLongItemClik onPressLongItemClik){
		this.onPressLongItemClik=onPressLongItemClik;
	}
	interface OnPressLongItemClik{
		void longPress(View view,String conttent);
	}
public class PopuwindowActivity1 extends Activity implements OnPressLongItemClik {

	private Button btn11;
	private ListView lv;
	private MyAdater1 adapter;
	private LayoutInflater infate;
	private View tipView;
	private PopupWindow popupWindow;
	private TextView tv;
	@Override
	protected void onCreate(Bundle savedInstanceState) {
		super.onCreate(savedInstanceState);
		setContentView(R.layout.activity_popuwindow);

		lv=(ListView)findViewById(R.id.listview);
		adapter=new MyAdater1(this, getData());
		//设置监听
		adapter.setOnPressLongItemClik(this);
		lv.setAdapter(adapter);
	}
	//实现接口
	@Override
	public void longPress(View view,String content) {
		// TODO Auto-generated method stub
		if(popupWindow==null){
			infate=PopuwindowActivity1.this.getLayoutInflater();
			tipView =infate.inflate(R.layout.list_tip_menu, null);
			tv=(TextView)tipView.findViewById(R.id.tip_show);
			//PopupWindow(View contentView, int width, int height)
			//contentView为要显示的view,
			//width和height为宽和高,值为像素值,也可以是MATCHT_PARENT和WRAP_CONTENT
			popupWindow=new PopupWindow(tipView, 200, 60);
		}

		tv.setText(content);

		popupWindow.setFocusable(true);
		popupWindow.setOutsideTouchable(true);
		popupWindow.setBackgroundDrawable(new BitmapDrawable());

		//相对view下方的位置,可以设置负值向相反方向移动,默认左上角为(0,0)
//		popupWindow.showAsDropDown(view, view.getWidth()/2,0-(3*view.getHeight())/2 );
		 int[] location = new int[2];
		 view.getLocationOnScreen(location);
		 //在点击的item上方中间 view为item,根据view,popuWindown计算的他们的宽长,从而确定位置
		  popupWindow.showAtLocation(view, Gravity.NO_GRAVITY,
				 location[0]+view.getWidth()/2-popupWindow.getWidth()/2,
				 location[1]-popupWindow.getHeight());
		//左方
//		 popupWindow.showAtLocation(view, Gravity.NO_GRAVITY, location[0]-popupWindow.getWidth(), location[1]);

		  //右边
		  //popupWindow.showAtLocation(view, Gravity.NO_GRAVITY, location[0]+v.getWidth(), location[1]);
		popupWindow.update();
	}
	private List<String> getData() {
		// TODO Auto-generated method stub
		  List<String> datas = new ArrayList<String>();
		for (int i = 0; i < 100; i++) {
			datas.add("test数据"+i);
		}
		return datas;
	}
智能推荐
python简易爬虫v1.0-程序员宅基地
文章浏览阅读1.8k次,点赞4次,收藏6次。python简易爬虫v1.0作者:William Ma (the_CoderWM)进阶python的首秀,大部分童鞋肯定是做个简单的爬虫吧,众所周知,爬虫需要各种各样的第三方库,例如scrapy, bs4, requests, urllib3等等。此处,我们先从最简单的爬虫开始。首先,我们需要安装两个第三方库:requests和bs4。在cmd中输入以下代码:pip install requestspip install bs4等安装成功后,就可以进入pycharm来写爬虫了。爬
安装flask后vim出现:error detected while processing /home/zww/.vim/ftplugin/python/pyflakes.vim:line 28_freetorn.vim-程序员宅基地
文章浏览阅读2.6k次。解决方法:解决方法可以去github重新下载一个pyflakes.vim。执行如下命令git clone --recursive git://github.com/kevinw/pyflakes-vim.git然后进入git克降目录,./pyflakes-vim/ftplugin,通过如下命令将python目录下的所有文件复制到~/.vim/ftplugin目录下即可。cp -R ...._freetorn.vim
HIT CSAPP大作业:程序人生—Hello‘s P2P-程序员宅基地
文章浏览阅读210次,点赞7次,收藏3次。本文简述了hello.c源程序的预处理、编译、汇编、链接和运行的主要过程,以及hello程序的进程管理、存储管理与I/O管理,通过hello.c这一程序周期的描述,对程序的编译、加载、运行有了初步的了解。_hit csapp
18个顶级人工智能平台-程序员宅基地
文章浏览阅读1w次,点赞2次,收藏27次。来源:机器人小妹 很多时候企业拥有重复,乏味且困难的工作流程,这些流程往往会减慢生产速度并增加运营成本。为了降低生产成本,企业别无选择,只能自动化某些功能以降低生产成本。 通过数字化..._人工智能平台
electron热加载_electron-reloader-程序员宅基地
文章浏览阅读2.2k次。热加载能够在每次保存修改的代码后自动刷新 electron 应用界面,而不必每次去手动操作重新运行,这极大的提升了开发效率。安装 electron 热加载插件热加载虽然很方便,但是不是每个 electron 项目必须的,所以想要舒服的开发 electron 就只能给 electron 项目单独的安装热加载插件[electron-reloader]:// 在项目的根目录下安装 electron-reloader,国内建议使用 cnpm 代替 npmnpm install electron-relo._electron-reloader
android 11.0 去掉recovery模式UI页面的选项_android recovery 删除 部分菜单-程序员宅基地
文章浏览阅读942次。在11.0 进行定制化开发,会根据需要去掉recovery模式的一些选项 就是在device.cpp去掉一些选项就可以了。_android recovery 删除 部分菜单
随便推点
echart省会流向图(物流运输、地图)_java+echart地图+物流跟踪-程序员宅基地
文章浏览阅读2.2k次,点赞2次,收藏6次。继续上次的echart博客,由于省会流向图是从echart画廊中直接取来的。所以直接上代码<!DOCTYPE html><html><head> <meta charset="utf-8" /> <meta name="viewport" content="width=device-width,initial-scale=1,minimum-scale=1,maximum-scale=1,user-scalable=no" /&_java+echart地图+物流跟踪
Ceph源码解析:读写流程_ceph 发送数据到其他副本的源码-程序员宅基地
文章浏览阅读1.4k次。一、OSD模块简介1.1 消息封装:在OSD上发送和接收信息。cluster_messenger -与其它OSDs和monitors沟通client_messenger -与客户端沟通1.2 消息调度:Dispatcher类,主要负责消息分类1.3 工作队列:1.3.1 OpWQ: 处理ops(从客户端)和sub ops(从其他的OSD)。运行在op_tp线程池。1...._ceph 发送数据到其他副本的源码
进程调度(一)——FIFO算法_进程调度fifo算法代码-程序员宅基地
文章浏览阅读7.9k次,点赞3次,收藏22次。一 定义这是最早出现的置换算法。该算法总是淘汰最先进入内存的页面,即选择在内存中驻留时间最久的页面予以淘汰。该算法实现简单,只需把一个进程已调入内存的页面,按先后次序链接成一个队列,并设置一个指针,称为替换指针,使它总是指向最老的页面。但该算法与进程实际运行的规律不相适应,因为在进程中,有些页面经常被访问,比如,含有全局变量、常用函数、例程等的页面,FIFO 算法并不能保证这些页面不被淘汰。这里,我_进程调度fifo算法代码
mysql rownum写法_mysql应用之类似oracle rownum写法-程序员宅基地
文章浏览阅读133次。rownum是oracle才有的写法,rownum在oracle中可以用于取第一条数据,或者批量写数据时限定批量写的数量等mysql取第一条数据写法SELECT * FROM t order by id LIMIT 1;oracle取第一条数据写法SELECT * FROM t where rownum =1 order by id;ok,上面是mysql和oracle取第一条数据的写法对比,不过..._mysql 替换@rownum的写法
eclipse安装教程_ecjelm-程序员宅基地
文章浏览阅读790次,点赞3次,收藏4次。官网下载下载链接:http://www.eclipse.org/downloads/点击Download下载完成后双击运行我选择第2个,看自己需要(我选择企业级应用,如果只是单纯学习java选第一个就行)进入下一步后选择jre和安装路径修改jvm/jre的时候也可以选择本地的(点后面的文件夹进去),但是我们没有11版本的,所以还是用他的吧选择接受安装中安装过程中如果有其他界面弹出就点accept就行..._ecjelm
Linux常用网络命令_ifconfig 删除vlan-程序员宅基地
文章浏览阅读245次。原文链接:https://linux.cn/article-7801-1.htmlifconfigping <IP地址>:发送ICMP echo消息到某个主机traceroute <IP地址>:用于跟踪IP包的路由路由:netstat -r: 打印路由表route add :添加静态路由路径routed:控制动态路由的BSD守护程序。运行RIP路由协议gat..._ifconfig 删除vlan