Blazor WebAssembly+Duende.IdentityServer+EF Core认证授权企业级实战_blazor identity ef 权限-程序员宅基地
技术标签: c# IdentityServer efcore # ASP.NET Core 认证授权 blazor
接上一篇(基础知识):Blazor WebAssembly身份认证与授权
文章目录
1. 前言
本文将从0开始介绍如何搭建一个适用于Blazor WASM应用的且基于OpenID和OAuth2.0的认证授权服务。我们会从创建空白项目一步一步开始,让大家了解到整个搭建流程,没有直接使用微软给定的认证模板或者IdentityServer的UI模板。
- 前端使用的是Blazor WebAssembly最新版本(基于 .net 5.0),主要我认为相对于Blazor Server来说,这个才是Web的未来。而且可以充分开会客户机的性能。
- 认证服务使用的Duende.IdentityServer 5.0版本。至于为什么没有使用现在常用的IdentityServer4呢?主要因为Duende.IdentityServer是IdentityServer4的后续版本,本质是同一个产品,会长期更新,虽然对于商业使用是需要授权的。但是对于一般的测试开发免费。IdentityServer4到2022年5月份就停止支持了,后续怎么发展不得而知。
- 数据存储使用的是目前的最新版的EF Core 5.0
至于为什么起名为企业级实战?在开始写这篇博文之前,在互联网上经历一番搜索后发现,大多数文章介绍的都很笼统,要么是基于官方的template解读(比如Blazor+Asp.net core Identity),要么还是用的一些测试配置(比如用的IdentityServer的TestUser,InMemoryClients等)。并没有说如何基于我们已有应用进行改造,并没有说生产上如何实践。
基于以上种种,所以就有了这篇文章。本文可能没有覆盖到你所使用场景的方方面面,欢迎在评论区交流探讨。
2. 搭建IdentityServer服务
2.1 安装dotnet命令行工具
安装IdentityServer的dotnet工具dotnet new --install Duende.IdentityServer.Templates,接下我们会用这个工具添加一些默认UI
2.2 创建ASP.NET Core Web MVC项目:
创建一个ASP.NET Core Web MVC项目,启动端口设置为:5000。
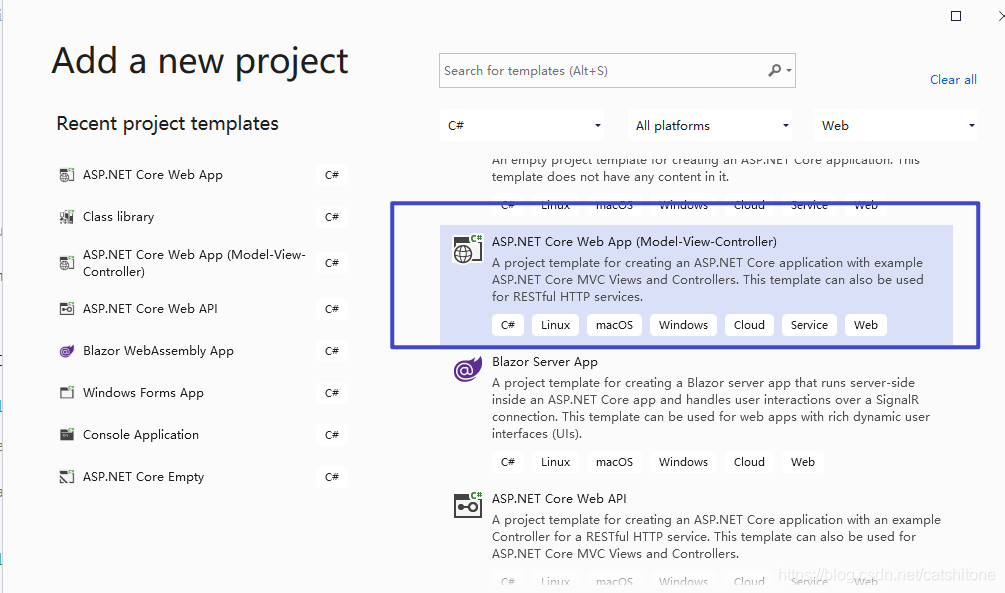
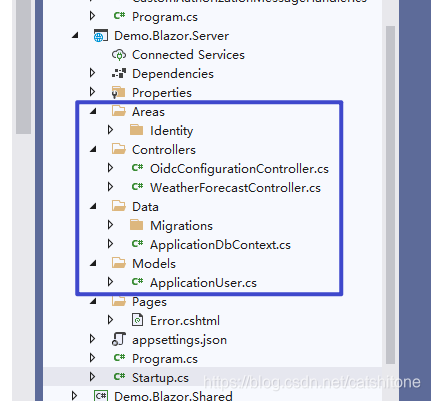
然后在项目的根目录下执行dotnet new isui --force命令,添加所需要的控制器和视图,执行完之后可以在右侧的解决方案中看到新添加的controll和view:

此时可以移除原有Controller->HomeControll.cs了,因为在Quickstart里已经有了。
2.3 配置IdentityServer
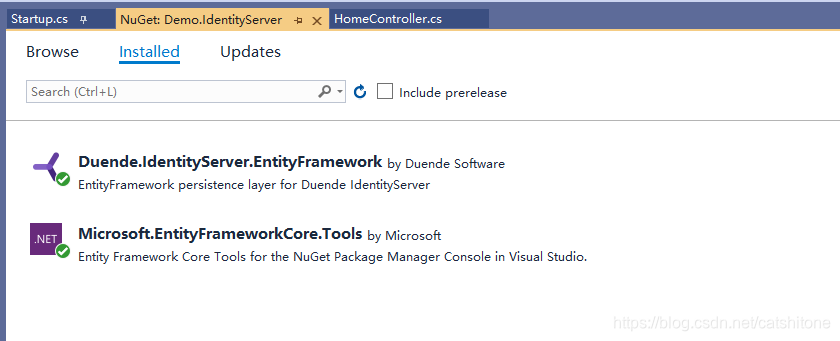
因为我们这次不整IdentityServer的TestUser,InMemoryClients练习数据的那一套,这些配置我们都需要从数据库读取。ORM我们选择使用EF Core,所以需要安装以下NuGet包:
- Duende.IdentityServer.EntityFramework:提供认证授权服务和数据存储功能
- Microsoft.EntityFrameworkCore.Tools:用来更新数据库结构
- Microsoft.EntityFrameworkCore.SqlServer:这里使用SqlServer数据库
安装后如下:
2.3.1 配置数据库连接字符串
{

  "Logging": {

    "LogLevel": {

      "Default": "Information",
      "Microsoft": "Warning",
      "Microsoft.Hosting.Lifetime": "Information"
    }
  },
  "AllowedHosts": "*",
  "ConnectionStrings": {

    "DemoMain": "Server=.,1433;Database=Demo.Main;Uid=xxx;Pwd=xxxx;",
    "DemoIds": "Server=.,1433;Database=Demo.IdentityServer;Uid=xx;Pwd=xxxx;"
  }
}
这里我们配置了两个数据库字符串DemoMain和DemoIds,一个是业务数据库,一个是IdentityServer的数据库(存放Ids认证和授权用到的一些东西)。
然后创建一个DemoMainDbContext 数据库上下文,以后会通过这个上下文验证用户密码。
    public class SysUser
    {

        public long Id {
     get; set; }
        public string UserName {
     get; set; }
        public string Password {
     get; set; }
        public string Email {
     get; set; }
    }
    public class DemoMainDbContext : DbContext
    {

        public DemoMainDbContext(DbContextOptions<DbContextOptions<DemoMainDbContext>> options) : base(options)
        {

            this.Database.EnsureCreated();
        }
        public DbSet<SysUser> Users {
     get; set; }

        protected override void OnModelCreating(ModelBuilder modelBuilder)
        {

            modelBuilder.Entity<SysUser>().ToTable("SysUser");
        }
    }
2.3.2 注册服务与配置管道
主要是以下几点:
- 注册
DemoMainDbContext的上下文 - 注册Cors:因为我们的解决方案将来会有多个应用,其他应用访问Ids的话会涉及到跨域问题。这里配置跨域的代码依自身需求灵活变通即可。
- 注册IdentityServer:
AddConfigurationStore用来配置ConfigurationDbContext上下文,存储那些受保护的ApiScope、IdentityResource、Client。AddOperationalStore用来配置PersistedGrantDbContext上下文,存储请求的token。 - 配置Cookie管道:
- 配置Cors:
- 配置IdentityServer:
Startup.cs完整代码参考如下:
public void ConfigureServices(IServiceCollection services)
{

    var conStrMain = Configuration.GetConnectionString("DemoMain");
    var conStrIds = Configuration.GetConnectionString("DemoIds");
    //注册数据库上下文
    services.AddDbContext<DemoMainDbContext>(opt => opt.UseSqlServer(conStrMain));
    //注册跨域
    services.AddCors(opt =>
    {

        opt.AddDefaultPolicy(builder => builder.AllowAnyOrigin().AllowAnyMethod().AllowAnyHeader());
    });
    //注册IdentityServer
    var migrationAsm = typeof(Startup).Assembly.GetName().Name;
    services.AddIdentityServer(opt =>
    {

        opt.Authentication.CookieSameSiteMode = Microsoft.AspNetCore.Http.SameSiteMode.Strict;
    })
        .AddConfigurationStore(opt =>
        {

            opt.ConfigureDbContext = b => b.UseSqlServer(conStrIds, sql => sql.MigrationsAssembly(migrationAsm));
        })
        .AddOperationalStore(opt =>
        {

            opt.ConfigureDbContext = b => b.UseSqlServer(conStrIds, sql => sql.MigrationsAssembly(migrationAsm));
        });
    services.AddControllersWithViews();
}
// This method gets called by the runtime. Use this method to configure the HTTP request pipeline.
public void Configure(IApplicationBuilder app, IWebHostEnvironment env)
{

    if (env.IsDevelopment())
    {

        app.UseDeveloperExceptionPage();
    }
    else
    {

        app.UseExceptionHandler("/Home/Error");
    }
    app.UseStaticFiles();
    //配置Cookie策略
    app.UseCookiePolicy(new CookiePolicyOptions
    {

        MinimumSameSitePolicy = Microsoft.AspNetCore.Http.SameSiteMode.Lax
    });
    app.UseRouting();
    //Use跨域
    app.UseCors();
    //Use Ids
    app.UseIdentityServer();
    app.UseAuthorization();
    app.UseEndpoints(endpoints =>
    {

        endpoints.MapControllerRoute(
            name: "default",
            pattern: "{controller=Home}/{action=Index}/{id?}");
    });
}
到这里IdentityServer的配置基本已经完成,但是我们还是没法运行,因为没有测试数据也没有对应的IdentityServer数据库架构。
2.3.3 配置测试数据
新建一个IdsConfig.cs类,添加以下方法:
//配置要保护的身份资源
public static List<IdentityResource> IdentityResources => new List<IdentityResource>()
{

    new IdentityResources.OpenId(),//必须有
    new IdentityResources.Profile()
};
//配置要保护的API资源
public static List<ApiScope> ApiScopes => new List<ApiScope>
{

    new ApiScope
    {

        Name="Classified",
        DisplayName="机密资源"
    }
};
//配置请求端
public static List<Client> Clients => new List<Client>
{

    new Client
    {

        ClientId="blazor_code2",
        AllowedGrantTypes=GrantTypes.Code,
        AllowedScopes={

            "Classified",
            IdentityServerConstants.StandardScopes.OpenId,
            IdentityServerConstants.StandardScopes.Profile,
        },
        RedirectUris=
        {

        	//如果请求过来的redirectUri在这个列表里,则会允许跳转。
            "http://localhost:7000/authentication/login-callback",
        },
        PostLogoutRedirectUris=
        {

        	//同上
            "http://localhost:7000/authentication/logout-callback",
        },
        RequireClientSecret=false,//不需要设置secret
        AllowedCorsOrigins={
     "http://localhost:7000"}//不需要跨域的话,可以不用这么设置
    },
};
以上的配置数据我们仅用来初始化数据库。
如上所看到的,我们添加了一个名为blazor_code2的client,并设置了RedirectUris和PostLogoutRedirectUris,用来登录成功之后和退出之后进行跳转。
这里的localhost:7000是我们接下来要创建的Blazor WebAssembly应用。因为Blazor WebAssembly属于客户端应用,所有的代码都保留在用户电脑里,而客户是不可信的,所以我们这里不需要设置ClientSecret和AccessToken,因为没法保证它们的安全。
2.3.4 数据初始化
接下来我们在IdsConfig.cs里添加一个SeedData方法,用来初始化上一步的配置数据:
public static void SeedData(IApplicationBuilder app)
{

    using (var serviceScope = app.ApplicationServices.GetService<IServiceScopeFactory>().CreateScope())
    {

    	//初始化时执行迁移记录
        serviceScope.ServiceProvider.GetRequiredService<PersistedGrantDbContext>().Database.Migrate();
        var context = serviceScope.ServiceProvider.GetRequiredService<ConfigurationDbContext>();
        context.Database.Migrate();
        //设置Clients
        context.Clients.RemoveRange(context.Clients.ToArray());//清空之前的,方便调试
        IdsConfig.Clients.ForEach(c => context.Clients.Add(c.ToEntity()));
        context.SaveChanges();
        //设置IdentityResource
        if (!context.IdentityResources.Any())
        {

            IdsConfig.IdentityResources.ForEach(r => context.IdentityResources.Add(r.ToEntity()));
            context.SaveChanges();
        }
        //设置ApiScope
        if (!context.ApiScopes.Any())
        {

            IdsConfig.ApiScopes.ForEach(a => context.ApiScopes.Add(a.ToEntity()));
            context.SaveChanges();
        }
        //给数据库加一个测试用户
		var mainContext = serviceScope.ServiceProvider.GetRequiredService<DemoMainDbContext>();
		if(!mainContext.Users.Any())
		{

    		mainContext.Users.Add(new SysUser
    		{

        		UserName = "admin",
        		Password = "1234",
        		Email = "[email protected]"
    		});
    		mainContext.SaveChanges();
		}
    }
}
然后在Stratup.cs的Configure方法,调用SeedData:
public void Configure(IApplicationBuilder app, IWebHostEnvironment env)
{

    IdsConfig.SeedData(app);
    //...
}
2.3.5 数据库迁移
打开PMC(Package Management Console),执行以下命令创建迁移记录:
Add-Migration InitialIdentityServerPersistedGrantDbMigration -c PersistedGrantDbContext -o Data/Migrations/IdentityServer/PersistedGrantDb

Add-Migration InitialIdentityServerConfigurationDbMigration -c ConfigurationDbContext -o Data/Migrations/IdentityServer/ConfigurationDb

当应用运行起来,就会执行迁移记录。
3. 创建WebApi应用
IdentityServer的创建告一段落了,接下来我们创建一个受IdentityServer保护的WebApi应用。

启动端口设置为:6001。
3.1 安装NuGet包
首先安装NuGet包:Microsoft.AspNetCore.Authentication.JwtBearer,用来验证请求资源时传进来的token。
3.2 配置Startup.cs
示例代码如下:
public void ConfigureServices(IServiceCollection services)
{

    services.AddCors(opt =>
    {

        opt.AddDefaultPolicy(builder =>
        {

            builder.AllowAnyOrigin().AllowAnyHeader().AllowAnyMethod();
        });
    });
    services.AddAuthentication("Bearer")
        .AddJwtBearer("Bearer", opt =>
        {

            opt.Authority = "http://localhost:5000";//IdentityServer的地址
            opt.TokenValidationParameters = new Microsoft.IdentityModel.Tokens.TokenValidationParameters
            {

                ValidateAudience = false//验证token是否来自trusted issuer, 大多数情况下都不需要验证。
            };
            opt.RequireHttpsMetadata = false;//我们没有使用https,所以这里disable。
        });
    services.AddAuthorization(opt =>
    {

        opt.AddPolicy("Policy1", builder =>
        {

            //首先需要通过验证
            builder.RequireAuthenticatedUser();
            //其次需要有Classified的scope
            builder.RequireClaim("scope", "Classified");
        });
    });
    services.AddControllers();
}
// This method gets called by the runtime. Use this method to configure the HTTP request pipeline.
public void Configure(IApplicationBuilder app, IWebHostEnvironment env)
{

    if (env.IsDevelopment())
    {

        app.UseDeveloperExceptionPage();
    }
    app.UseRouting();
    app.UseCors();//添加跨域
    app.UseAuthentication();//添加认证
    app.UseAuthorization();
    app.UseEndpoints(endpoints =>
    {

        endpoints.MapControllers();
    });
}
主要工作是以下几点:
- 因为我们需要跨域,所以在服务和请求管道里配置了Cors。
- 配置了基于
Bearer的token验证,拿到token之后会到localhost:5000上进行验证,也就是我们上一步创建的IdentityServer应用。 - 然后配置另一个基于策略的授权
Policy1,这个策略表示需要包含名为Classified的scope
3.3 保护控制器
在控制器上应用[Authorize]特性,保护控制器:
namespace Demo.ApiResource.Controllers
{

    [ApiController]
    [Route("[controller]")]
    [Authorize("Policy1")]
    public class WeatherForecastController : ControllerBase
    {

        //...
    }
}
到此WebApi的配置结束。
4. 创建Blazor WebAssembly应用
在创建Blazor WASM应用之前,建议先看下这篇文章:Blazor WebAssembly身份认证与授权,对Blazor的认证组件有个大致了解。
然后我们创建一个用ASP.NET Core 作为Host的Blazor WebAssembly应用,认证类型里选中Individual Accounts,然后勾上ASP.NET Core hosted:
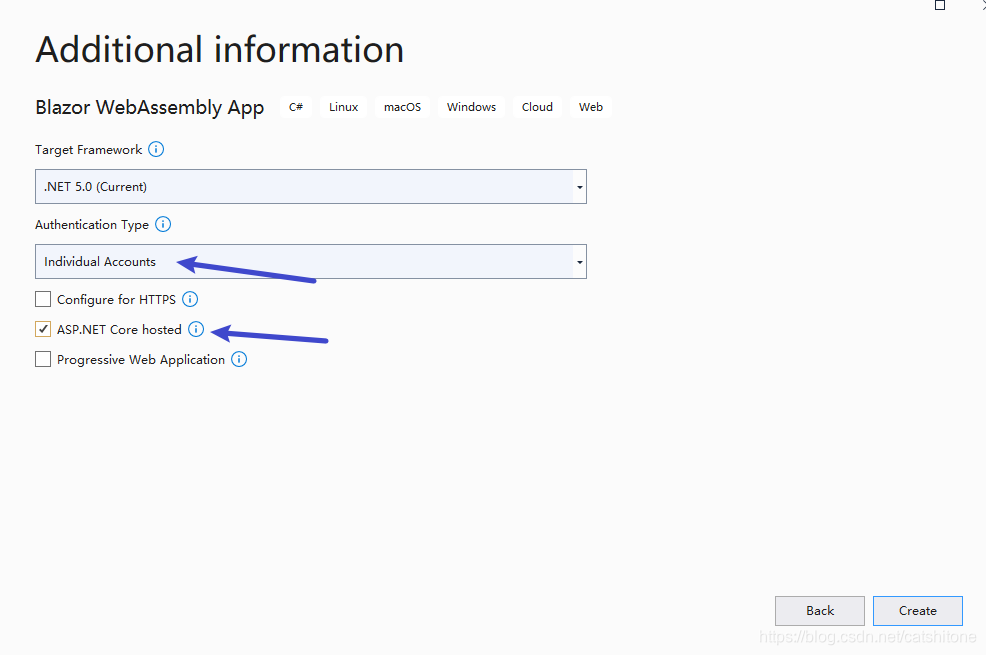
启动端口设置为7000
4.1 Host端配置
创建好项目之后,Host端的这些东西我们暂时不用可以都删除,简简单单的让它只做为一个Host就够了:
然后修改下Startup.cs把不要的代码也注释掉,清清爽爽:
public void ConfigureServices(IServiceCollection services)
{

    //services.AddDbContext<ApplicationDbContext>(options =>
    //    options.UseSqlServer(
    //        Configuration.GetConnectionString("DefaultConnection")));
    //services.AddDatabaseDeveloperPageExceptionFilter();
    //services.AddDefaultIdentity<ApplicationUser>(options => options.SignIn.RequireConfirmedAccount = true)
    //    .AddEntityFrameworkStores<ApplicationDbContext>();
    //services.AddIdentityServer()
    //    .AddApiAuthorization<ApplicationUser, ApplicationDbContext>();
    //services.AddAuthentication()
    //    .AddIdentityServerJwt();
    services.AddControllersWithViews();
    services.AddRazorPages();
}
// This method gets called by the runtime. Use this method to configure the HTTP request pipeline.
public void Configure(IApplicationBuilder app, IWebHostEnvironment env)
{

    if (env.IsDevelopment())
    {

        app.UseDeveloperExceptionPage();
        app.UseMigrationsEndPoint();
        app.UseWebAssemblyDebugging();
    }
    else
    {

        app.UseExceptionHandler("/Error");
        // The default HSTS value is 30 days. You may want to change this for production scenarios, see https://aka.ms/aspnetcore-hsts.
        app.UseHsts();
    }
    //app.UseHttpsRedirection();
    app.UseBlazorFrameworkFiles();
    app.UseStaticFiles();
    app.UseRouting();
    //app.UseIdentityServer();
    //app.UseAuthentication();
    //app.UseAuthorization();
    app.UseEndpoints(endpoints =>
    {

        endpoints.MapRazorPages();
        endpoints.MapControllers();
        endpoints.MapFallbackToFile("index.html");
    });
}
4.2 Client端配置
因为需要用到一些认证组件,所以需要首先在Client端安装NuGet包:Microsoft.AspNetCore.Components.WebAssembly.Authentication。
接下来配置Program.cs:
public static async Task Main(string[] args)
{

    var builder = WebAssemblyHostBuilder.CreateDefault(args);
    builder.RootComponents.Add<App>("#app");
    //注册自定义的http handler
    builder.Services.AddScoped<CustomAuthorizationMessageHandler>();
    builder.Services.AddHttpClient("webapi", client => client.BaseAddress = new Uri("http://localhost:6001"))
        .AddHttpMessageHandler<CustomAuthorizationMessageHandler>();
    //注册一个通用的HttpClient,让Blazor访问自身提供的服务
    builder.Services.AddScoped(sp => new HttpClient {
     BaseAddress = new Uri(builder.HostEnvironment.BaseAddress) });
    builder.Services.AddOidcAuthentication(opt =>
    {

        //这里是写死了,可以配置到appsettings.json里
        opt.ProviderOptions.Authority = "http://localhost:5000";
        opt.ProviderOptions.ClientId = "blazor_code2";
        opt.ProviderOptions.PostLogoutRedirectUri = "http://localhost:7000/authentication/logout-callback";
        opt.ProviderOptions.RedirectUri = "http://localhost:7000/authentication/login-callback";
        opt.ProviderOptions.ResponseType = "code";
    });
    builder.Services.AddApiAuthorization();
    await builder.Build().RunAsync();
}
注意
这里有一个坑,微软的官方文档说的也很模糊,当AddHttpMessageHandler时,会让你使用BaseAddressAuthorizationMessageHandler。但是使用这个handler,并不会让你请求到localhost:6000上,而一直是localhost:5000,具体原因可以参考BaseAddressAuthorizationMessageHandler的源码。
所以我们这里自定义了一个CustomAuthorizationMessageHandler,并进行了注册。自定义handler的代码如下:
    public class CustomAuthorizationMessageHandler : AuthorizationMessageHandler
    {

        public CustomAuthorizationMessageHandler(IAccessTokenProvider provider,
            NavigationManager navigationManager, IConfiguration configuration)
            : base(provider, navigationManager)
        {

            ConfigureHandler(authorizedUrls: new[] {
     "http://localhost:6001" }, scopes: new[] {
     "Classified" });
        }
    }
(主要设置webapi的url和请求的scope)
4.3 访问API
这里我们使用[Authorize]特性保护我们的Blazor页面Counter和FetchData。当请求到这两个页面上时会首先验证用户,没有登录的话会提示登录。
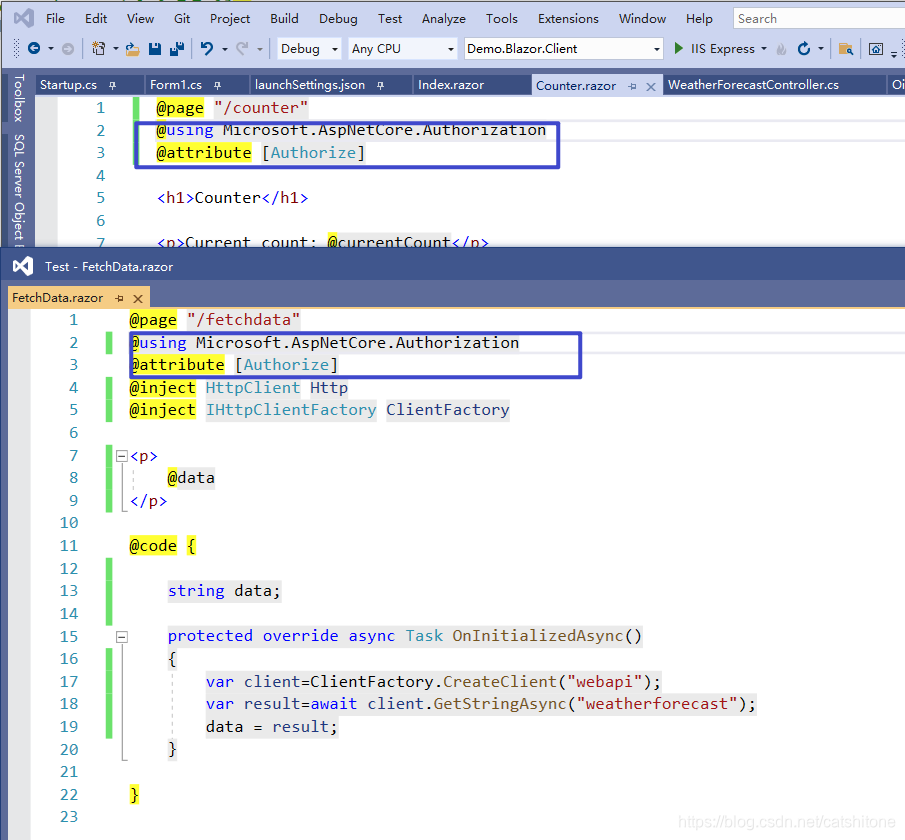
在FetchData页面,我们还请求了之前的WebApi应用,获取天气数据,会请求到http://localhost:6001/weatherforecast。还注入另外一个HttpClient,用这个实例可以请求到host上的服务。
5. 整合测试
在整合测试之前,我们再回顾已下几个要点:
- 我们用的是OpenId 授权码模式
- IdentityServer的端口是:5000
- WeiApi的端口是:6001
- Blazor应用的端口是:7000
确认以上几点没有问题之后,我们就可以开始调试项目了。我们先启动IdentityServer,然后尝试进行登录,不出意外的话,会遇到如下问题:
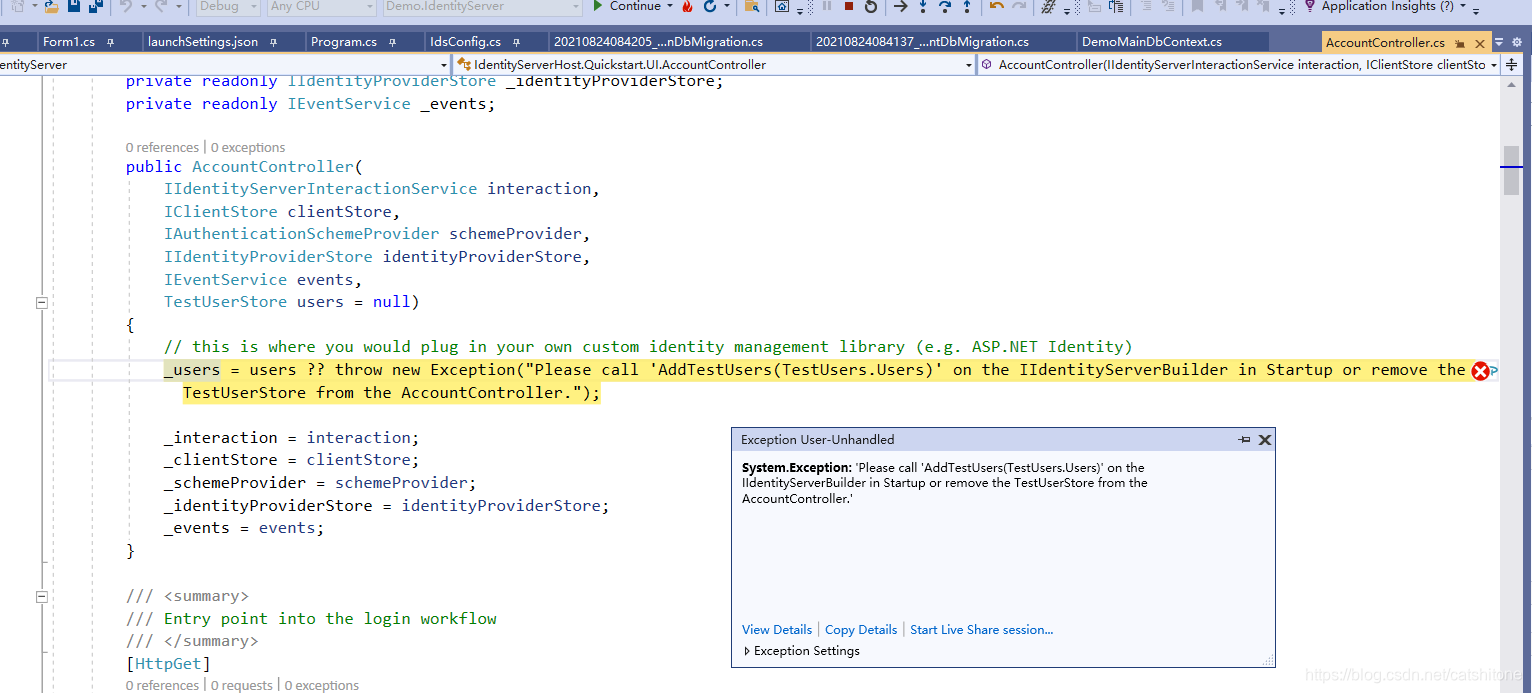
这是因为我们之前说过不用TestUser,而是使用自己数据库的用户数据。所以需要对AccountController进行改造,主要是更改Login方法,这个比较简单,就不做介绍了。
调整之后启动项目,正常情况下应该有如下展示:

6. 其他
如果你使用的是资源拥有着凭着模式(ResourceOwnerPassword)且想使用自己数据库的用户进行验证该怎么办呢?则值需要实现IResourceOwnerPasswordValidator和IProfileService接口即可。具体可以参考下面的引用3。 这里我贴下代码仅供参考:
ResourceOwnerPasswordValidator.cs
public class ResourceOwnerPasswordValidator : IResourceOwnerPasswordValidator
{

    OpsDbContext dbContext;
    public ResourceOwnerPasswordValidator(OpsDbContext dbContext)
    {

        this.dbContext = dbContext;
    }
    public async Task ValidateAsync(ResourceOwnerPasswordValidationContext context)
    {

        try
        {

            var user = await dbContext.Users.FirstOrDefaultAsync(u => u.UserName == context.UserName);
            if (user != null)
            {

                if (user.Password == context.Password.ToSHA256())
                {

                    context.Result = new GrantValidationResult(subject: user.Id.ToString(), authenticationMethod: "custom", claims: GetUserClaims(user));
                    return;
                }
                context.Result = new GrantValidationResult(Duende.IdentityServer.Models.TokenRequestErrors.InvalidGrant, "密码错误");
            }
            context.Result = new GrantValidationResult(Duende.IdentityServer.Models.TokenRequestErrors.InvalidGrant, "用户不存在");
        }
        catch (Exception ex)
        {

            context.Result = new GrantValidationResult(Duende.IdentityServer.Models.TokenRequestErrors.InvalidGrant, $"出现异常:{
      ex.Message}");
        }
    }
    public static IEnumerable<Claim> GetUserClaims(StorageLayer.Entity.SysUser user)
    {

        return new Claim[]
        {

            new Claim("user_id", user.Id.ToString() ?? ""),
            new Claim(JwtClaimTypes.Name, user.UserName),
            new Claim(JwtClaimTypes.Email, user.Email?? ""),
            new Claim("some_claim_you_want_to_see", user.CreateTime.ToString()),
            //roles
            new Claim(JwtClaimTypes.Role, "管理员")
        };
    }
}
ProfileService.cs
public class ProfileService : IProfileService
{

    OpsDbContext dbContext;
    public ProfileService(OpsDbContext dbContext)
    {

        this.dbContext = dbContext;
    }
    //Get user profile date in terms of claims when calling /connect/userinfo
    public async Task GetProfileDataAsync(ProfileDataRequestContext context)
    {

        //depending on the scope accessing the user data.
        if (!string.IsNullOrEmpty(context.Subject.Identity.Name))
        {

            //get user from db (in my case this is by email)
            var user = await dbContext.Users.FirstOrDefaultAsync(u=>u.UserName== context.Subject.Identity.Name);
            if (user != null)
            {

                var claims = ResourceOwnerPasswordValidator.GetUserClaims(user);
                //set issued claims to return
                context.IssuedClaims = claims.Where(x => context.RequestedClaimTypes.Contains(x.Type)).ToList();
            }
        }
        else
        {

            //get subject from context (this was set ResourceOwnerPasswordValidator.ValidateAsync),
            //where and subject was set to my user id.
            var userId = context.Subject.Claims.FirstOrDefault(x => x.Type == "sub");
            if (!string.IsNullOrEmpty(userId?.Value) && long.Parse(userId.Value) > 0)
            {

                //get user from db (find user by user id)
                var user = await dbContext.Users.FindAsync(long.Parse(userId.Value));
                // issue the claims for the user
                if (user != null)
                {

                    var claims = ResourceOwnerPasswordValidator.GetUserClaims(user);
                    context.IssuedClaims = claims.Where(x => context.RequestedClaimTypes.Contains(x.Type)).ToList();
                }
            }
        }
    }
    public Task IsActiveAsync(IsActiveContext context)
    {

        get subject from context (set in ResourceOwnerPasswordValidator.ValidateAsync),
        //var userId = context.Subject.Claims.FirstOrDefault(x => x.Type == "user_id");
        //if (!string.IsNullOrEmpty(userId?.Value) && long.Parse(userId.Value) > 0)
        //{

        //    var user = await _userRepository.FindAsync(long.Parse(userId.Value));
        //    if (user != null)
        //    {

        //        if (user.IsActive)
        //        {

        //            context.IsActive = user.IsActive;
        //        }
        //    }
        //}
        return Task.CompletedTask;
    }
}
最后,进行注册:
public void ConfigureServices(IServiceCollection services)
{

    services.AddSqlService(Configuration, "SysOpsConStr");
    services.AddCors(opt =>
    {

        opt.AddPolicy("allowAll", builder =>
        {

            builder.AllowAnyOrigin().AllowAnyMethod().AllowAnyHeader();
        });
    });
    var conStr = Configuration.GetConnectionString("SysIdsConStr");
    var migrationAsm = typeof(Startup).GetTypeInfo().Assembly.GetName().Name;
    services.AddIdentityServer(opt =>
    {

        opt.Authentication.CookieSameSiteMode = Microsoft.AspNetCore.Http.SameSiteMode.Strict;
    })
        .AddConfigurationStore(opt =>
        {

            opt.ConfigureDbContext = b => b.UseSqlServer(conStr, sql => sql.MigrationsAssembly(migrationAsm));
        })
        .AddOperationalStore(opt =>
        {

            opt.ConfigureDbContext = b => b.UseSqlServer(conStr, sql => sql.MigrationsAssembly(migrationAsm));
        });
    //进行注册
    services.AddTransient<IResourceOwnerPasswordValidator, ResourceOwnerPasswordValidator>();
    services.AddTransient<IProfileService, ProfileService>();

    services.AddControllersWithViews();
}
源代码在开源项目:Blazor-Treadstone
参考资料:
智能推荐
oracle 12c 集群安装后的检查_12c查看crs状态-程序员宅基地
文章浏览阅读1.6k次。安装配置gi、安装数据库软件、dbca建库见下:http://blog.csdn.net/kadwf123/article/details/784299611、检查集群节点及状态:[root@rac2 ~]# olsnodes -srac1 Activerac2 Activerac3 Activerac4 Active[root@rac2 ~]_12c查看crs状态
解决jupyter notebook无法找到虚拟环境的问题_jupyter没有pytorch环境-程序员宅基地
文章浏览阅读1.3w次,点赞45次,收藏99次。我个人用的是anaconda3的一个python集成环境,自带jupyter notebook,但在我打开jupyter notebook界面后,却找不到对应的虚拟环境,原来是jupyter notebook只是通用于下载anaconda时自带的环境,其他环境要想使用必须手动下载一些库:1.首先进入到自己创建的虚拟环境(pytorch是虚拟环境的名字)activate pytorch2.在该环境下下载这个库conda install ipykernelconda install nb__jupyter没有pytorch环境
国内安装scoop的保姆教程_scoop-cn-程序员宅基地
文章浏览阅读5.2k次,点赞19次,收藏28次。选择scoop纯属意外,也是无奈,因为电脑用户被锁了管理员权限,所有exe安装程序都无法安装,只可以用绿色软件,最后被我发现scoop,省去了到处下载XXX绿色版的烦恼,当然scoop里需要管理员权限的软件也跟我无缘了(譬如everything)。推荐添加dorado这个bucket镜像,里面很多中文软件,但是部分国外的软件下载地址在github,可能无法下载。以上两个是官方bucket的国内镜像,所有软件建议优先从这里下载。上面可以看到很多bucket以及软件数。如果官网登陆不了可以试一下以下方式。_scoop-cn
Element ui colorpicker在Vue中的使用_vue el-color-picker-程序员宅基地
文章浏览阅读4.5k次,点赞2次,收藏3次。首先要有一个color-picker组件 <el-color-picker v-model="headcolor"></el-color-picker>在data里面data() { return {headcolor: ’ #278add ’ //这里可以选择一个默认的颜色} }然后在你想要改变颜色的地方用v-bind绑定就好了,例如:这里的:sty..._vue el-color-picker
迅为iTOP-4412精英版之烧写内核移植后的镜像_exynos 4412 刷机-程序员宅基地
文章浏览阅读640次。基于芯片日益增长的问题,所以内核开发者们引入了新的方法,就是在内核中只保留函数,而数据则不包含,由用户(应用程序员)自己把数据按照规定的格式编写,并放在约定的地方,为了不占用过多的内存,还要求数据以根精简的方式编写。boot启动时,传参给内核,告诉内核设备树文件和kernel的位置,内核启动时根据地址去找到设备树文件,再利用专用的编译器去反编译dtb文件,将dtb还原成数据结构,以供驱动的函数去调用。firmware是三星的一个固件的设备信息,因为找不到固件,所以内核启动不成功。_exynos 4412 刷机
Linux系统配置jdk_linux配置jdk-程序员宅基地
文章浏览阅读2w次,点赞24次,收藏42次。Linux系统配置jdkLinux学习教程,Linux入门教程(超详细)_linux配置jdk
随便推点
matlab(4):特殊符号的输入_matlab微米怎么输入-程序员宅基地
文章浏览阅读3.3k次,点赞5次,收藏19次。xlabel('\delta');ylabel('AUC');具体符号的对照表参照下图:_matlab微米怎么输入
C语言程序设计-文件(打开与关闭、顺序、二进制读写)-程序员宅基地
文章浏览阅读119次。顺序读写指的是按照文件中数据的顺序进行读取或写入。对于文本文件,可以使用fgets、fputs、fscanf、fprintf等函数进行顺序读写。在C语言中,对文件的操作通常涉及文件的打开、读写以及关闭。文件的打开使用fopen函数,而关闭则使用fclose函数。在C语言中,可以使用fread和fwrite函数进行二进制读写。 Biaoge 于2024-03-09 23:51发布 阅读量:7 ️文章类型:【 C语言程序设计 】在C语言中,用于打开文件的函数是____,用于关闭文件的函数是____。
Touchdesigner自学笔记之三_touchdesigner怎么让一个模型跟着鼠标移动-程序员宅基地
文章浏览阅读3.4k次,点赞2次,收藏13次。跟随鼠标移动的粒子以grid(SOP)为partical(SOP)的资源模板,调整后连接【Geo组合+point spirit(MAT)】,在连接【feedback组合】适当调整。影响粒子动态的节点【metaball(SOP)+force(SOP)】添加mouse in(CHOP)鼠标位置到metaball的坐标,实现鼠标影响。..._touchdesigner怎么让一个模型跟着鼠标移动
【附源码】基于java的校园停车场管理系统的设计与实现61m0e9计算机毕设SSM_基于java技术的停车场管理系统实现与设计-程序员宅基地
文章浏览阅读178次。项目运行环境配置:Jdk1.8 + Tomcat7.0 + Mysql + HBuilderX(Webstorm也行)+ Eclispe(IntelliJ IDEA,Eclispe,MyEclispe,Sts都支持)。项目技术:Springboot + mybatis + Maven +mysql5.7或8.0+html+css+js等等组成,B/S模式 + Maven管理等等。环境需要1.运行环境:最好是java jdk 1.8,我们在这个平台上运行的。其他版本理论上也可以。_基于java技术的停车场管理系统实现与设计
Android系统播放器MediaPlayer源码分析_android多媒体播放源码分析 时序图-程序员宅基地
文章浏览阅读3.5k次。前言对于MediaPlayer播放器的源码分析内容相对来说比较多,会从Java-&amp;gt;Jni-&amp;gt;C/C++慢慢分析,后面会慢慢更新。另外,博客只作为自己学习记录的一种方式,对于其他的不过多的评论。MediaPlayerDemopublic class MainActivity extends AppCompatActivity implements SurfaceHolder.Cal..._android多媒体播放源码分析 时序图
java 数据结构与算法 ——快速排序法-程序员宅基地
文章浏览阅读2.4k次,点赞41次,收藏13次。java 数据结构与算法 ——快速排序法_快速排序法