yolov3-tiny工程应用和实现-程序员宅基地
技术标签: 神经网络
目录
前言
从去年十一月份开始学习yolo神经网络用于目标识别的硬件实现,到现在已经六个月了。一个硬件工程师,C/C++基础都差劲的很,对照着darknet作者的源码和网上东拼西凑的原理讲解,一点一点地摸索。刚开始进度很慢,每天都感觉学习不了几行代码,到后来慢慢的入了门,每周都有不菲的收获和重大的进展。总结一下自己这大半年的学习,记录一下心路历程,也为躬耕于此的有缘人提供哪怕一点点的帮助吧。
相关推荐
网上的资源很多,也有很多博主的原理讲解。在这里推荐几个资源:
darknet官网:https://pjreddie.com/darknet/yolo/ linux系统
github上基于VS的工程:https://github.com/AlexeyAB/darknet
github上带有注释的工程:https://github.com/hgpvision/darknet
yolov3-tiny 原理
Yolo算法采用一个单独的CNN模型实现end-to-end的目标检测,首先将输入图片resize到448x448,然后送入CNN网络,最后处理网络预测结果得到检测的目标。
YOLO 的核心思想就是利用整张图作为网络的输入,直接在输出层回归 bounding box(边界框) 的位置及其所属的类别。将一幅图像分成 SxS 个网格(grid cell),如果某个 object 的中心落在这个网格中,则这个网格就负责预测这个 object。
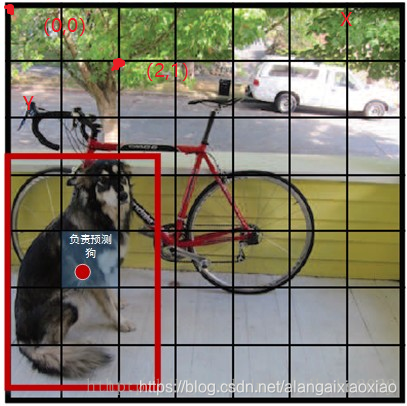
每个 bounding box 要预测 (x, y, w, h) 和 confidence 共5个值,每个网格还要预测一个类别信息,记为 C 类。则 SxS个 网格,每个网格要预测 B 个 bounding box, 每个box中都有 C 个 classes对应的概率值。输出就是 S x S x B x(5+C) 的一个 tensor。
注意:class 信息是针对每个网格的,confidence 信息是针对每个 bounding box 的。
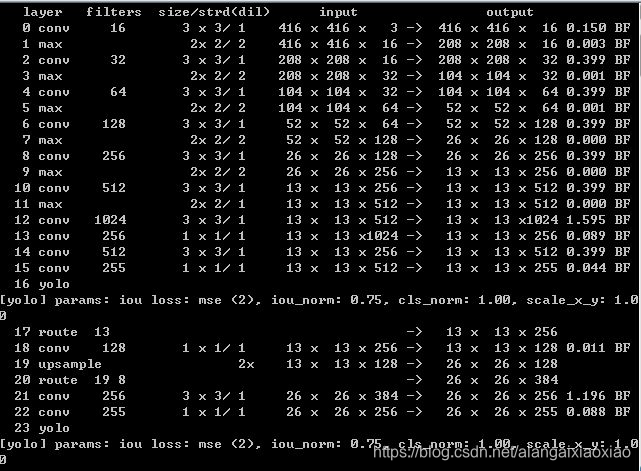
yolov3-tiny中,共有两个输出层(yolo层),分别为13x13和26x26,每个网格可以预测3个bounding box,共有80个分类数。所以最后的yolo层的尺寸为:13x13x255和26x26x255。
yolov3-tiny网络层结构如下:
更直观的一个模型图:
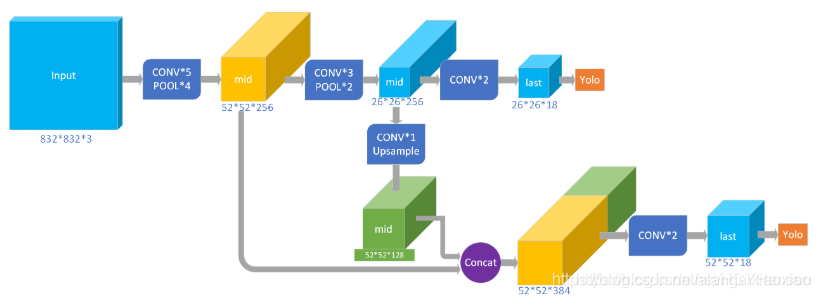
可以看出,yolov3-tiny共有23层网络,其中包含五种不同的网络层:卷积层convolutional(13个),池化层maxpool(6个),路由层route(2个),上采样层upsample(1个),输出层yolo(2个)。Yolov3-tiny中,除了Yolo层之前的那个卷积层,每个卷积层之后都有BN层,且每个卷积层之后都有激活函数LEAKY(yolo层之前是linear)。
yolov3-tiny 源码分析
配置网络结构
yolov3-tiny前向传播主要在detector.c中的test_detector函数中完成:
/** 本函数是检测模型的一个前向推理测试函数.
* @param datacfg       数据集信息文件路径(也即cfg/*.data文件),文件中包含有关数据集的信息,比如cfg/coco.data
* @param cfgfile       网络配置文件路径(也即cfg/*.cfg文件),包含一个网络所有的结构参数,比如cfg/yolo.cfg
* @param weightfile    已经训练好的网络权重文件路径,比如darknet网站上下载的yolo.weights文件
* @param filename      待进行检测的图片路径(单张图片)
* @param thresh        阈值,类别检测概率大于该阈值才认为其检测结果有效
* @param hier_thresh
* @param outfile
* @param fullscreen
* @details 该函数为一个前向推理测试函数,不包括训练过程,因此如果要使用该函数,必须提前训练好网络,并加载训练好的网络参数文件,
*          这些文件可以在作者网站上根据作者的提示下载到。本函数由darknet.c中的主函数调用,严格来说,本文件不应纳入darknet网络结构文件夹中,
*          其只是一个测试文件,或者说是一个example,应该放入到example文件夹中(新版的darknet已经这样做了,可以在github上查看)。
*          本函数的流程为:.
*/
void test_detector(char *datacfg, char *cfgfile, char *weightfile, char *filename, float thresh,
    float hier_thresh, int dont_show, int ext_output, int save_labels, char *outfile, int letter_box, int benchmark_layers)
{

	// 从指定数据文件datacfg(.data文件)中读入数据信息(测试、训练数据信息)到options中
	// options是list类型数据,其中的node包含的void指针具体是kvp数据类型,具有键值和值(类似C++中的Map)
    list *options = read_data_cfg(datacfg);
	// 获取数据集的名称(包括路径),第二个参数"names"表明要从options中获取所用数据集的名称信息(如names = data/coco.names)
    char *name_list = option_find_str(options, "names", "data/names.list");
    int names_size = 0;
	// 从data/**.names中读取物体名称/标签信息
    char **names = get_labels_custom(name_list, &names_size); //get_labels(name_list);

    // 加载data/labels/文件夹中所有的字符标签图片
    image **alphabet = load_alphabet();

    network net = parse_network_cfg_custom(cfgfile, 1, 1); // set batch=1  配置各网络层参数,重要
在parser.c中的parse_network_cfg_custom函数中,根据yolov3-tiny.cfg文件对网络结构进行配置,明确各层网络的类型、输入输出通道数、图像尺寸、卷积核大小等。
//配置各网络层参数
network parse_network_cfg_custom(char *filename, int batch, int time_steps)
{

	// 从神经网络结构参数文件中读入所有神经网络层的结构参数,存储到sections中,
	// sections的每个node包含一层神经网络的所有结构参数
    list *sections = read_cfg(filename);
	// 获取sections的第一个节点,可以查看一下cfg/***.cfg文件,其实第一块参数(以[net]开头)不是某层神经网络的参数,
	// 而是关于整个网络的一些通用参数,比如学习率,衰减率,输入图像宽高,batch大小等,
	// 具体的关于某个网络层的参数是从第二块开始的,如[convolutional],[maxpool]...,
	// 这些层并没有编号,只说明了层的属性,但层的参数都是按顺序在文件中排好的,读入时,
	// sections链表上的顺序就是文件中的排列顺序。
    node *n = sections->front;
    if(!n) error("Config file has no sections");
	// 创建网络结构并动态分配内存:输入网络层数为sections->size - 1,sections的第一段不是网络层,而是通用网络参数
    network net = make_network(sections->size - 1);
	// 所用显卡的卡号(gpu_index在cuda.c中用extern关键字声明)
	// 在调用parse_network_cfg()之前,使用了cuda_set_device()设置了gpu_index的值号为当前活跃GPU卡号
    net.gpu_index = gpu_index;
	// size_params结构体元素不含指针变量
    size_params params;

    if (batch > 0) params.train = 0;    // allocates memory for Detection only
    else params.train = 1;              // allocates memory for Detection & Training

    section *s = (section *)n->val;
    list *options = s->options;
    if(!is_network(s)) error("First section must be [net] or [network]");
    parse_net_options(options, &net);

#ifdef GPU
    printf("net.optimized_memory = %d \n", net.optimized_memory);
    if (net.optimized_memory >= 2 && params.train) {

        pre_allocate_pinned_memory((size_t)1024 * 1024 * 1024 * 8);   // pre-allocate 8 GB CPU-RAM for pinned memory
    }
#endif  // GPU

    params.h = net.h;
    params.w = net.w;
    params.c = net.c;
    params.inputs = net.inputs;
    if (batch > 0) net.batch = batch;
    if (time_steps > 0) net.time_steps = time_steps;
    if (net.batch < 1) net.batch = 1;
    if (net.time_steps < 1) net.time_steps = 1;
    if (net.batch < net.time_steps) net.batch = net.time_steps;
    params.batch = net.batch;
    params.time_steps = net.time_steps;
    params.net = net;
    printf("mini_batch = %d, batch = %d, time_steps = %d, train = %d \n", net.batch, net.batch * net.subdivisions, net.time_steps, params.train);

    int avg_outputs = 0;
    float bflops = 0;
    size_t workspace_size = 0;
    size_t max_inputs = 0;
    size_t max_outputs = 0;
    n = n->next;
    int count = 0;
    free_section(s);

	// 此处stderr不是错误提示,而是输出结果提示,提示网络结构
    fprintf(stderr, "   layer   filters  size/strd(dil)      input                output\n");
    while(n){

        params.index = count;
        fprintf(stderr, "%4d ", count);
        s = (section *)n->val;
        options = s->options;
		// 定义网络层
        layer l = {
     (LAYER_TYPE)0 };
		// 获取网络层的类别

        LAYER_TYPE lt = string_to_layer_type(s->type);

		//通过读取网络类型,从而配置各网络层的参数
        if(lt == CONVOLUTIONAL){
    //yolov3-tiny  卷积层  13层
            l = parse_convolutional(options, params);
        }else if(lt == LOCAL){

            l = parse_local(options, params);
        }else if(lt == ACTIVE){

            l = parse_activation(options, params);
        }else if(lt == RNN){

            l = parse_rnn(options, params);
        }else if(lt == GRU){

            l = parse_gru(options, params);
        }else if(lt == LSTM){

            l = parse_lstm(options, params);
        }else if (lt == CONV_LSTM) {

            l = parse_conv_lstm(options, params);
        }else if(lt == CRNN){

            l = parse_crnn(options, params);
        }else if(lt == CONNECTED){

            l = parse_connected(options, params);
        }else if(lt == CROP){

            l = parse_crop(options, params);
        }else if(lt == COST){

            l = parse_cost(options, params);
            l.keep_delta_gpu = 1;
        }else if(lt == REGION){

            l = parse_region(options, params);
            l.keep_delta_gpu = 1;
        }else if (lt == YOLO) {
    //yolov3-tiny YOLO层  两层
            l = parse_yolo(options, params);
            l.keep_delta_gpu = 1;
        }else if (lt == GAUSSIAN_YOLO) {

            l = parse_gaussian_yolo(options, params);
            l.keep_delta_gpu = 1;
        }else if(lt == DETECTION){

            l = parse_detection(options, params);
        }else if(lt == SOFTMAX){

            l = parse_softmax(options, params);
            net.hierarchy = l.softmax_tree;
            l.keep_delta_gpu = 1;
        }else if(lt == NORMALIZATION){

            l = parse_normalization(options, params);
        }else if(lt == BATCHNORM){

            l = parse_batchnorm(options, params);
        }else if(lt == MAXPOOL){
    //yolov3-tiny 池化层 maxpool  6层
            l = parse_maxpool(options, params);
        }else if (lt == LOCAL_AVGPOOL) {

            l = parse_local_avgpool(options, params);
        }else if(lt == REORG){

            l = parse_reorg(options, params);        }
        else if (lt == REORG_OLD) {

            l = parse_reorg_old(options, params);
        }else if(lt == AVGPOOL){

            l = parse_avgpool(options, params);
        }else if(lt == ROUTE){
    //yolov3-tiny 路由层 2层
            l = parse_route(options, params);
            int k;
            for (k = 0; k < l.n; ++k) {

                net.layers[l.input_layers[k]].use_bin_output = 0;
                net.layers[l.input_layers[k]].keep_delta_gpu = 1;
            }
        }else if (lt == UPSAMPLE) {
    //yolov3-tiny 上采样层 1层
            l = parse_upsample(options, params, net);
        }else if(lt == SHORTCUT){

            l = parse_shortcut(options, params, net);
            net.layers[count - 1].use_bin_output = 0;
            net.layers[l.index].use_bin_output = 0;
            net.layers[l.index].keep_delta_gpu = 1;
        }else if (lt == SCALE_CHANNELS) {

            l = parse_scale_channels(options, params, net);
            net.layers[count - 1].use_bin_output = 0;
            net.layers[l.index].use_bin_output = 0;
            net.layers[l.index].keep_delta_gpu = 1;
        }
        else if (lt == SAM) {

            l = parse_sam(options, params, net);
            net.layers[count - 1].use_bin_output = 0;
            net.layers[l.index].use_bin_output = 0;
            net.layers[l.index].keep_delta_gpu = 1;
        }else if(lt == DROPOUT){

            l = parse_dropout(options, params);
            l.output = net.layers[count-1].output;
            l.delta = net.layers[count-1].delta;
            .........
下载权重文件
在parser.c的load_weights_upto中,根据卷积层的网络配置,开始下载读取各层的权重文件。
//读取权重文件函数
void load_weights_upto(network *net, char *filename, int cutoff)//cutoff = net->n
{

#ifdef GPU
    if(net->gpu_index >= 0){

        cuda_set_device(net->gpu_index);
    }
#endif
    fprintf(stderr, "Loading weights from %s...\n", filename);
    fflush(stdout);
    FILE *fp = fopen(filename, "rb");
    if(!fp) file_error(filename);

    int major;
    int minor;
    int revision;
    fread(&major, sizeof(int), 1, fp);//读取一个4字节的数据
    fread(&minor, sizeof(int), 1, fp);//读取一个4字节的数据
    fread(&revision, sizeof(int), 1, fp);//读取一个4字节的数据
	printf("the size of int in x64 is %d bytes,attention!!!\n", sizeof(int));//x86 x64: 4
	printf("major ,minor,revision of weight is %d, %d ,%d\n", major, minor, revision);//0.2.0
    if ((major * 10 + minor) >= 2) {
    //运行这一部分
        printf("\n seen 64");
        uint64_t iseen = 0;
        fread(&iseen, sizeof(uint64_t), 1, fp);//读取一个8字节的数据
		printf("the size of uint64_t is %d\n", sizeof(uint64_t));
        *net->seen = iseen;
    }
    else {

        printf("\n seen 32");
        uint32_t iseen = 0;
        fread(&iseen, sizeof(uint32_t), 1, fp);
        *net->seen = iseen;
    }
    *net->cur_iteration = get_current_batch(*net);
    printf(", trained: %.0f K-images (%.0f Kilo-batches_64) \n", (float)(*net->seen / 1000), (float)(*net->seen / 64000));
    int transpose = (major > 1000) || (minor > 1000);

    int i;
    for(i = 0; i < net->n && i < cutoff; ++i){
    //cutoff = net->n
        layer l = net->layers[i];
        if (l.dontload) continue;//always 0		跳过之后的循环体,直接运行++i
        if(l.type == CONVOLUTIONAL && l.share_layer == NULL){
     //只运行这一个分支的代码
            load_convolutional_weights(l, fp);
			//printf("network layer [%d] is CONVOLUTIONAL \n",i);
        }
        .......
在读取yolov3-tiny各层权重文件前,先读取4个和训练有关的参数:major,minor, revision和iseen。在前向传播的工程当中,并没有实际的应用。
parser.c中的load_convolutional_weights函数,具体执行对yolov3-tiny权重文件的下载,包括节点参数weight,偏置参数bias和批量归一化参数BN。
void load_convolutional_weights(layer l, FILE *fp)
{

	static int flipped_num;
    if(l.binary){

        //load_convolutional_weights_binary(l, fp);
        //return;
    }
    int num = l.nweights;
	//int num = l.n*l.c*l.size*l.size;//l.n 输出的层数 l.c输入的层数
    int read_bytes;
    read_bytes = fread(l.biases, sizeof(float), l.n, fp);//读取偏置参数 l.n个float数据
    if (read_bytes > 0 && read_bytes < l.n) printf("\n Warning: Unexpected end of wights-file! l.biases - l.index = %d \n", l.index);
    //fread(l.weights, sizeof(float), num, fp); // as in connected layer
    if (l.batch_normalize && (!l.dontloadscales)){

        read_bytes = fread(l.scales, sizeof(float), l.n, fp);//读取batch normalize 参数  l.n个float数据
        if (read_bytes > 0 && read_bytes < l.n) printf("\n Warning: Unexpected end of wights-file! l.scales - l.index = %d \n", l.index);
        read_bytes = fread(l.rolling_mean, sizeof(float), l.n, fp);//读取batch normalize 参数  l.n个float数据
        if (read_bytes > 0 && read_bytes < l.n) printf("\n Warning: Unexpected end of wights-file! l.rolling_mean - l.index = %d \n", l.index);
        read_bytes = fread(l.rolling_variance, sizeof(float), l.n, fp);//读取batch normalize 参数  l.n个float数据
        if (read_bytes > 0 && read_bytes < l.n) printf("\n Warning: Unexpected end of wights-file! l.rolling_variance - l.index = %d \n", l.index);
将权重参数批量归一化
yolov3-tiny每个卷积层之后,激活函数之前,都要对结果进行Batch Normalization: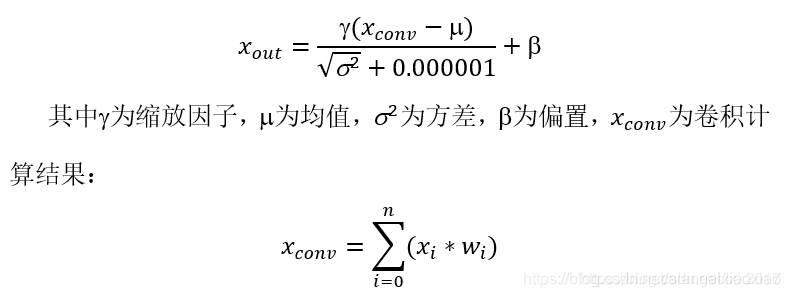
由于BN层和卷积操作都是线性的,将权重文件进行批量归一化,可以代替卷积层之后的BN层:
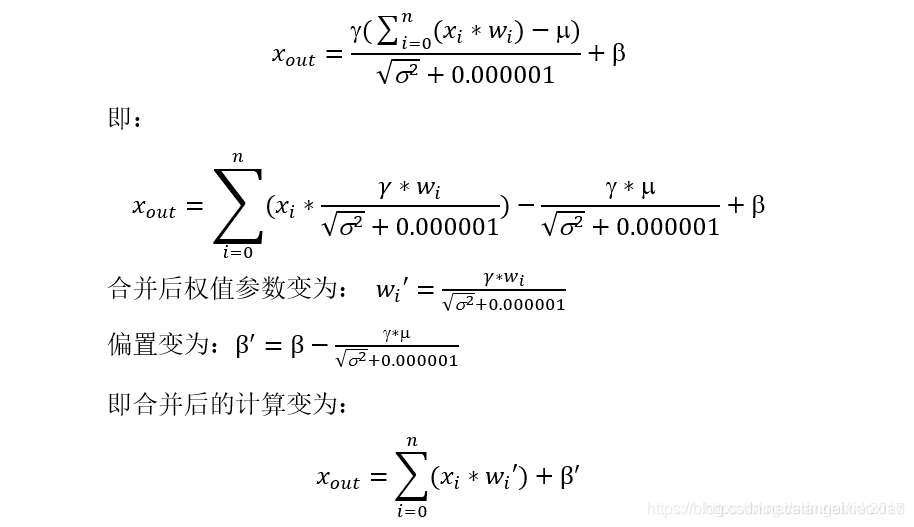
在network.c的fuse_conv_batchnorm函数中实现权重文件和BN层的合并。
void fuse_conv_batchnorm(network net)
{

    int j;
    for (j = 0; j < net.n; ++j) {

        layer *l = &net.layers[j];
		    // printf("the %d layer batch_normalize is %d,   groups is %d \n", j, l->batch_normalize, l->groups);
        if (l->type == CONVOLUTIONAL) {
     //只运行这一分支   合并卷积层和batch_normal
             //printf(" Merges Convolutional-%d and batch_norm \n", j);

            if (l->share_layer != NULL) {
    //l->share_layer always is 0,不运行这个分支
                l->batch_normalize = 0;
            }

            if (l->batch_normalize) {
    //#15,22层卷积,卷积之后没有batch normalize,其他都要运行这一分支
                int f;
                for (f = 0; f < l->n; ++f)//该层神经网络 1->n 个输出层权重
                {

                    l->biases[f] = l->biases[f] - (double)l->scales[f] * l->rolling_mean[f] / (sqrt((double)l->rolling_variance[f] + .00001));

                    const size_t filter_size = l->size*l->size*l->c / l->groups;//kernel_size * kernel_size * c/分组  l->groups存在于卷积层always is 1
                    int i;
                    for (i = 0; i < filter_size; ++i) {

                        int w_index = f*filter_size + i;

                        l->weights[w_index] = (double)l->weights[w_index] * l->scales[f] / (sqrt((double)l->rolling_variance[f] + .00001));
                    }
                }

                free_convolutional_batchnorm(l);//no use
                l->batch_normalize = 0;
                ......
输入图像
yolov3-tiny输入神经网络的图像尺寸为416x416,对不符合该尺寸的图像,要进行裁剪。在image.c的resize_image函数中完成。这个可以说是整个yolo算法对输入图像唯一进行预处理的地方了。这也是yolo算法在工程应用中极好的地方,没有那么多类似于降噪、滤波之类的预处理,直接送到网络里就完事了。
//im:输入图片  w:416 h:416
//函数作用:将输入图片热size到416x416的尺寸,基本按照缩放/扩大的策略
image resize_image(image im, int w, int h)
{

    if (im.w == w && im.h == h) return copy_image(im);

    image resized = make_image(w, h, im.c);//416 x 416 x 3空的地址空间
    image part = make_image(w, im.h, im.c);//416 x im.h x im.c空的地址空间
    int r, c, k;
    float w_scale = (float)(im.w - 1) / (w - 1);//宽度缩放因子
    float h_scale = (float)(im.h - 1) / (h - 1);//高度缩放因子
    for(k = 0; k < im.c; ++k){

        for(r = 0; r < im.h; ++r){

            for(c = 0; c < w; ++c){
    //416
                float val = 0;
                if(c == w-1 || im.w == 1){
    //c =415 最后一列
                    val = get_pixel(im, im.w-1, r, k);//取原图片最后一列的像素
                } else {

                    float sx = c*w_scale;
                    int ix = (int) sx;
                    float dx = sx - ix;
                    val = (1 - dx) * get_pixel(im, ix, r, k) + dx * get_pixel(im, ix+1, r, k);
                }
                set_pixel(part, c, r, k, val);
            }
        }
    }
    for(k = 0; k < im.c; ++k){

        for(r = 0; r < h; ++r){

            float sy = r*h_scale;
            int iy = (int) sy;
            float dy = sy - iy;
            for(c = 0; c < w; ++c){

                float val = (1-dy) * get_pixel(part, c, iy, k);
                set_pixel(resized, c, r, k, val);
            }
            if(r == h-1 || im.h == 1) continue;
            for(c = 0; c < w; ++c){

                float val = dy * get_pixel(part, c, iy+1, k);
                add_pixel(resized, c, r, k, val);
            }
        }
    }

    free_image(part);
    return resized;
}
前向传播网络
network.c中的forward_network函数是整个神经网络的核心部分,各层的网络都在函数指针l.forward(l, state)中完成。
void forward_network(network net, network_state state)
{

    state.workspace = net.workspace;
    int i;
	   /// 遍历所有层,从第一层到最后一层,逐层进行前向传播(网络总共有net.n层)
    for(i = 0; i < net.n; ++i){

        state.index = i;/// 置网络当前活跃层为当前层,即第i层
        layer l = net.layers[i];/// 获取当前层
        if(l.delta && state.train){
    //不执行此分支的代码
			/// 如果当前层的l.delta已经动态分配了内存,则调用fill_cpu()函数,将其所有元素的值初始化为0
            scal_cpu(l.outputs * l.batch, 0, l.delta, 1);/// 第一个参数为l.delta的元素个数,第二个参数为初始化值,为0
			printf("forward_network scal_cpu of %d layer done!\n ", i);
        }
           //double time = get_time_point();
		l.forward(l, state);//进行卷积运算,激活函数,池化运算/
		   //if layer_type = convolutional ;   l.forward = forward_convolutional_layer;
		   //if layer_type = maxpool           l.forward = forward_maxpool_layer;
		   //if layer_type = yolo              l.forward = forward_yolo_layer;
		   //if layer_type = ROUTE             l.forward = forward_route_layer;其实就是数据的复制和搬移
		   //if layer_type = upsample          l.forward = forward_upsample_layer;;
           //printf("%d - Predicted in %lf milli-seconds.\n", i, ((double)get_time_point() - time) / 1000);
		   /// 完成某一层的推理时,置网络的输入为当前层的输出(这将成为下一层网络的输入),要注意的是,此处是直接更改指针变量net.input本身的值,
		   /// 也就是此处是通过改变指针net.input所指的地址来改变其中所存内容的值,并不是直接改变其所指的内容而指针所指的地址没变,
		   /// 所以在退出forward_network()函数后,其对net.input的改变都将失效,net.input将回到进入forward_network()之前时的值。
		   ......
卷积层[convolution]
卷积层在convolutional_layer.c中的forward_convolutional_layer函数实现。
void forward_convolutional_layer(convolutional_layer l, network_state state)
{


	int out_h = convolutional_out_height(l);//获得本层卷积层输出特征图的高、宽
    int out_w = convolutional_out_width(l);
    int i, j;

	// l.outputs = l.out_h * l.out_w * l.out_c在make各网络层函数中赋值(比如make_convolutional_layer()),
	// 对应每张输入图片的所有输出特征图的总元素个数(每张输入图片会得到n也即l.out_c张特征图)
	// 初始化输出l.output全为0.0;输入l.outputs*l.batch为输出的总元素个数,其中l.outputs为batch
	// 中一个输入对应的输出的所有元素的个数,l.batch为一个batch输入包含的图片张数;0表示初始化所有输出为0;
    fill_cpu(l.outputs*l.batch, 0, l.output, 1);//将地址l.output,l.outputs*l.batch个float地址空间的数据初始化0
    .......
作者在进行卷积运算前,将输入特征图进行重新排序:
```c
void im2col_cpu(float* data_im,
     int channels,  int height,  int width,
     int ksize,  int stride, int pad, float* data_col)
{

    int c,h,w;
	// 计算该层神经网络的输出图像尺寸(其实没有必要再次计算的,因为在构建卷积层时,make_convolutional_layer()函数
	// 已经调用convolutional_out_width(),convolutional_out_height()函数求取了这两个参数,
	// 此处直接使用l.out_h,l.out_w即可,函数参数只要传入该层网络指针就可了,没必要弄这么多参数)
    int height_col = (height + 2*pad - ksize) / stride + 1;
    int width_col = (width + 2*pad - ksize) / stride + 1;

	/// 卷积核大小:ksize*ksize是一个卷积核的大小,之所以乘以通道数channels,是因为输入图像有多通道,每个卷积核在做卷积时,
	/// 是同时对同一位置处多通道的图像进行卷积运算,这里为了实现这一目的,将三通道上的卷积核并在一起以便进行计算,因此卷积核
	/// 实际上并不是二维的,而是三维的,比如对于3通道图像,卷积核尺寸为3*3,该卷积核将同时作用于三通道图像上,这样并起来就得
	/// 到含有27个元素的卷积核,且这27个元素都是独立的需要训练的参数。所以在计算训练参数个数时,一定要注意每一个卷积核的实际
	/// 训练参数需要乘以输入通道数。
    int channels_col = channels * ksize * ksize;//输入通道
	// 外循环次数为一个卷积核的尺寸数,循环次数即为最终得到的data_col的总行数
    for (c = 0; c < channels_col; ++c) {


		//行,列偏置都是对应着本次循环要操作的输出位置的像素而言的,通道偏置,是该位置像素所在的输出通道的绝对位置(通道数)

		// 列偏移,卷积核是一个二维矩阵,并按行存储在一维数组中,利用求余运算获取对应在卷积核中的列数,比如对于
		// 3*3的卷积核(3通道),当c=0时,显然在第一列,当c=5时,显然在第2列,当c=9时,在第二通道上的卷积核的第一列,
		// 当c=26时,在第三列(第三输入通道上)
        int w_offset = c % ksize;//0,1,2
		// 行偏移,卷积核是一个二维的矩阵,且是按行(卷积核所有行并成一行)存储在一维数组中的,
		// 比如对于3*3的卷积核,处理3通道的图像,那么一个卷积核具有27个元素,每9个元素对应一个通道上的卷积核(互为一样),
		// 每当c为3的倍数,就意味着卷积核换了一行,h_offset取值为0,1,2,对应3*3卷积核中的第1, 2, 3行
        int h_offset = (c / ksize) % ksize;//0,1,2
		// 通道偏移,channels_col是多通道的卷积核并在一起的,比如对于3通道,3*3卷积核,每过9个元素就要换一通道数,
		// 当c=0~8时,c_im=0;c=9~17时,c_im=1;c=18~26时,c_im=2,操作对象是排序后的像素位置
        int c_im = c / ksize / ksize;
		// 中循环次数等于该层输出图像行数height_col,说明data_col中的每一行存储了一张特征图,这张特征图又是按行存储在data_col中的某行中
        for (h = 0; h < height_col; ++h) {

			// 内循环等于该层输出图像列数width_col,说明最终得到的data_col总有channels_col行,height_col*width_col列
            for (w = 0; w < width_col; ++w) {

				// 由上面可知,对于3*3的卷积核,行偏置h_offset取值为0,1,2,当h_offset=0时,会提取出所有与卷积核第一行元素进行运算的像素,
				// 依次类推;加上h*stride是对卷积核进行行移位操作,比如卷积核从图像(0,0)位置开始做卷积,那么最先开始涉及(0,0)~(3,3)
				// 之间的像素值,若stride=2,那么卷积核进行一次行移位时,下一行的卷积操作是从元素(2,0)(2为图像行号,0为列号)开始
                int im_row = h_offset + h * stride;//yolov3-tiny stride = 1
				// 对于3*3的卷积核,w_offset取值也为0,1,2,当w_offset取1时,会提取出所有与卷积核中第2列元素进行运算的像素,
				// 实际在做卷积操作时,卷积核对图像逐行扫描做卷积,加上w*stride就是为了做列移位,
				// 比如前一次卷积其实像素元素为(0,0),若stride=2,那么下次卷积元素起始像素位置为(0,2)(0为行号,2为列号)
                int im_col = w_offset + w * stride;
				// col_index为重排后图像中的像素索引,等于c * height_col * width_col + h * width_col +w(还是按行存储,所有通道再并成一行),
				// 对应第c通道,h行,w列的元素
                int col_index = (c * height_col + h) * width_col + w;//将重排后的图片像素,按照左上->右下的顺序,计算一维索引

				//im_col + width*im_row +  width*height*channel 重排前的特征图在内存中的位置索引
				// im2col_get_pixel函数获取输入图像data_im中第c_im通道,im_row,im_col的像素值并赋值给重排后的图像,
				// height和width为输入图像data_im的真实高、宽,pad为四周补0的长度(注意im_row,im_col是补0之后的行列号,
				// 不是真实输入图像中的行列号,因此需要减去pad获取真实的行列号)
                data_col[col_index] = im2col_get_pixel(data_im, height, width, channels,
                        im_row, im_col, c_im, pad);
				// return data_im[im_col + width*im_row +  width*height*channel)];
            }
        }
    }
}
通过gemm进行卷积乘加操作,通过add_bias添加偏置。
//进行卷积的乘加运算,没有bias偏置参数参与运算;
gemm(0, 0, m, n, k, 1, a, k, b, n, 1, c, n);

add_bias(l.output, l.biases, l.batch, l.n, out_h*out_w);//每个输出特征图的元素都加上对应通道的偏置参数
池化层[maxpool]
maxpool_layer.c中的forward_maxpool_layer函数完成池化操作。yolov3-tiny保留了池化层,并使用最大值池化,将尺寸为2x2的核中最大值保留下来。
void forward_maxpool_layer_avx(float *src, float *dst, int *indexes, int size, int w, int h, int out_w, int out_h, int c,
    int pad, int stride, int batch)
{


    const int w_offset = -pad / 2;
    const int h_offset = -pad / 2;
    int b, k;

    for (b = 0; b < batch; ++b) {

		// 对于每张输入图片,将得到通道数一样的输出图,以输出图为基准,按输出图通道,行,列依次遍历
		// (这对应图像在l.output的存储方式,每张图片按行铺排成一大行,然后图片与图片之间再并成一行)。
		// 以输出图为基准进行遍历,最终循环的总次数刚好覆盖池化核在输入图片不同位置进行池化操作。
        #pragma omp parallel for
        for (k = 0; k < c; ++k) {

            int i, j, m, n;
            for (i = 0; i < out_h; ++i) {

                //for (j = 0; j < out_w; ++j) {

                j = 0;
                for (; j < out_w; ++j) {

					// out_index为输出图中的索引
                    int out_index = j + out_w*(i + out_h*(k + c*b));//j + out_w * i + out_w * iout_h * k
                    float max = -FLT_MAX;// FLT_MAX为c语言中float.h定义的对大浮点数,此处初始化最大元素值为最小浮点数
                    int max_i = -1;// 最大元素值的索引初始化为-1
                    // 下面两个循环回到了输入图片,计算得到的cur_h以及cur_w都是在当前层所有输入元素的索引,内外循环的目的是找寻输入图像中,
                    // 以(h_offset + i*l.stride, w_offset + j*l.stride)为左上起点,尺寸为l.size池化区域中的最大元素值max及其在所有输入元素中的索引max_i
                    for (n = 0; n < size; ++n) {
    //2
                        for (m = 0; m < size; ++m) {
    //2
                            // cur_h,cur_w是在所有输入图像中第k通道中的cur_h行与cur_w列,index是在所有输入图像元素中的总索引。
                            // 为什么这里少一层对输入通道数的遍历循环呢?因为对于最大池化层来说输入与输出通道数是一样的,并在上面的通道数循环了!
                            int cur_h = h_offset + i*stride + n;
                            int cur_w = w_offset + j*stride + m;
                            int index = cur_w + w*(cur_h + h*(k + b*c));
							// 边界检查:正常情况下,是不会越界的,但是如果有补0操作,就会越界了,这里的处理方式是直接让这些元素值为-FLT_MAX
							// (注意虽然称之为补0操作,但实际不是补0),总之,这些补的元素永远不会充当最大元素值。
                            int valid = (cur_h >= 0 && cur_h < h &&
                                cur_w >= 0 && cur_w < w);
                            float val = (valid != 0) ? src[index] : -FLT_MAX;
							// 记录这个池化区域中的最大的元素值及其在所有输入元素中的总索引
                            max_i = (val > max) ? index : max_i;
                            max = (val > max) ? val : max;
                        }
                    }
					// 由此得到最大池化层每一个输出元素值及其在所有输入元素中的总索引。
					// 为什么需要记录每个输出元素值对应在输入元素中的总索引呢?因为在下面的反向过程中需要用到,在计算当前最大池化层上一层网络的敏感度时,
					// 需要该索引明确当前层的每个元素究竟是取上一层输出(也即上前层输入)的哪一个元素的值,具体见下面backward_maxpool_layer()函数的注释。
                    dst[out_index] = max;
                    if (indexes) indexes[out_index] = max_i;
                }
            }
        }
    }
}
路由层[route]
yolov3-tiny中共有两层路由层。第17层路由层(从0层开始),其实直接将第13层网络的输出结果输入。第20层路由层,将第19层和第8层网络结果合并在一起,19层在前,8层在后。在route_layer.c中的forward_route_layer函数中实现。
void forward_route_layer(const route_layer l, network_state state)
{

    int i, j;
    int offset = 0;
    for(i = 0; i < l.n; ++i){
    //l.n:  卷积层:输出特征图通道数 路由层:有几层网络层输入本层  17层:1(路由第13层)   20:2(路由第19、8层)
        int index = l.input_layers[i];//输入本网络层的网络层的索引:如13,19,8
        float *input = state.net.layers[index].output;//输入等于 之前网络层索引值得输出(.output)
        int input_size = l.input_sizes[i];//输入的网络层的数据量
        int part_input_size = input_size / l.groups;//未分组
        for(j = 0; j < l.batch; ++j){

            //copy_cpu(input_size, input + j*input_size, 1, l.output + offset + j*l.outputs, 1);
			//从首地址input处复制input_size 个数据到 l.output中
            copy_cpu(part_input_size, input + j*input_size + part_input_size*l.group_id, 1, l.output + offset + j*l.outputs, 1);//l.group_id = 0
			//其实就是copy_cpu(part_input_size, input, 1, l.output + offset, 1);
        }
        //offset += input_size;
        offset += part_input_size;
    }
}
上采样层[upsample]
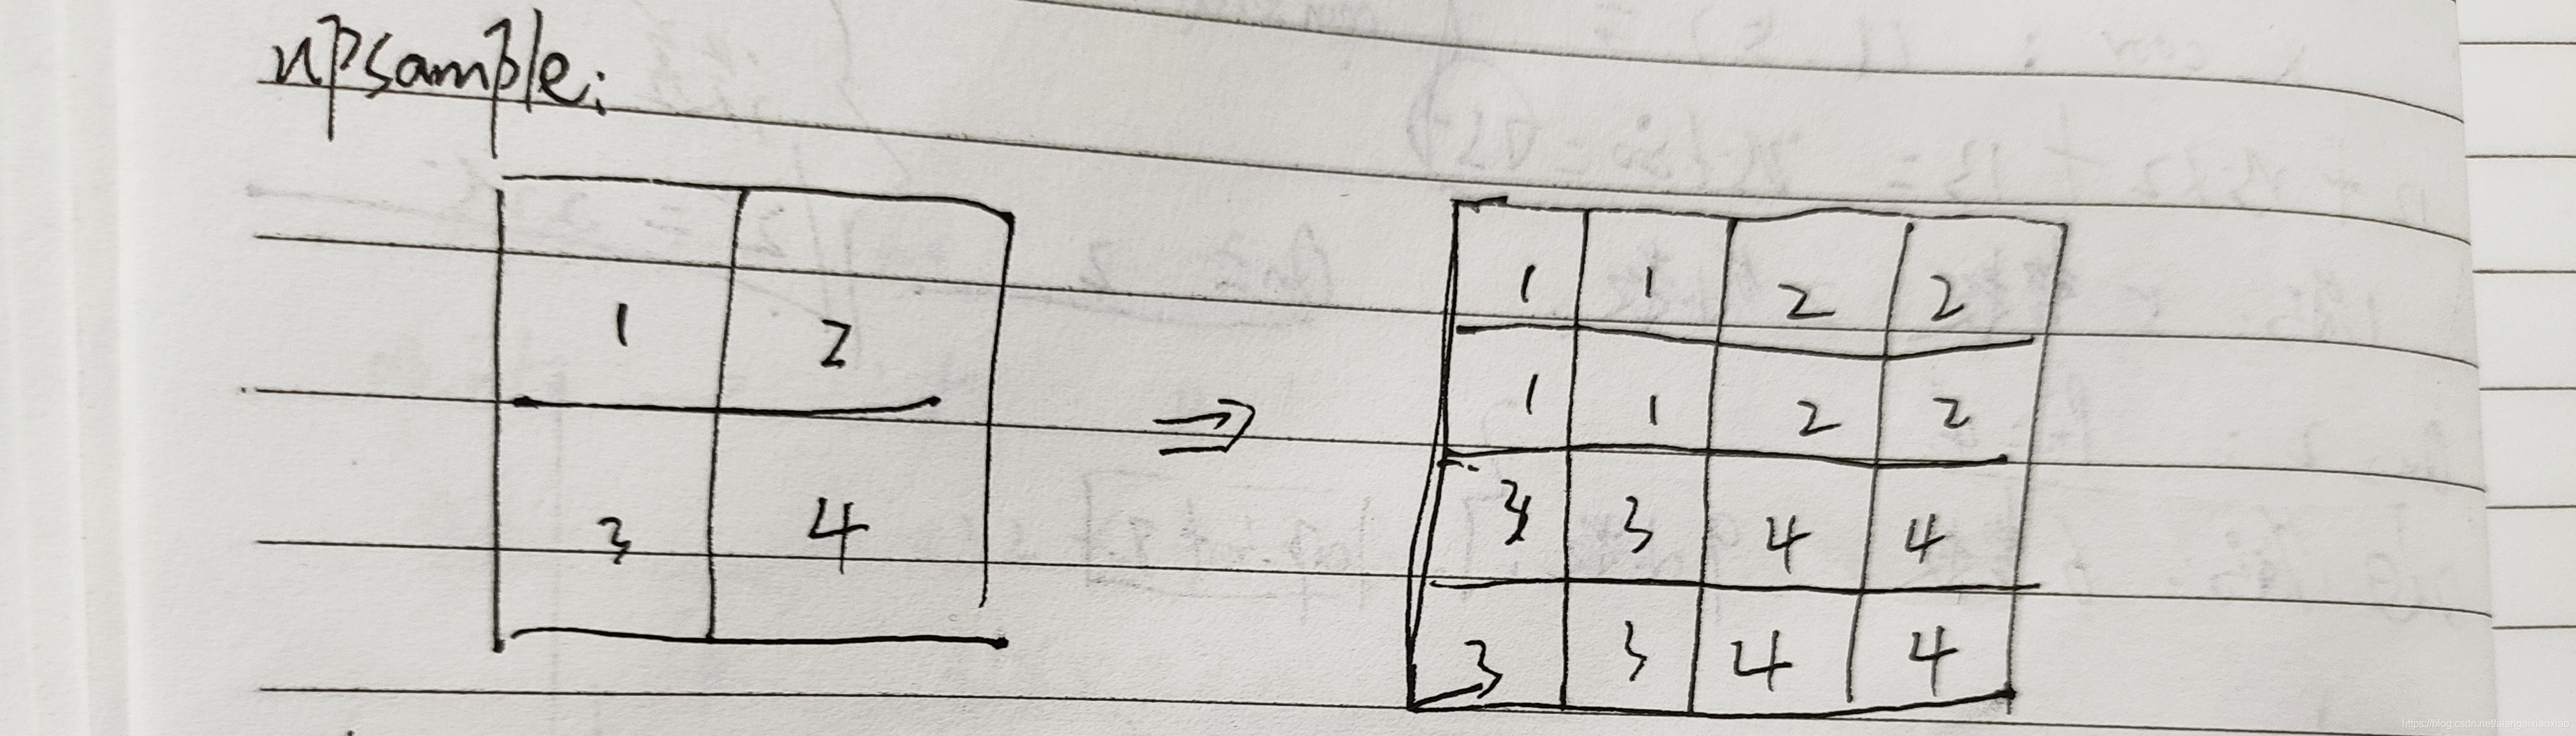
yolov3-tiny中第19层是上采样层,将18层13x13x128的输入特征图转变为26x26x128的输出特征图。在upsample_layer.c中的forward_upsample_layer函数中完成。
void upsample_cpu(float *in, int w, int h, int c, int batch, int stride, int forward, float scale, float *out)
{


    int i, j, k, b;
    for (b = 0; b < batch; ++b) {

        for (k = 0; k < c; ++k) {

            for (j = 0; j < h*stride; ++j) {

                for (i = 0; i < w*stride; ++i) {

                    int in_index = b*w*h*c + k*w*h + (j / stride)*w + i / stride;
                    int out_index = b*w*h*c*stride*stride + k*w*h*stride*stride + j*w*stride + i;
                    if (forward) out[out_index] = scale*in[in_index];
                    else in[in_index] += scale*out[out_index];
                }
            }
        }
    }
}
上采样效果:
输出层[yolo]
yolo层完成了对13x13x255和26x26x255输入特诊图的logistic逻辑回归计算。每个box的预测宽度和高度不参与逻辑回归,在yolo_layer.c中的forward_yolo_layer函数中完成。
//两个yolo层 只对数据进行了logistic处理,并没有预测box的位置
//将0-1通道(x,y) 4-84(confidence+class)计算logistic,三个prior(预测框都是这样)
void forward_yolo_layer(const layer l, network_state state)
{

    int i, j, b, t, n;
	//从state.input复制数据到l.output
    memcpy(l.output, state.input, l.outputs*l.batch * sizeof(float));

#ifndef GPU
	printf("yolo v3 tiny l.n and l.batch of yolo layer is %d and %d  \n ",l.n,l.batch);
    for (b = 0; b < l.batch; ++b) {
    //l.batch = 1
        for (n = 0; n < l.n; ++n) {
    //l.n:3(yolo层)mask 0,1,2  表示每个网络单元预测三个box?

			//printf("l.coords is %d in yolov3 tiny yolo layer ,l.scale_x_y is %f \n", l.coords, l.scale_x_y);
            // l.coords 坐标:0  l.classes分类数量:80   l.scale_x_y:1
			//l.w:输入特征图宽度 l.h输出特征图高度
			int index = entry_index(l, b, n*l.w*l.h, 0);//index = n*l.w*l.h*(4 + l.classes + 1)

		   //起始地址为:l.output + index 个数为:2 * l.w*l.h  计算逻辑回归值,并保存
            activate_array(l.output + index, 2 * l.w*l.h, LOGISTIC);  // x,y,

			//起始地址为:l.output + index 个数为:2 * l.w*l.h  计算方式为:x = x*l.scale_x_y + -0.5*(l.scale_x_y - 1) 简化后:x = x
			//yolov3-tiny l.scale_x_y = 1  实际上该函数没有参与任何的运算   scal_add_cpu
            scal_add_cpu(2 * l.w*l.h, l.scale_x_y, -0.5*(l.scale_x_y - 1), l.output + index, 1);    // scale x,y

			//
			index = entry_index(l, b, n*l.w*l.h, 4);//index = n*l.w*l.h*(4 + l.classes + 1)+ 4*l.w*l.h

			//起始地址为:l.output + index,个数为:(1+80)*l.w*l.h   计算器其逻辑回归值
			activate_array(l.output + index, (1 + l.classes)*l.w*l.h, LOGISTIC);
        }
    }
预测结果统计[detection ]
//w:输入图像宽度640,不一定是416 h:输入图像高度424,不一定是416  thresh:图像置信度阈值0.25   hier:0.5
//map:0   relative:1  num:0   letter:0
//函数作用:统计两个yolo层中 置信度大于阈值的box个数,并对这个box初始化一段地址空间 dets
//根据网络来填充该地址空间dets:
//根据yolo层 计算满足置信度阈值要求的box相对的预测坐标、宽度和高度,并将结果保存在dets[count].bbox结构体中
//每个box有80个类别,有一个置信度,该类别对应的可能性prob:class概率*置信度
///舍弃prob小于阈值0.25的box
//将满足阈值的box个数保存到num中
detection *get_network_boxes(network *net, int w, int h, float thresh, float hier, int *map, int relative, int *num, int letter)
{

	//printf("w、h、thresh、hier and letter is %d 、%d 、%f 、%f and %d\n", w, h, thresh, hier, letter);

	//函数作用:统计两个yolo层中 置信度大于阈值的box个数,并对这个box初始化一段地址空间 dets
	//将满足阈值的box个数保存到num中
    detection *dets = make_network_boxes(net, thresh, num);

	//根据网络来填充该地址空间dets:
	//根据yolo层 计算满足置信度阈值要求的box相对的预测坐标、宽度和高度,并将结果保存在dets[count].bbox结构体中
	//每个box有80个类别,有一个置信度,该类别对应的可能性prob:class概率*置信度
	///舍弃prob小于阈值0.25的box
    fill_network_boxes(net, w, h, thresh, hier, map, relative, dets, letter);
    return dets;
}
使用make_network_boxes来创建预测信息的指针变量:
// thresh:  置信度阈值
//num: 0
//函数作用:统计置信度大于阈值的box个数,并对这个box初始化一段地址空间
detection *make_network_boxes(network *net, float thresh, int *num)
{
    layer l = net->layers[net->n - 1];//应该是神经网络最后一层 net->n:24 最后一层yolo层
	//printf(" net->n  of network is %d\n " ,(net->n));
    int i;
	// -thresh 0.25
	//yolo层:yolov3-tiny中共有两层
	//三个prior预测框,对每个预测框中,置信度大于thresh 0.25,记为一次,将次数进行累加,并输出
	//nboxes:即为要保留的box的个数 两个yolo层中的置信度个数一起累加
    int nboxes = num_detections(net, thresh);//-thresh 0.25

	if (num) {
		printf("nbox = %d \n", num);
		*num = nboxes;//不执行该语句
	}
    //申请内存,个数为nboxes,每个内存大小为:sizeof(detection)
    detection* dets = (detection*)xcalloc(nboxes, sizeof(detection));

	//遍历每个box,每个dets.prob申请80个float类型的内存:
	//dets.uc,申请4个float类型的空间:位置信息
    for (i = 0; i < nboxes; ++i) {
        dets[i].prob = (float*)xcalloc(l.classes, sizeof(float));
        // tx,ty,tw,th uncertainty
        dets[i].uc = (float*)xcalloc(4, sizeof(float)); // Gaussian_YOLOv3

		if (l.coords > 4) {//不执行这个分支 l.coords:0
            dets[i].mask = (float*)xcalloc(l.coords - 4, sizeof(float));
        }
    }
    return dets;
}
使用get_yolo_detections来统计两层yolo层的预测信息:
//w,h:640,424    netw, neth:416,416 thresh:图像置信度阈值0.25   hier:0.5
//map:0   relative:1    letter:0
//根据yolo层 计算满足置信度阈值要求的box相对的预测坐标、宽度和高度,并将结果保存在dets[count].bbox结构体中
//每个box有80个类别,有一个置信度,该类别对应的可能性prob:class概率*置信度
///舍弃prob小于阈值0.25的box
int get_yolo_detections(layer l, int w, int h, int netw, int neth, float thresh, int *map, int relative, detection *dets, int letter)
{

    printf("\n l.batch = %d, l.w = %d, l.h = %d, l.n = %d ,netw = %d, neth = %d \n", l.batch, l.w, l.h, l.n, netw, neth);
    int i,j,n;
    float *predictions = l.output;//yolo层的输出
    // This snippet below is not necessary
    // Need to comment it in order to batch processing >= 2 images
    //if (l.batch == 2) avg_flipped_yolo(l);
    int count = 0;

	//printf("yolo layer l.mask[0] is %d, l.mask[1] is %d, l.mask[2] is %d\n", l.mask[0], l.mask[1], l.mask[2]);
	//printf("yolo layer l.biases[l.mask[0]*2] is %f, l.biases[l.mask[1]*2] is %f, l.biases[l.mask[2]*2] is %f\n", l.biases[l.mask[0] * 2], l.biases[l.mask[1] * 2], l.biases[l.mask[2] * 2]);
	//遍历yolo层
    for (i = 0; i < l.w*l.h; ++i){
    //该yolo层输出特征图的宽度、高度:13x13 26x26
        int row = i / l.w;
        int col = i % l.w;
        for(n = 0; n < l.n; ++n){
    //yolo层,l.n = 3

            //obj_index:置信度层索引
            int obj_index  = entry_index(l, 0, n*l.w*l.h + i, 4);//obj_index  = n*l.w*l.h*(4+l.classes+1) + 4*l.w*l.h + i;
            float objectness = predictions[obj_index];//获得对应的置信度
            //if(objectness <= thresh) continue;    // incorrect behavior for Nan values

			if (objectness > thresh) {
    //只有置信度大于阈值才开始执行该分支
                //printf("\n objectness = %f, thresh = %f, i = %d, n = %d \n", objectness, thresh, i, n);

				//box_index:yolo层每个像素点有三个box,表示每个box的索引值
				int box_index = entry_index(l, 0, n*l.w*l.h + i, 0);//box_index = n*l.w*l.h*(4+l.classes+1)+ i;

				//l.biases->偏置参数起始地址    l.mask[n]:分别为3,4,5,0,1,2,biases偏置参数偏移量
				//根据yolo层 计算满足置信度阈值要求的box相对的预测坐标、宽度和高度,并将结果保存在dets[count].bbox结构体中
                dets[count].bbox = get_yolo_box(predictions, l.biases, l.mask[n], box_index, col, row, l.w, l.h, netw, neth, l.w*l.h);

				//获取对应的置信度,该置信度经过了logistic
                dets[count].objectness = objectness;

				//获得分类数:80(int类型)
                dets[count].classes = l.classes;
                for (j = 0; j < l.classes; ++j) {

					//80个类别,每个类别对应的概率,class_index为其所在层的索引
                    int class_index = entry_index(l, 0, n*l.w*l.h + i, 4 + 1 + j);//class_index  = n*l.w*l.h*(4+l.classes+1) + (4+1+j)*l.w*l.h + i;
                    //每个box有80个类别,有一个置信度,该类别对应的可能性prob:class概率*置信度
					float prob = objectness*predictions[class_index];

					//舍弃prob小于阈值0.25的box
                    dets[count].prob[j] = (prob > thresh) ? prob : 0;
                }
                ++count;
            }
        }
    }
    correct_yolo_boxes(dets, count, w, h, netw, neth, relative, letter);
    return count;
}
非极大值抑制[NMS]
//dets:box结构体 nboxes:满足阈值的box个数   l.classe:80    thresh=0.45f
//两个box,同一类别进行非极大值抑制,遍历
void do_nms_sort(detection *dets, int total, int classes, float thresh)
{

    int i, j, k;
    k = total - 1;
    for (i = 0; i <= k; ++i) {
    //box个数
        if (dets[i].objectness == 0) {
    //置信度==0  不执行该分支,理论上没有objectness = 0
			printf("there is no objectness == 0 !!! \n");
            detection swap = dets[i];
            dets[i] = dets[k];
            dets[k] = swap;
            --k;
            --i;
        }
    }
    total = k + 1;
	//同一类别进行比较
    for (k = 0; k < classes; ++k) {
    //80个
        //box预测的类别
		for (i = 0; i < total; ++i) {
    //box个数
            dets[i].sort_class = k;
        }
		//函数作用:将prob较大的box排列到前面
        qsort(dets, total, sizeof(detection), nms_comparator_v3);
        for (i = 0; i < total; ++i) {
    //两个box,同一类别进行非极大值抑制
            //printf("  k = %d, \t i = %d \n", k, i);
            if (dets[i].prob[k] == 0) continue;
            box a = dets[i].bbox;
            for (j = i + 1; j < total;++j){

				box b = dets[j].bbox;
				if( box_iou(a, b) > thresh) dets[j].prob[k] = 0;
            }
        }
    }
}
智能推荐
《EROFS: A Compression-friendly Readonly File System for Resource-scarce Devices》_erofs 论文-程序员宅基地
这篇文章介绍了一种面向资源稀缺设备的压缩友好的只读文件系统EROFS,能显著减少存储空间使用,减少I/O放大和计算开销,并降低内存分配开销。
python计算机视觉编程——sift特征提取和ransac减少错配_python实现sift特征匹配及ransca误匹配剔除-程序员宅基地
文章浏览阅读5.8k次,点赞8次,收藏100次。SIFT算法运用演示一、什么是sift算法SIFT,即尺度不变特征变换(Scale-invariant feature transform,SIFT),是用于图像处理领域的一种描述。这种描述具有尺度不变性,可在图像中检测出关键点,是一种局部特征描述子。它是由David Lowe发明的。SIFT在2004年由Lowe完善并经受住了时间的考验。SIFT特征是基于物体上的一些局部外观的兴趣点而与影..._python实现sift特征匹配及ransca误匹配剔除
Visual Studio Code有哪些你常用的插件?_类似beautify插件-程序员宅基地
文章浏览阅读7.5k次。Java自学的网站(Java全栈工程师 | 以实例驱动学习 | how2j.cn)仅供参考:beautify,这款类似于vscode里格式化代码的功能,不错;Emoji,很好玩的一款插件,可以在代码中插入emoji了,也许是程序猿的娱乐方式吧;HTML Snippets,这款插件包含html标签,非常全,很实用;Can I Use,自动检测所写代码能否在相应容器正常编译执行;Java..._类似beautify插件
【AI】搭建Windows Linux子系统(WSL2)CUDA环境_wsl2 安装cuda-程序员宅基地
文章浏览阅读1.8k次,点赞40次,收藏20次。介绍Windows Linux子系统(WSL2)搭建CUDA运行环境的操作_wsl2 安装cuda
javascript中new的模拟实现_js new的实现-程序员宅基地
文章浏览阅读4.4k次,点赞4次,收藏6次。new 运算符创建一个用户定义的对象类型的实例或具有构造函数的内置对象的实例。语法:new constructor[([arguments])]那么什么是构造函数呢? 构造函数 constructor 是用于创建和初始化类中创建的一个对象的一种特殊方法。(1)我们来看一下new 和 constructor 的基本使用:function Person(name,ag..._js new的实现
Google《Android性能优化》学习笔记_intro and recap timestamps-程序员宅基地
文章浏览阅读1k次。http://www.csdn.net/article/2015-04-15/2824477-android-performance/1摘要:Google在Udacity上的《Android性能优化》在线课程详细介绍了该如何优化性能,这些课程是Google之前在Youtube上发布的Android性能优化典范专题课程的细化与补充。本文是对渲染、运算、内存、电量四个篇章的学习笔记。_intro and recap timestamps
随便推点
大电流dcdc降压芯片20a_基于MC34063芯片DC-DC(20-5)降压型变换电路-程序员宅基地
文章浏览阅读1.4k次。目录基于MC34063芯片的DC-DC(20/5)降压型变换电路.................................................................21引言......................................................................................................_dc电源芯片 20a
About Add DataRow-程序员宅基地
文章浏览阅读128次。当从一个表中将记录Copy到另一个结构相同的表中的时候,有两种方式:DataTable.ImportRow()或: DataTable.Rows.Add()正确的使用方法: dt1.ImportRow(dt.Rows[0]);或: dt1.Rows.Add(dt.Rows[0].ItemArray);不要使用:..._add data row
linux中-f的含义,linux 下shell中if的“-e,-d,-f”的含义-程序员宅基地
文章浏览阅读1.5w次,点赞4次,收藏55次。文件表达式-e filename 如果 filename存在,则为真-d filename 如果 filename为目录,则为真-f filename 如果 filename为常规文件,则为真-L filename 如果 filename为符号链接,则为真-r filename 如果 filename可读,则为真-w filename 如果 filename可写,则为真-x filename 如果..._-f
【JS】根据日期和给定的天数,计算日期的前几天或者后几天的日期时间_js计算某个日期多少天后的日期-程序员宅基地
文章浏览阅读301次。【代码】【JS】根据日期和给定的天数,计算日期的前几天或者后几天的日期时间。_js计算某个日期多少天后的日期
WebRTC-Android 源码导读(二):预览实现分析_surfaceviewrenderer-程序员宅基地
文章浏览阅读2.4k次,点赞2次,收藏5次。在本系列第一篇中,我们分析了 WebRTC-Android 相机采集的实现,本文中我们将分析预览的实现。有过一定相机开发经验的朋友可能会疑惑,预览还有什么好分析的,不是直接 camera.setPreviewDisplay 或者 camera.setPreviewTexture 就能在 SurfaceView/TextureView上预览了吗?实际上预览还有更高级的玩法,尤其是需要加上图像处理功能..._surfaceviewrenderer
Easyx-----c语言实现斗地主_easyx制作打牌-程序员宅基地
文章浏览阅读2.7k次,点赞28次,收藏88次。tools.hpp源.cpp_easyx制作打牌