macos上的ios虚拟机
I recently turned one of my posts into a SwiftUI app, and the process is very easy. My post was documentation for SwiftUI itself, so it was separated into segments for each of the Views and classes. In this tutorial, I will be referring to these as chapters, but what I’m really talking about is the different sections that will be displayed in the app. Obviously you can’t make an app out of just a single post without any interactivity or segmentation, so if your posts are all one long piece you might want to include multiple Medium posts with one post per chapter.
最近,我将自己的一篇文章变成了SwiftUI应用,该过程非常简单。 我的文章是SwiftUI本身的文档 ,因此将其分为每个View和类的各个部分。 在本教程中,我将这些章节称为章节,但我真正要谈论的是将在应用程序中显示的不同部分。 显然,如果没有任何交互性或细分,就不能仅凭单个帖子制作应用程序,因此,如果您的帖子都是一篇长篇文章,则您可能希望包括多篇中级帖子,每章一篇。
You actually don’t need to have a Medium post to make this app. It will display HTML from anywhere, I just give some specific instructions about extracting the HTML from a Medium post here so that you can follow in my footsteps. What we’re essentially creating here is a SwiftUI HTML reader, which isn’t really the same as a web app. After all, we have the ability to do whatever we want with SwiftUI, and HTML doesn’t (and shouldn’t) need to be a central component of our app’s functionality.
您实际上不需要发布中级帖子即可制作此应用。 它会在任何地方显示HTML,在这里我只给出一些有关从Medium帖子中提取HTML的具体说明,以便您可以按照我的脚步进行操作。 我们实际上在这里创建的是SwiftUI HTML阅读器,它实际上与网络应用程序并不相同。 毕竟,我们具有使用SwiftUI进行任何操作的能力,并且HTML不必(也不应该)成为应用程序功能的核心组件。
This is just a quick way to get our content from here to there.
这只是从此处获取内容的一种快捷方法。
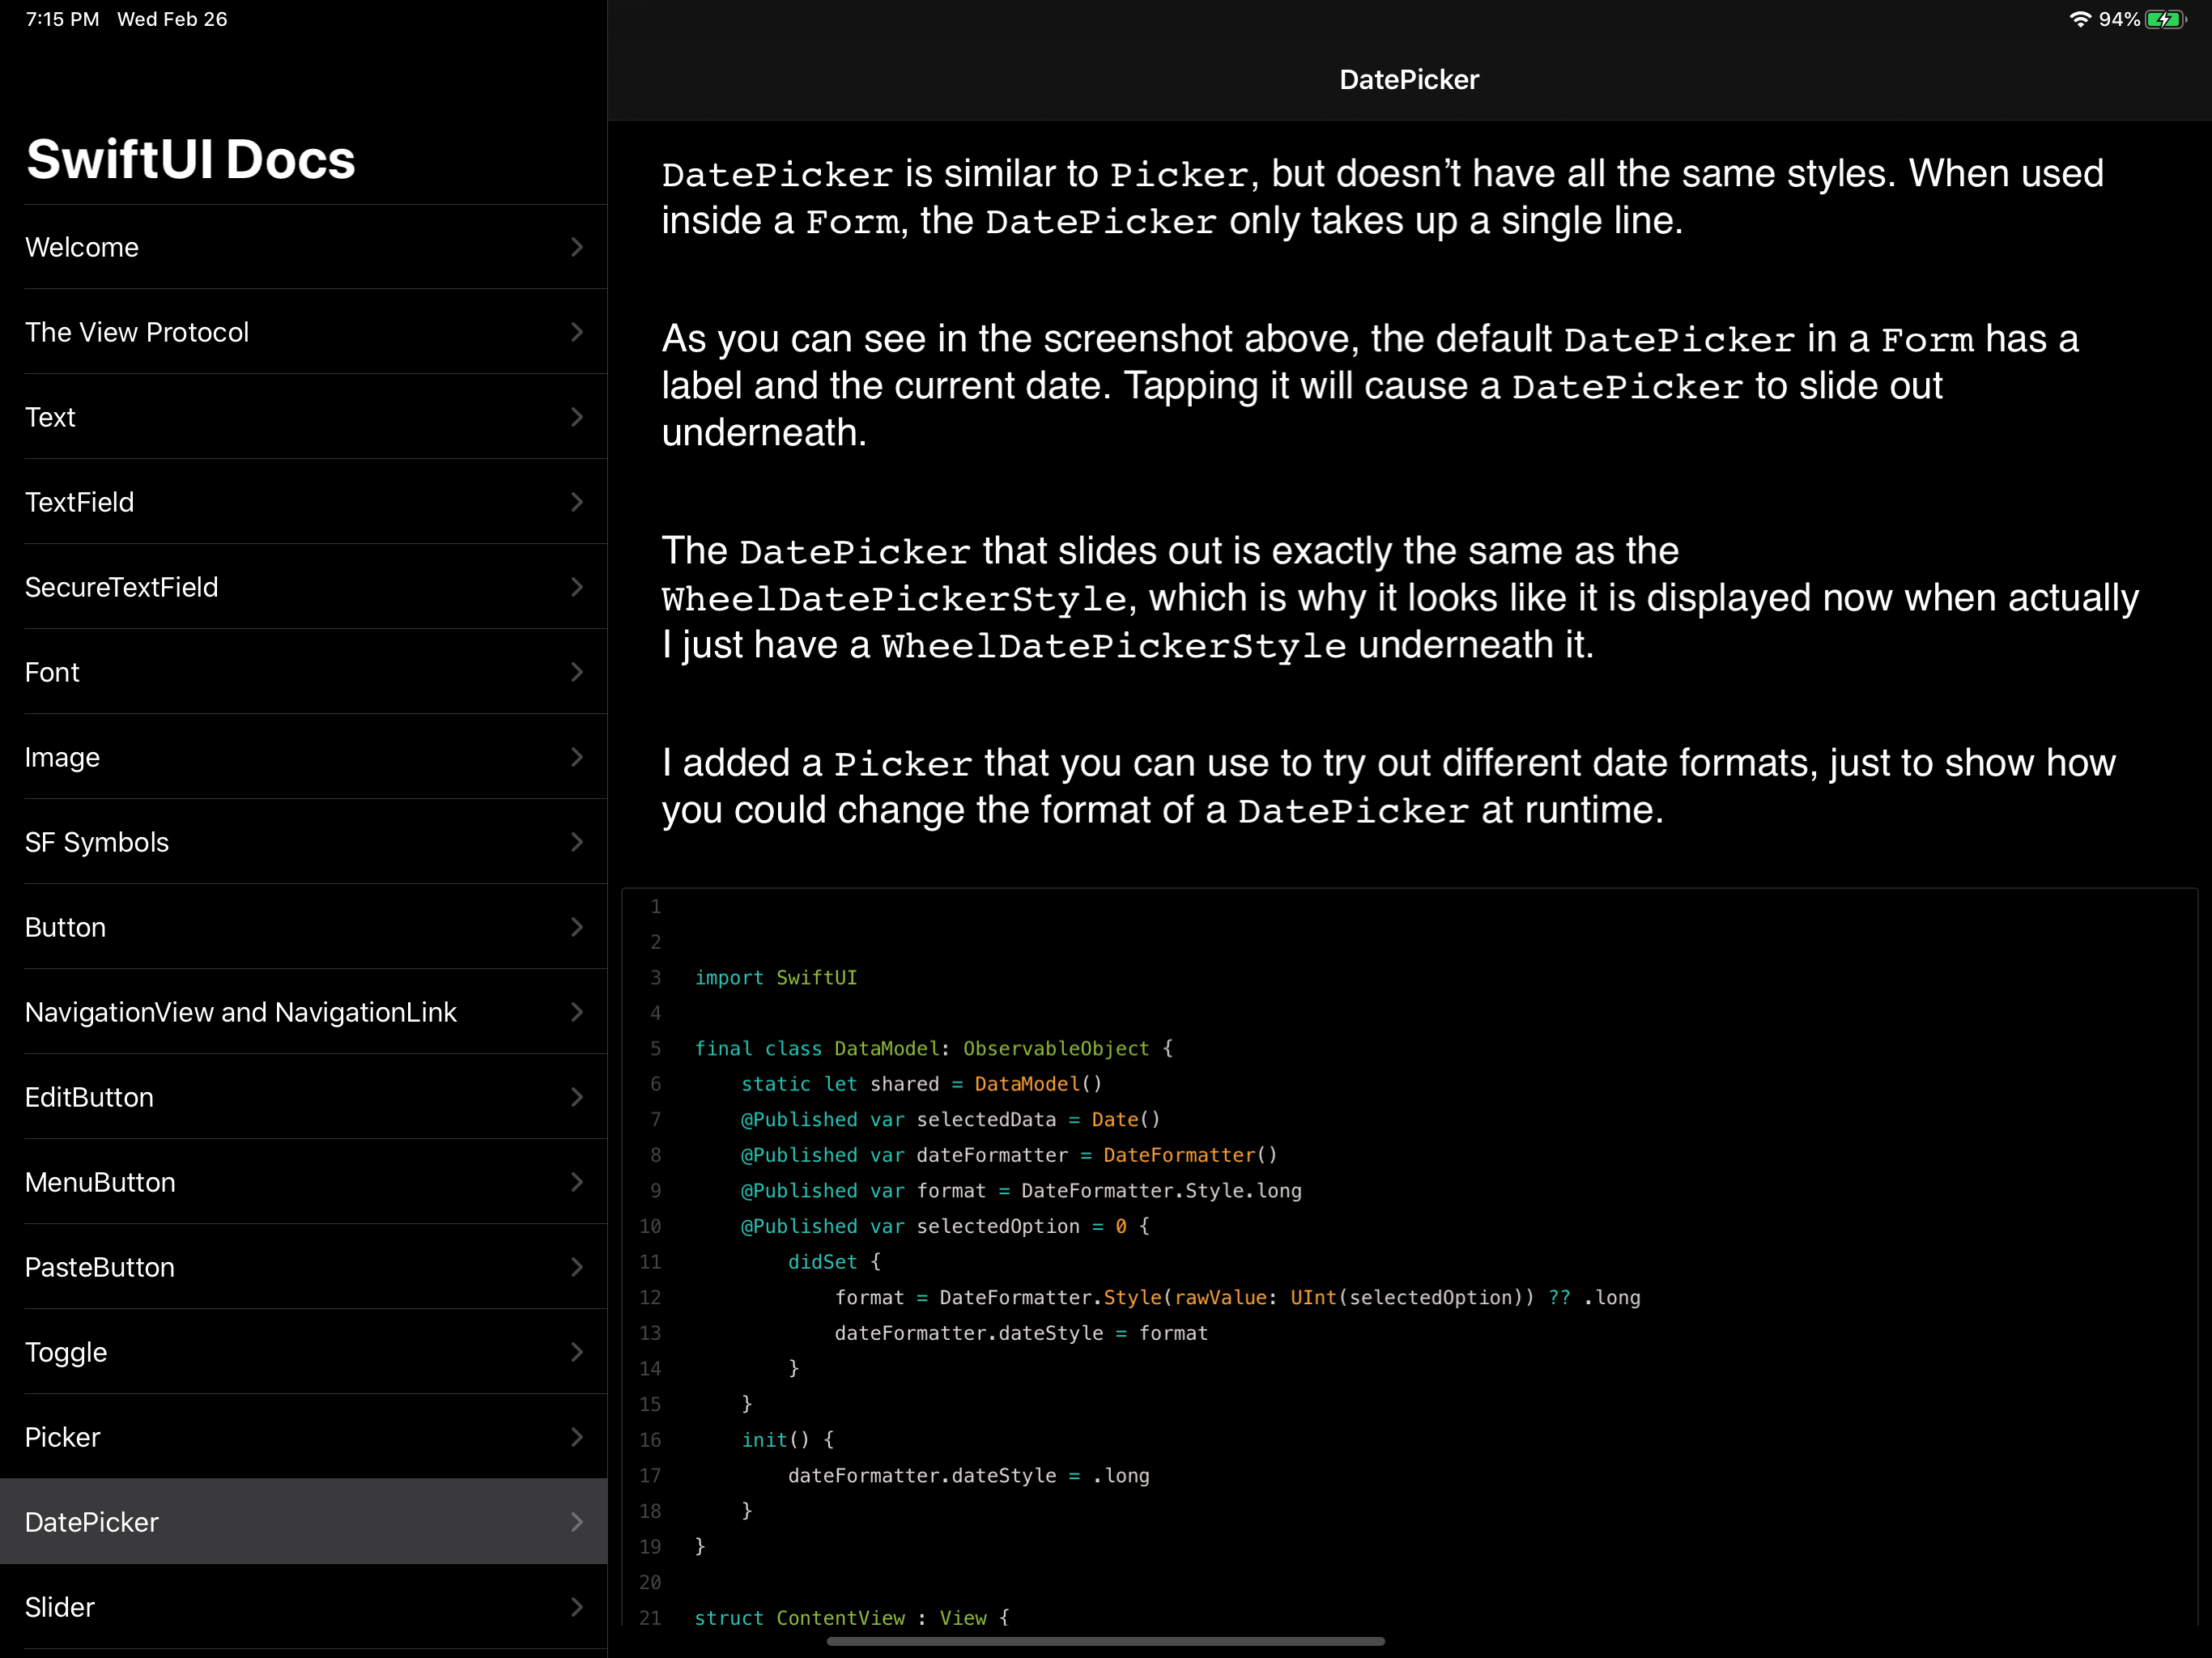
If you want to get used to the Master-Detail layout in SwiftUI before starting this tutorial, you might want to take a look at the template that Xcode provides. To do this, create a new project with the Master-Detail App template. I don’t recommend starting the tutorial with this though. It provides a way to add the current time to a list of data, but much of the default functionality would need to be removed to start the tutorial. It does show you what the interface will look like though, with a List that is full screen on iPhone and in a side panel on iPad and macOS.
如果您想在开始本教程之前习惯SwiftUI中的Master-Detail布局,则可能需要看一下Xcode提供的模板。 为此,请使用Master-Detail App模板创建一个新项目。 我不建议您从此开始本教程。 它提供了一种将当前时间添加到数据列表中的方法,但是需要删除许多默认功能才能开始本教程。 它确实向您显示了界面的外观,其中一个列表在iPhone上为全屏,在iPad和macOS上为侧面。
入门 (Getting started)
To get started, create a new Single View App project in Xcode, making sure you choose SwiftUI as the user interface. This will give you everything you need for a SwiftUI app on iOS, but if you want macOS support you’ll need to click the name of your app at the top of the Project Inspector in the left panel. This will give you access to all of your project’s settings, including what platform it supports. Tick MacOS, and click enable.
首先,请使用Xcode创建一个新的Single View App项目,并确保选择SwiftUI作为用户界面。 这将为您提供iOS上的SwiftUI应用所需的一切,但是如果您想要macOS支持,则需要在左侧面板中的项目检查器顶部单击应用的名称。 这将使您能够访问项目的所有设置,包括它支持的平台。 勾选MacOS,然后点击启用。
获取HTML (Getting the HTML)
You’re going to need the HTML from your Medium story. Open your story in Safari, but don’t go into Edit Mode. Instead, go to File > Save As, and make sure that Format is set to Page Source and not Web Archive. Save the HTML somewhere on your Mac, and next you’ll need to edit that file in a text editor. There are a variety of HTML code editors out there, but I chose Visual Studio Code which is free. It doesn’t really matter what you choose to edit with, but I found that Xcode itself can have problems opening and editing large HTML files.
您将需要Medium故事中HTML。 在Safari中打开故事,但不要进入“编辑模式”。 而是转到“文件”>“另存为”,并确保“格式”设置为“页面源”而不是“ Web存档”。 将HTML保存在Mac上的某个位置,然后下一步需要在文本编辑器中编辑该文件。 有各种各样HTML代码编辑器,但是我选择了免费的Visual Studio Code。 选择使用什么进行编辑并不重要,但是我发现Xcode本身在打开和编辑大型HTML文件时会遇到问题。
Obviously don’t open your HTML in a browser, as this will display it and not allow you to edit it.
显然不要在浏览器中打开HTML,因为这将显示它,并且不允许您对其进行编辑。
On opening the file, you’ll be greeted by a head tag inside which lies a small JavaScript function and a lot of metadata for search engines. Though the body tag eventually starts, it still has to give information about the Medium header, so think there’s an easy way to find the start of your article. Press cmd + F to bring up Find (in most text editors) and type <p including the space after it. As all tags automatically added to your post contain both an id and a class, searching for <p> will not return any results.
打开文件时,您会受到一个head标签的欢迎,其中包含一个小JavaScript函数和许多搜索引擎的元数据。 尽管body标签最终开始了,但是它仍然必须提供有关Medium标头的信息,因此,认为有一种简单的方法可以找到文章的开头。 按cmd + F调出Find(在大多数文本编辑器中),然后键入<p及其后面的空格。 由于所有自动添加到帖子中的标签都包含一个ID和一个类,因此搜索<p>不会返回任何结果。
Searching for <p without a space at the end will probably get you to the path that is used in drawing the Medium header.
搜索<p末尾没有空格,可能会带您到绘制Medium标题时使用的路径。
If your post starts with an image and you want to include it, you’ll be searching for the <img tag instead.
如果您的帖子以图片开头,并且想要包含它,那么您将搜索<img标签。
Now that you know where your post starts, you should probably get rid of everything above it that you don’t need. Delete everything above the element you searched for, including the opening body tag, the entire head tag and the <!doctype html> tag right at the start of the file. We won’t be needing any of this, as we’ll be adding it again in code at a later time. Now that you have deleted everything above the start of your post, it’s time to find everything below it. Search for the closing </article> tag, as there should only be one. Mine had two closing </div> tags before it too, so I deleted these and everything below that.
现在您知道了帖子的开始位置,您应该摆脱上面不需要的所有内容。 删除要搜索的元素上方的所有内容,包括开头的body标记,整个head标记和文件<!doctype html>的<!doctype html>标记。 我们将不需要任何这些,因为稍后将在代码中再次添加它。 既然您已经删除了帖子开头上方的所有内容,那么现在该找到帖子下方的所有内容了。 搜索结束</article>标记,因为应该只有一个。 我的前面也有两个结束符</div> ,所以我删除了这些以及下面的所有内容。
My documentation post was a 45 minute read, so it makes sense that my post’s full HTML came out as 191,427 characters. What I found more surprising was everything that was below. After a few div tags containing Medium’s responses section and related stories, I found 652,174 characters of extra JavaScript at the end. I’m not a web developer, so I’m not going to venture a guess at what this all does.
我的文档文章阅读了45分钟,因此我的文章的完整HTML格式为191,427个字符,这是有道理的。 我发现更令人惊讶的是下面的所有内容。 在一些包含Medium的Responses部分和相关故事的div标签之后,我发现最后有652,174个额外JavaScript字符。 我不是网络开发人员,所以我不会冒险猜测这一切。
If you have any ideas about what all that extra JavaScript, let me know below!
如果您对所有这些额外JavaScript有任何想法,请在下面告诉我!
Now you should have only the HTML of your post, so save it and open it in a browser. What do you see? If you have any images, you’ll notice that they’re probably massive and pixellated at the same time. We won’t be displaying images the same way as Medium, so these will need to be changed. If you don’t have any images, skip to the Codable structs section below.
现在您应该只拥有帖子HTML,因此保存它并在浏览器中打开它。 你看到了什么? 如果您有任何图像,您会注意到它们可能同时庞大且像素化。 我们不会以与“中”相同的方式显示图像,因此需要对其进行更改。 如果没有任何图像,请跳到下面的“可编码结构”部分。
Here’s what we will need our images to look like, along with what they look like in the original HTML for comparison:
这是我们需要图像的外观以及原始HTML中的图像以进行比较的外观:
Because we will be adding our images to the assets of the app, we will not need to use the internet to fetch them each time. As we are accessing them from the main bundle, we also won’t need any sort of complicated path. Width and height will be handled by our custom CSS, which will be created later. If you really care about having a caption under your image, you can decide how you want to display that. I’m using padding for p, h1 and h2 in my CSS, so you probably don’t need to put your chapter’s whole HTML in a div. I’ve managed to avoid using any div tags in my HTML.
因为我们会将图像添加到应用程序的资产中,所以我们不需要每次都使用互联网来获取它们。 从主捆绑包访问它们时,我们也不需要任何复杂的路径。 宽度和高度将由我们的自定义CSS处理,该CSS将在以后创建。 如果您真的很想在图像下显示标题,则可以决定如何显示它。 我在CSS中为p , h1和h2使用了填充,因此您可能不需要将章节的整个HTML放在div中。 我设法避免在HTML中使用任何div标签。
You will also not need to add a closing body tag at the end of the HTML, as this will also be added later.
您也不需要在HTML的末尾添加一个结束body标记,因为稍后也会添加。
可编码结构 (Codable structs)
In Swift the Codable protocol allows us to easily create value types that store data which we can easily convert to and from JSON. Why would we want to do that? The JSON of your data might be useful if you expect to store the text of your post on a server, so that the app can always fetch the latest version. I decided it would be easier to have my data in a JSON file, which is why I took this approach.
在Swift中,可编码协议允许我们轻松创建存储数据的值类型,这些数据可以轻松地与JSON相互转换。 我们为什么要这样做? 如果您希望将帖子的文本存储在服务器上,则数据的JSON可能会很有用,以便该应用程序始终可以获取最新版本。 我认为将数据保存在JSON文件中会更容易,这就是为什么我采用这种方法。
Create a new file called DataModel, and add two Codable structs.
创建一个名为DataModel的新文件,并添加两个Codable结构。
For the initial version of my app, my Codable structs took the following format:
对于我的应用程序的初始版本,我的Codable结构采用以下格式:
Create a file called JSONMaker, and create a struct inside it of the same name. This is where we’ll store the data for our Xcode project, but it won’t be compiled into the app. That’s what the JSON is for! Create a struct called JSONMaker inside this file, along with a function called createJSON(). To make things easier I’ve called createJSON() in the initialiser for the struct, meaning all we need to do is create an instance of the struct and we’ll get our JSON string.
创建一个名为JSONMaker的文件,并在其中创建一个具有相同名称的结构。 我们将在此处存储Xcode项目的数据,但不会将其编译到应用程序中。 这就是JSON的目的! 在此文件内创建一个名为JSONMaker的结构,以及一个名为createJSON()的函数。 为了使事情变得更容易,我在结构的初始化程序中调用了createJSON() ,这意味着我们需要做的就是创建该结构的实例,然后获取JSON字符串。
Although I currently only have the title and HTML for each Chapter, it’s easy to see how I could add more properties here. Similarly, the Book object, which simply provides the array of Chapter objects, could contain more useful information. But I’m keeping it simple and only providing the absolute necessities for this app to function.
尽管我目前只为每Chapter标题和HTML,但很容易看出如何在此处添加更多属性。 同样,仅提供Chapter对象数组的Book对象可能包含更多有用的信息。 但我保持简单,仅提供此应用程序运行的绝对必要条件。
I’ve provided the chapters array below createJSON(), only including the Welcome chapter for brevity.
我提供的chapters阵列下面createJSON()只包括简洁的欢迎章。
I made the mistake of writing my JSON myself first, but that makes it impossible for Swift to let you know when a string has errors relating to escape characters. You’ll notice as you copy each chapter into Swift that any speech marks in the original HTML cause the string to end early. I used Find & Replace to replace all occurrences of " with \", which will also apply it to the start and end of your strings, so be sure to change those back to normal speech marks.
我犯了一个错误,那就是我自己先写我的JSON,但这使Swift无法在字符串出现与转义字符有关的错误时通知您。 在将每章复制到Swift时,您会注意到原始HTML中的任何语音标记都会导致字符串提前结束。 我使用“查找并替换”将所有出现的"替换为\" ,这也会将其应用于字符串的开头和结尾,因此请确保将其改回普通的语音标记。
Notice that I’m using """ to indicate the start and end of a multiline string. This makes it easier to lay your HTML out in a way that makes sense to you visually. It doesn’t really matter if line breaks make their way into the JSON data string, as line breaks are ignored by HTML. If you’d rather avoid this, or if you are fine with your HTML string being all on one line, a regular string would also be fine.
请注意,我使用"""来表示多行字符串的开始和结束。这样可以更轻松地以可视化的方式对HTML进行布局,而换行符是否构成它们并没有关系HTML会将换行符插入JSON数据字符串中,如果您希望避免这种情况,或者如果HTML字符串全部放在一行中就可以了,那么常规字符串也可以。
Now we need to create that JSON string I’ve been talking about! Go into DataModel and create a class that conforms to ObservableObject. This will make it easy to access our Swift file from our SwiftUI. Add an initialiser that creates an instance of the JSONMaker class. It doesn’t need a name, as we only want it to print the JSON string. This code will be removed once we have the JSON.
现在我们需要创建我一直在谈论的JSON字符串! 进入DataModel并创建一个符合ObservableObject的类。 这将使从SwiftUI访问Swift文件变得容易。 添加一个初始化程序,该初始化程序创建JSONMaker类的实例。 它不需要名称,因为我们只希望它显示JSON字符串。 有了JSON后,该代码将被删除。
The last thing you’ll need to do is add your DataModel as an EnvironmentObject to your SceneDelegate file. This will make it easily accessible in your SwiftUI, as long as you declare it in each View that needs to reference it. This isn’t very complicated, as it just requires you to add a modifier to ContentView in the top function that SceneDelegate provides that passes in the shared static instance of DataModel.
您需要做的最后一件事是将DataModel作为EnvironmentObject添加到SceneDelegate文件。 只要您在需要引用它的每个View中声明它,就可以在您的SwiftUI中轻松访问它。 这并不是很复杂,因为它只需要您在SceneDelegate提供的传递给DataModel shared静态实例的顶级函数中向ContentView添加一个修饰符即可。
Now simply add the following inside your ContentView struct:
现在,只需在ContentView结构中添加以下内容:
@ObservedObject var data: DataModelBuild and run your app on iOS or your Mac, and if all goes well you should see the JSON string print to the console. This is a somewhat lazy way to do it, as I didn't go through the process of writing the JSON directly to a file. But this is good enough for our purposes. Since my JSON string was pretty long, I simply clicked inside the console, pressed cmd + A to select all, and copied it to a new file called Chapters.json. This included a few other debug messages from the console that I had to remove manually, but it was a lot easier than clicking and dragging to select the whole thing!
在iOS或Mac上构建并运行您的应用,如果一切顺利,您应该会在控制台上看到JSON字符串。 这是一种比较懒惰的方式,因为我没有经历将JSON直接写入文件的过程。 但这对于我们的目的已经足够了。 由于我的JSON字符串很长,因此我只需在控制台内单击,然后按cmd + A来选择所有内容,然后将其复制到名为Chapters.json的新文件中。 这包括我必须手动删除的控制台中的其他一些调试消息,但是这比单击并拖动以选择整个对象要容易得多!
Now we have our data file, we’re ready to remove the JSONMaker file from the app. We can always add it again when we want to make a new JSON. With the JSONMaker file selected in the left panel, go to the File Inspector in the right panel and untick your app’s name under targets. You can now also remove let _ = JSONMaker from the initialiser of your DataModel class. If you ever make changes to your chapters, you’ll need to reverse this process to create a new JSON string.
现在我们有了数据文件,我们准备从应用程序中删除JSONMaker文件。 当我们想创建一个新的JSON时,我们总是可以再次添加它。 在左侧面板中选择JSONMaker文件后,转到右侧面板中的File Inspector(文件检查器),然后在目标下取消您的应用名称。 现在,您还可以从DataModel类的初始化程序中删除let _ = JSONMaker 。 如果您对章节进行了更改,则需要撤消该过程以创建新的JSON字符串。
加载JSON文件 (Loading the JSON file)
Now that we’re no longer creating the JSON in the initialiser of our DataModel, we’ll need to load it from the file. Since the JSON should now be in a file called Chapters.json that is in the Project Inspector and added to the app target, we simply need to find the URL of that file to access it. This is pretty easy, and it shouldn’t matter whether you decide to put the file in a folder or not, as long as you don’t give another file the same name! Once we have the URL, decoding the JSON is a lot like encoding it. I’ve provided specific catches that should help you to work out what's wrong if your JSON has any decoding issues, but otherwise, you should be good to go.
现在,我们不再在DataModel的初始化程序中创建JSON,我们需要从文件中加载它。 由于JSON现在应该位于Project Inspector中的一个名为Chapters.json的文件中,并已添加到应用程序目标中,因此我们只需要查找该文件的URL即可访问它。 这很容易,只要您不给另一个文件同名,就决定将文件放在文件夹中都没有关系! 有了URL后,对JSON进行解码非常类似于对其进行编码。 我提供了一些特定的捕获,这些捕获应该可以帮助您弄清如果JSON有任何解码问题,那是什么问题,但是否则,您应该一切顺利。
I was thinking of adding a print statement to this so that you can see the data was successfully loaded into the chapters array, but it will be obvious if you are calling loadJSON() and none of the assertionFailure() calls happened. This is all we need in the DataModel class, although it’s a good place to put any Swift data or functions that don’t directly relate to your interface. I originally put the function that makes the CSS string here, but I’ve decided to move it to the WebView instead.
我正在考虑为此添加一条打印语句,以使您可以看到数据已成功加载到loadJSON()数组中,但是如果您正在调用loadJSON()而没有发生assertionFailure()调用,则将很明显。 这是我们在DataModel类中所需要的,尽管在这里放置任何与您的界面不直接相关的Swift数据或函数是一个很好的地方。 我最初将制作CSS字符串的函数放在这里,但是我决定将其移至WebView。
创建WebView以显示HTML (Creating the WebView to display the HTML)
Let’s create a Swift file called WebView. This is where we’ll display our chapters, and using a WKWebView allows us to also link to external sites. Instead of allowing the WebView to visit any site, we’ll make sure that websites open in Safari. I’ll explain why. For my app, I used a lot of Github Gists, which are the shortcode samples included in this tutorial. When you tap on the name of the gist or tap on ‘Open raw’, you are sent to Github’s website to view the content full size.
让我们创建一个名为WebView的Swift文件。 这是我们显示章节的地方,并且使用WKWebView允许我们还链接到外部站点。 确保让网站在Safari中打开,而不是允许WebView访问任何网站。 我会解释原因。 对于我的应用程序,我使用了很多Github Gist,它们是本教程中包含的短代码示例。 当您点击要点的名称或点击“ Open raw”时,您将被转到Github的网站查看完整内容的内容。
If I allowed these links to open in my WebView, things get complicated. Github has a ‘Log in’ button, and you could start using Github as normal from inside my app. You could also follow links inside Github that take you anywhere on the internet, and now I have a browser in my app that isn’t displaying the content I want it to. In order to prevent this kind of navigation, we’re going to need a class that conforms to the WKNavigationDelegate protocol.
如果我允许在WebView打开这些链接,事情将会变得复杂。 Github有一个“登录”按钮,您可以从我的应用程序中正常使用Github。 您还可以跟踪Github中的链接,这些链接将您带到Internet上的任何地方,现在我的应用程序中有一个浏览器,该浏览器没有显示我想要的内容。 为了防止这种导航,我们将需要一个符合WKNavigationDelegate协议的类。
In UIKit, you often make your UIViewController subclass the delegate in this situation. But in SwiftUI there is no such class, so we need to create a class that still counts as an object. Since UIViewController inherits from NSObject among other things, it has what it takes to be a delegate. However, a custom class we make doesn’t inherit from this by default, so we have to specify it explicitly. I use another singleton shared instance here mostly so that I don’t accidentally create multiple instances of this delegate.
在UIKit中,在这种情况下,通常使UIViewController子类成为委托。 但是在SwiftUI中没有这样的类,因此我们需要创建一个仍然算作对象的类。 由于UIViewController继承自NSObject等,因此它具有成为委托的条件。 但是,默认情况下,我们制作的自定义类不会继承自此类,因此我们必须明确指定它。 我主要在这里使用另一个单例共享实例,这样我就不会意外地创建此委托的多个实例。
Note that the way I am restricting external links is by looking for HTTP or HTTPS in at the start of the URL.
请注意,我限制外部链接的方式是在URL的开头查找HTTP或HTTPS。
如果您坚持使用从Web服务器获取的图像,则需要更改此设置 (If you insist on using images that are fetched from a web server, you will need to change this)
Since getting an image from the web is considered by the delegate to be a form of navigation, opening a chapter that has such an image source will cause the app to open that link in Safari. This is not what you want, so I suggest you change the delegate to accept the domains you’ll be using. Embedding content as I did with my Github Gists does not seem to cause the same issue, so don’t worry if you are getting JavaScript from an HTTP or HTTPS domain.
由于代表认为从网络获取图像是一种导航形式,因此打开包含此类图像源的章节将使应用程序在Safari中打开该链接。 这不是您想要的,所以我建议您更改委托以接受将要使用的域。 像我在Github Gists上所做的那样嵌入内容似乎不会引起同样的问题,因此,如果您从HTTP或HTTPS域中获取JavaScript,请不要担心。
A lot is going on under the NavigationDelegate class, and it’s all going on in the WebView struct. This struct conforms to UIViewRepresentable, which allows you to represent UIViews in SwiftUI. SwiftUI doesn’t currently have access to WKWebView, so this is the best we can do for now. In makeUIView we're creating the WebView and assigning the NavigationDelegate. We’re also making the WebView transparent, which will be useful when we make it work with Dark Mode. In updateUIView, we’re getting the HTML and CSS and displaying it in the WebView.
NavigationDelegate类下发生了很多事情,而这一切都在WebView结构中发生。 该结构符合UIViewRepresentable ,它允许您在SwiftUI中表示UIViews。 SwiftUI目前无法访问WKWebView,因此这是我们目前能做的最好的事情。 在makeUIView我们正在创建WebView并分配NavigationDelegate 。 我们还使WebView透明,这在将其与暗模式一起使用时将非常有用。 在updateUIView ,我们获取HTML和CSS并将其显示在WebView 。
Note how we’re currently just displaying the entire HTML string, without separating it into chapters. This is to make it easier to preview the HTML and see how it came out. I provided an example PreviewProvider at the bottom, which ought to preview the WebView in the SwiftUI Canvas but it doesn’t work in my version of Xcode. If it works for you, that’s fine, otherwise, you may want to put that code inside the body: some View property of your ContentView struct. This will make it easy to view all of your HTML content and decide whether you like how it came out.
请注意,我们目前是如何仅显示整个HTML字符串,而不将其分成几章。 这样可以更轻松地预览HTML并查看其结果。 我在底部提供了一个示例PreviewProvider ,它应该在SwiftUI Canvas中预览WebView,但在我的Xcode版本中不起作用。 如果它适合您,那很好,否则,您可能需要将该代码放入body: some View ContentView结构的body: some View属性。 这样可以轻松查看所有HTML内容并确定是否喜欢它的显示方式。
Notice how the CSS is constructed programmatically, taking two parameters. One provides a font size, which doesn’t currently take accessibility font sizes into account but it will soon! The other provides the colour scheme, which could be Light Mode or Dark Mode. This is to allow us to invert the colours of the WebView in Dark Mode, as this is the easiest way to handle this with a single CSS property. I previously inverted the entire WebView, which worked for some of my images but made others look strange.
请注意,如何使用两个参数以编程方式构造CSS。 一个提供了字体大小,当前不考虑可访问性字体大小,但是很快! 另一个提供了配色方案,可以是亮模式或暗模式。 这是为了使我们能够在黑暗模式下反转WebView的颜色,因为这是使用单个CSS属性处理此问题的最简单方法。 之前,我反转了整个WebView ,该WebView适用于我的某些图像,但使其他图像看起来很奇怪。
When you apply a colour inversion filter to the entire body tag, you can’t override it in any of its children. This is because a filter is applied at the end, after all the other CSS has been applied. Instead, I decided to apply the filter to all of the individual children of the body tag, rather than the body tag itself. This allowed me to override it for only my images, and it’s easy to see how you could similarly override it for any of your other HTML elements. One of the main reasons why I used a filter was so that my Github Gists would be inverted in Dark Mode.
当您将颜色反转滤镜应用于整个body标签时,您不能在其任何子级中覆盖它。 这是因为在应用了所有其他CSS之后,最后才应用了过滤器。 相反,我决定将过滤器应用于body标签的所有单个子元素,而不是body标签本身。 这使我仅对图像覆盖它,并且很容易看出如何对其他HTML元素类似地覆盖它。 我使用过滤器的主要原因之一是要使我的Github Gists在黑暗模式下反转。
If I manually chose colours for my elements based on colour scheme, my gists would stay the same colour, and I like the way they look when inverted!
如果我根据配色方案为元素手动选择颜色,我的主意将保持不变的颜色,并且我喜欢它们反转时的外观!
添加图像 (Adding the images)
I don’t recommend trying to use the image source URLs you got when you took the HTML from your post. For one thing, the scaling will be wrong, but I also don’t want to condone anyone making apps that repeatedly make server requests to Medium. Instead, you’ll be using the images themselves, and loading them from the bundle that gets installed with your app. If you have all your original images, you’re one step ahead of where I was. I had no idea where all my original images were, so I just went to my post (without being in Edit Mode) and left-clicked them. This brings them up in a larger viewer, and now it’s easy to right-click or control-click and say Save Image As.
我不建议尝试使用从帖子中获取HTML时获得的图像源URL。 一方面,扩展将是错误的,但我也不想纵容任何制作重复向中型服务器发出服务器请求的应用程序的人。 相反,您将自己使用图像,并从与您的应用程序一起安装的捆绑包中加载图像。 如果您拥有所有原始图像,那么您要比我先走一步。 我不知道所有原始图像在哪里,所以我去了我的帖子(没有处于“编辑模式”)并用鼠标左键单击了它们。 这使它们在更大的查看器中显示出来,现在右键单击或按住Control键单击并说“将图像另存为”很容易。
Now that you have all of your images, I recommend giving them lower case names with dashes. This is me trying to act like a web developer! If you want to know why I chose dashes instead of underscores, check out dashes-versus_underscores; The Definitive Guide. Although we aren’t dealing with actual HTTP(S) URLs like the ones that exist on the web, HTML still can’t deal with spaces in filenames. I also believe that you should play by the rules of the language you’re using, so I don’t want anyone to use camelCase or PascalCase for their image names!
现在您已经拥有了所有图像,我建议给它们使用带短划线的小写名称。 这是我试图扮演Web开发人员的角色! 如果您想知道为什么我选择破折号而不是下划线,请查看dashes-versus_underscores。 权威指南 。 尽管我们不像网络上那样处理实际的HTTP(S)URL,但是HTML仍然无法处理文件名中的空格。 我也相信您应该遵守所使用语言的规则,所以我不希望任何人使用camelCase或PascalCase作为其图像名称!
Actually I don’t care, but that’s what I’m doing.
其实我不在乎,但这就是我在做什么。
I created a folder in my project by right-clicking the yellow folder with the app’s name that is the second row of the Project inspector hierarchy and selecting New Group. I created a folder called Images, right-clicked it, chose Add files, and imported all of my images. Note that I’m not adding my images to the Assets.xcassets library. This is because this asset library behaves differently from the bundle directory, and you will not be able to access images that are there from HTML.
我在项目中创建了一个文件夹,方法是右键单击带有应用程序名称的黄色文件夹,该名称是项目检查器层次结构的第二行,然后选择“新建组”。 我创建了一个名为Images的文件夹,右键单击它,选择Add files,然后导入了我的所有图像。 请注意,我没有将图像添加到Assets.xcassets库。 这是因为此资产库的行为与捆绑软件目录不同,因此您将无法访问HTML中存在的图像。
Did you see that the updateUIView method in WebView adds a baseURL parameter when loading the HTML string?
您是否看到WebView中的updateUIView方法在加载HTML字符串时添加了baseURL参数?
This tells our app to look in the local storage for files that have partial URLs. When I mentioned changing the HTML for the images, you might notice that I only included the filename. This is all you need even if, like me, your images are in a subdirectory called Images. Just make sure you don’t give several files the same name and you should be fine. Again you don’t need to provide a size for your images in HTML, because that will be handled by the CSS. Currently, I have mine set to reduce the width of the image to 60% of the WebView while maintaining its aspect ratio. You might want to use the full width, but I found that since my images were largely iPhone screenshots, this made the image too long and require a lot of scrolling.
这告诉我们的应用程序在本地存储中查找具有部分URL的文件。 当我提到更改图像HTML时,您可能会注意到我只包含文件名。 这就是您所需要的,即使您像我一样,图像位于一个名为Images的子目录中。 只要确保您没有给多个文件使用相同的名称就可以了。 同样,您不需要为HTML中的图像提供大小,因为它将由CSS处理。 目前,我已设置为在保持宽高比的同时将图像的宽度减小到WebView的60%。 您可能要使用全角宽度,但是我发现由于我的图像主要是iPhone屏幕快照,因此图像太长,需要大量滚动。
创建显示WebView的DetailView (Creating the DetailView that shows the WebView)
Since the MasterView references it, it makes sense that we make the DetailView first. Remember when I said that we are not yet making our font size accessible? Now we are! By referencing the sizeCategory environment property, even without using it directly, we are prompting SwiftUI to give us up to date information about what font size has been selected in the Accessibility settings. By using UIFontMetrics we are able to scale our starting font size to a size that is appropriate.
由于MasterView引用了它,因此我们首先制作DetailView是有意义的。 还记得我说过我们尚未使字体大小可访问吗? 现在好了! 通过引用sizeCategory环境属性,即使不直接使用它,我们也提示SwiftUI向我们提供有关在“辅助功能”设置中选择哪种字体大小的最新信息。 通过使用UIFontMetrics我们可以将起始字体大小缩放到合适的大小。
Many thanks to Hacking With Swift’s tutorial on Dynamic Type that showed me how to respect accessibility settings even inside a WKWebView!
非常感谢Hacking With Swift的Dynamic Type教程,该教程向我展示了即使在WKWebView内也如何尊重可访问性设置!
The reason I reference the sizeCategory is because I found that the size that seemed appropriate on the iPhone was too big on iPad and macOS. To deal with this, I have a different base font size for compact devices and another for larger ones. Both of these will still scale according to accessibility, but they’ll look more consistent when differing amounts of screen space are available.
我之所以引用sizeCategory的原因是,我发现在iPhone和iPhone上合适的尺寸在iPad和macOS上太大了。 为了解决这个问题,紧凑型设备的基本字体大小不同,大型设备的基本字体大小不同。 两者仍将根据可访问性进行缩放,但是当可用屏幕空间数量不同时,它们看起来会更加一致。
I’m referencing the colourScheme so that I can use Dark Mode in my WebView. Otherwise, my HTML content would have a white background by default, as I mentioned in creating the WebView section above. The WebView is displayed inside a Group so that I can give it a navigationBarTitle, and I display this title inline. Displaying it inline makes more sense for the longer titles my chapters have. Otherwise, the titles will be displayed big and bold, and this causes truncation when the title is long.
我正在引用colourScheme,以便可以在WebView使用“暗模式”。 否则,默认情况下,我HTML内容将具有白色背景,就像我在上面创建WebView部分中提到的那样。 WebView显示在Group内部,因此我可以为其指定navigationBarTitle ,并且可以内联显示此标题。 对于本章中较长的标题,内联显示更为有意义。 否则,标题将以粗体显示,并且在标题较长时会导致截断。
Lastly, we have an index for the chapter that will be passed in when the chapter is selected from MasterView.
最后,我们有一个章节索引,当从MasterView中选择该章节时将传递该章节。
创建显示章节列表的MasterView (Creating the MasterView that shows the list of chapters)
The MasterView is arguably even less complicated. ForEach allows you to dynamically display data from your DataModel class. If our Chapter Codable struct conformed to Hashable, we might be able to iterate through it without using an index. However, I’ve decided to use an index as I find it quite a useful way to guarantee that each row of the MasterView List passes the index it used to find its own title to the DetailView, which then uses that same index to access the same array to get the corresponding content.
可以说,MasterView甚至更简单。 ForEach允许您动态显示DataModel类中的数据。 如果我们的Chapter Codable结构符合Hashable ,我们也许可以在不使用索引的情况下对其进行迭代。 但是,我决定使用索引,因为我发现它是一种非常有用的方法,可以确保MasterView List每一行都将其用于查找自己标题的索引传递给DetailView ,然后使用该索引访问相同的索引。相同的数组以获取相应的内容。
在ContentView中显示主从界面 (Displaying the Master-Detail Interface in ContentView)
The final piece of the puzzle brings all of these elements together and completes the app. Notice how both the MasterView and DetailView are displayed, as this allows us to set the initial state of the app when it first opens. Oddly when this app opens on an iPad in portrait orientation, the MasterView is completely hidden unless you swipe in from the left. I’ve warned my users about this in my first chapter, as they may be confused as to why there is no visible menu.
难题的最后一部分将所有这些元素结合在一起,从而完善了该应用程序。 请注意如何同时显示MasterView和DetailView,因为这使我们可以设置应用程序首次打开时的初始状态。 奇怪的是,当此应用程序在iPad上以纵向打开时,除非您向左滑动,否则MasterView将完全隐藏。 我已经在我的第一章中警告过用户,因为他们可能对为什么没有可见的菜单感到困惑。
You may need to do the same, or change the navigation view style as follows:
您可能需要执行相同的操作,或如下更改导航视图样式:
.This will eliminate the problem on iPad, but it will also force the MasterView to be full screen when the app starts, regardless of orientation or device. This completely eliminates the ability to have the MasterView and DetailView displayed on the screen at the same time, which I would argue is too high a price to pay to fix the portrait orientation iPad problem.
这样可以消除iPad上的问题,但无论应用程序的方向或设备如何,它都将在应用程序启动时强制将MasterView显示为全屏。 这完全消除了同时在屏幕上显示MasterView和DetailView的能力,我认为这太高了,无法解决iPad纵向问题。
Who uses iPads in portrait orientation anyway?
谁会纵向使用iPad?
Maybe they’ll guess that they need to swipe the MasterView in from the left, I have no idea.
也许他们会猜测需要从左侧向内滑动MasterView,我不知道。
下一步 (Next Steps)
I learnt the way this Master-Detail app works from Xcode’s Master-Detail App template, which I mentioned at the start of the post. I suggest you check out some of the other project templates, as they contain surprisingly complete examples of how your apps can be created. If you’d rather not use HTML and CSS, you could make a version of this app that uses attributed strings instead. Hacking With Swift’s tutorial on NSTextAttachment tells you how you can actually put images into an attributed string, although I haven’t tried it. For my particular case, I needed to be able to display my Github Gists, so I couldn’t take this approach for my post.
我从文章开头提到的Xcode的Master-Detail App模板了解了Master-Detail应用程序的工作方式。 我建议您检查其他一些项目模板,因为它们包含令人惊讶的完整示例,说明如何创建您的应用程序。 如果您不想使用HTML和CSS,则可以制作此应用程序的一个版本,该版本使用属性字符串。 Swift的NSTextAttachment上的Hacking教程向您介绍了如何实际将图像放入属性字符串中,尽管我还没有尝试过。 对于我的特殊情况,我需要能够展示我的Github Gists,所以我不能在帖子中采用这种方法。
I only embedded the gists because I couldn’t be bothered to work out how to do colourful syntax highlighting. The other benefit of using HTML is obviously the ability to preserve hyperlinks, although I still recommend restricting links that HTTP or HTTPS in the scheme to opening in Safari only.
我之所以只嵌入要点,是因为我不介意找出如何进行色彩鲜艳的语法突出显示。 使用HTML的另一个好处显然是可以保留超链接,尽管我仍然建议将方案中HTTP或HTTPS的链接限制为仅在Safari中打开。
macos上的ios虚拟机