Ubuntu- easyefi 硬盘安装Ubuntu_用easyefi-程序员宅基地
现在新的电脑都是UEFI的启动方式了,EasyBCD就变得不好用了。在网上找到了easyefi的工具。
安装ubuntu后,我想删除window的启动项
~$ efibootmgr
BootCurrent: 0001
Timeout: 1 seconds
BootOrder: 0001,000E,000C,000D,0000
Boot0000* Windows Boot Manager
Boot0001* ubuntu
Boot000C* UEFI : LAN : IP4 Intel(R) Ethernet Connection (H) I219-LM
Boot000D* UEFI : LAN : IP6 Intel(R) Ethernet Connection (H) I219-LM
Boot000E* UEFI : HP SSD EX900 250GB : PART 4 : OS Bootloader
~$ sudo efibootmgr -b 0 -B
BootCurrent: 0001
Timeout: 1 seconds
BootOrder: 0001,000E,000C,000D
Boot0001* ubuntu
Boot000C* UEFI : LAN : IP4 Intel(R) Ethernet Connection (H) I219-LM
Boot000D* UEFI : LAN : IP6 Intel(R) Ethernet Connection (H) I219-LM
Boot000E* UEFI : HP SSD EX900 250GB : PART 4 : OS Bootloader
------引用文章---------------------------------
用 EasyUEFI 在 Win8/10 中硬盘安装 Ubuntu
作者:TeliuTe 来源:基础教程网
1、准备Ubuntu安装文件
1)下载带amd的64位 Ubuntu 桌面版光盘镜像文件,如 ubuntu-16.04.2-desktop-amd64.iso:http://releases.ubuntu.com/16.04/
其他下载地址可以参阅前面的课程;
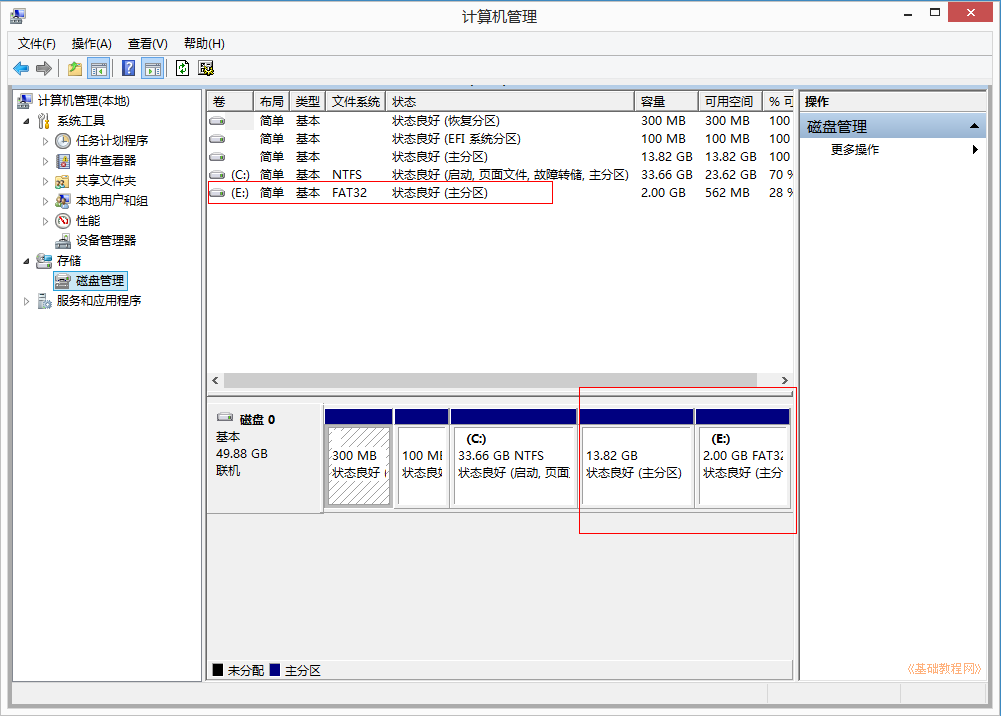
2)分出一个5G左右的分区,格式化为FAT32,将下载的光盘镜像解压到里面;
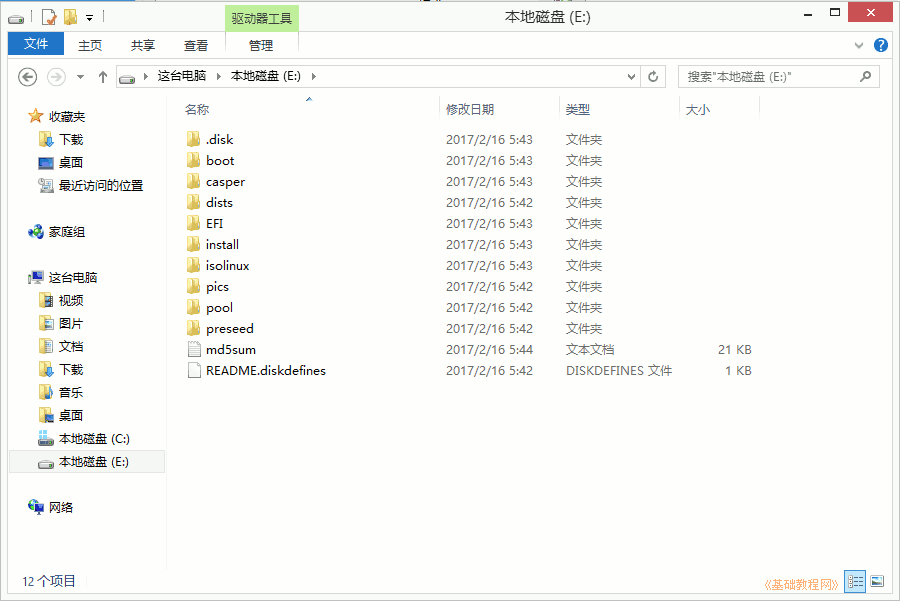
3)再分出40G空间,作为安装Ubuntu系统的空间,不用格式化,记住分区大小和位置;
4)Win8/10要关闭快速启动、关闭安全启动,参考第2条安装常见问题:=http://teliute.org/fw/win8insu2.html
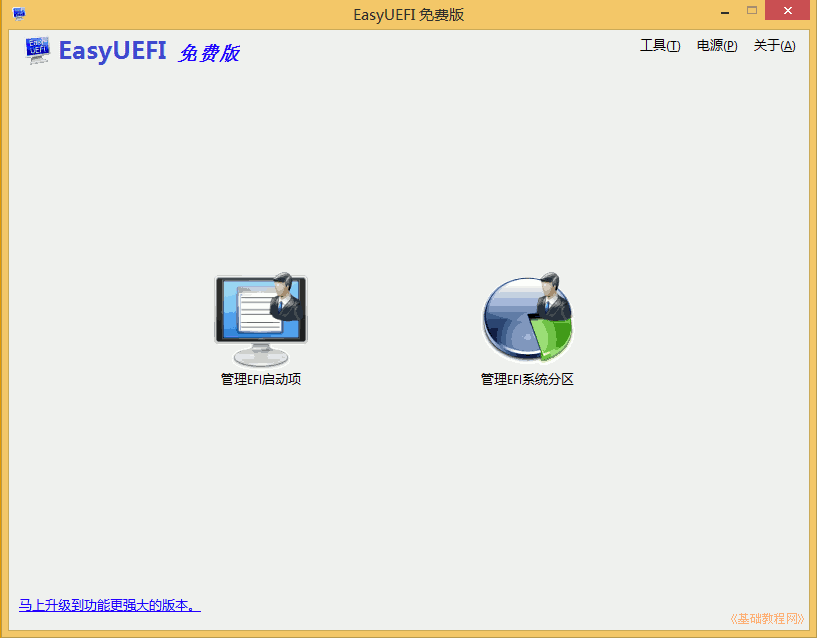
2、安装 EasyUEFI,添加启动项
1)EasyUEFI个人版是免费的,可以在官网或友链下载: http://www.easyuefi.com/index-cn.html,下载完后双击运行安装,
2)在出来的安装对话框中,一路点“继续、确定、完成”,一般默认选中了简体中文;
安装完自动运行,或双击桌面上图标运行,进入主窗口,再点“管理EFI启动项”
3)在出来程序窗口中间栏,点击第二个绿色加号图标的“添加新项目”;
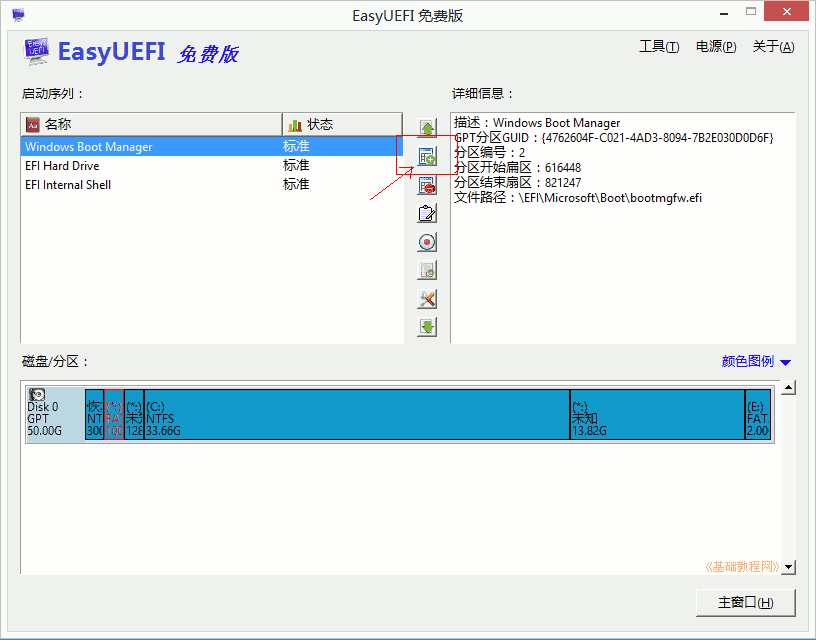
4)在出来的面板上边类型里选择Linux,右边文本框里输入名称“Ubuntu”,然后在中间的分区图表中,选中后边的FAT32分区,上边有个圆点;
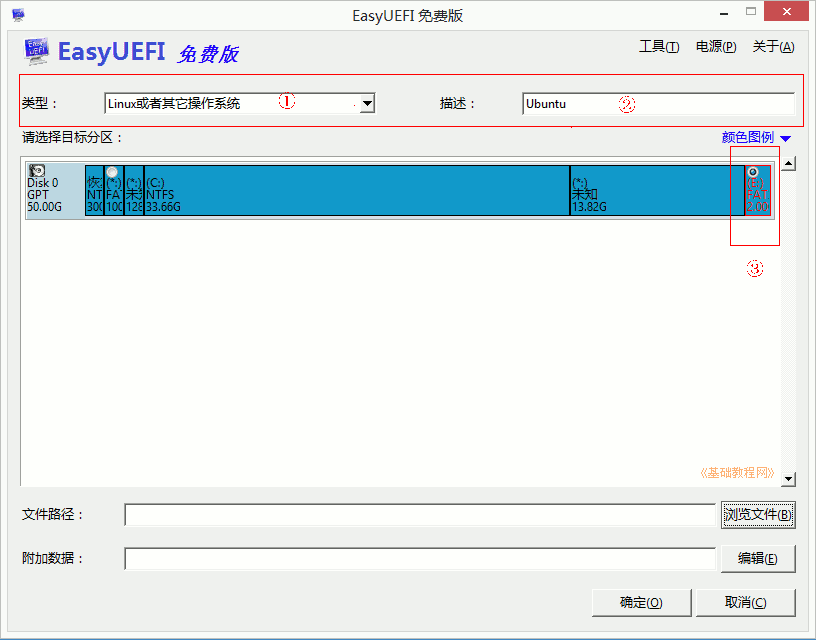
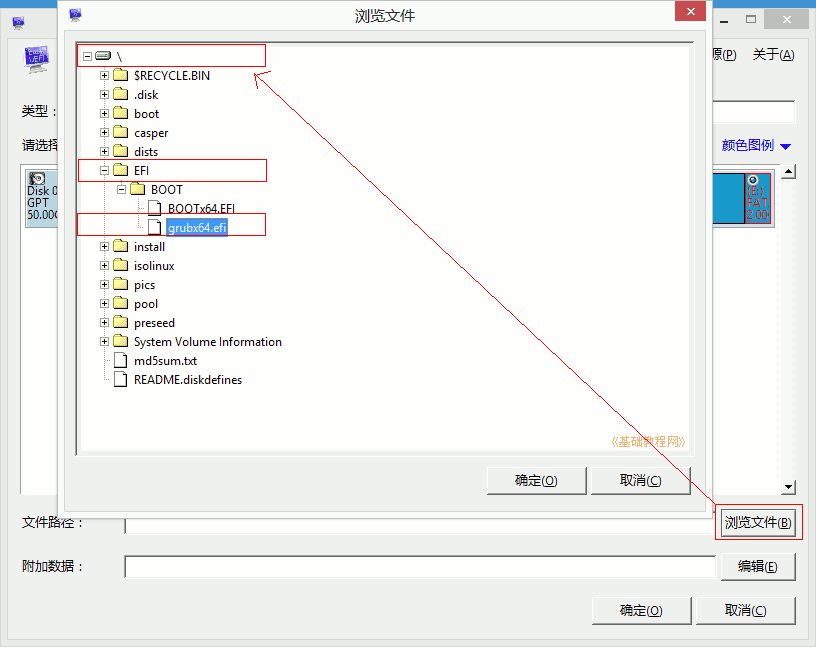
5)再点右下角的“浏览文件”按钮,在面板中依次点开加号,找到“\EFI\BOOT\grubx64.efi”,点“确定”;
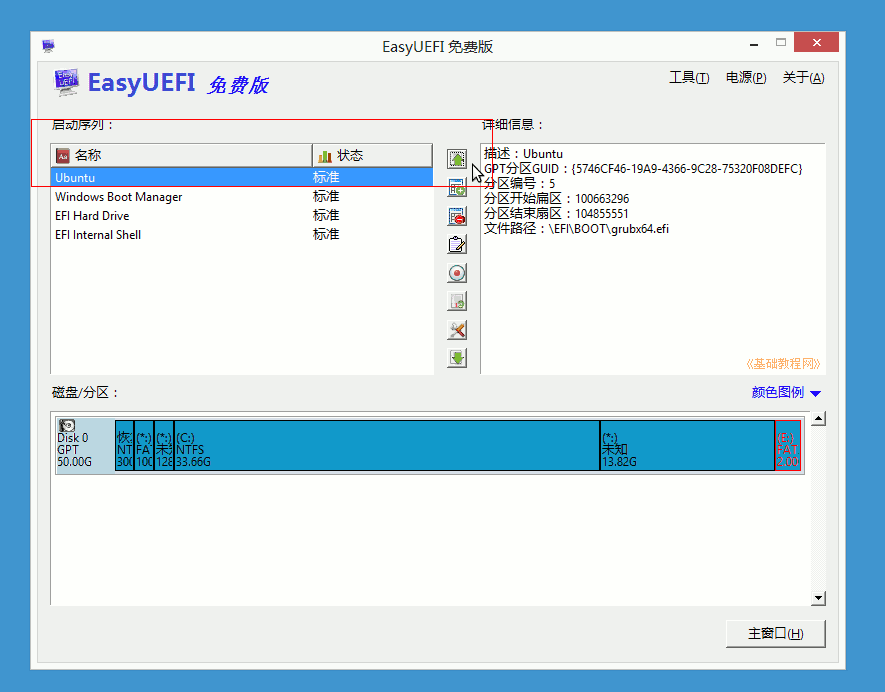
6)点“确定”返回主窗口,在左边的启动列表里,选中“Ubuntu”,点中间第一个绿色向上箭头,调到第一位,点击返回主窗口;
7)关闭所有窗口,重启计算机,可以按“win键+R”调出运行框,输入 shutdown.exe -f -r -t 0
3、安装Ubuntu系统
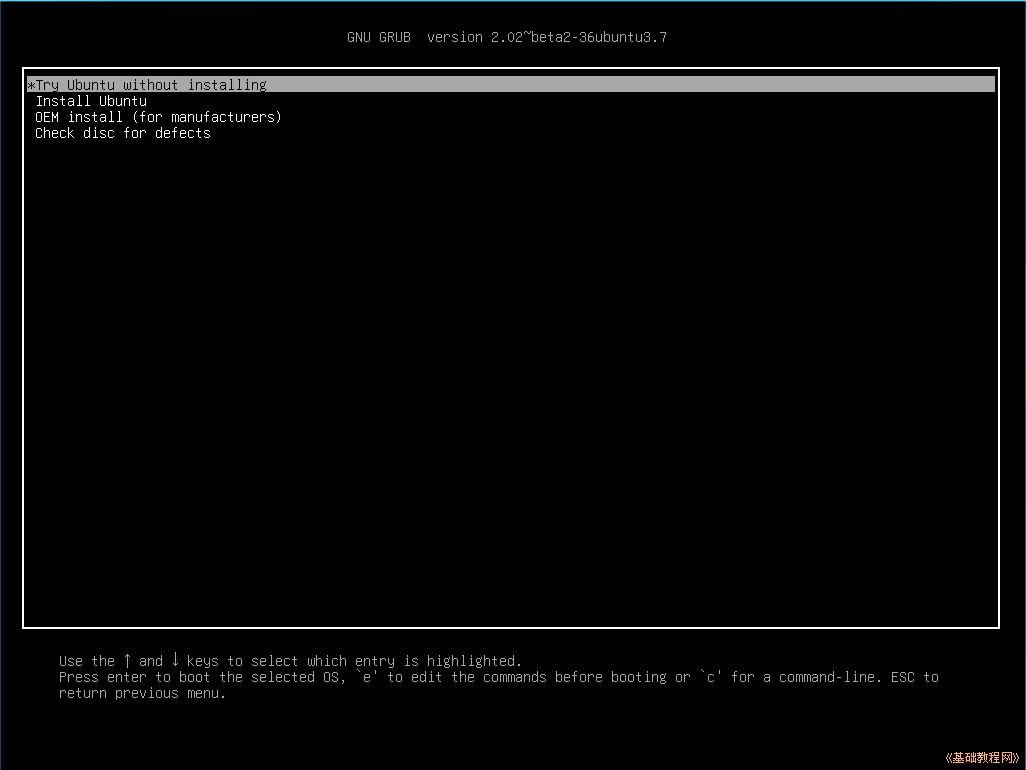
1)重新启动后,出现Ubuntu安装菜单,按回车键进入第一个试用Ubuntu(Try Ubuntu);
This is efibootmgr, a Linux user-space application to modify the Intel
Extensible Firmware Interface (EFI) Boot Manager.  This application
can create and destroy boot entries, change the boot order, change
the next running boot option, and more.

Details on the EFI Boot Manager are available from the EFI
Specification, v1.02 or above, available from http://developer.intel.com.

Note: efibootmgr requires that the kernel module efivars be loaded
prior to use.  'modprobe efivars' should do the trick.

usage: efibootmgr [options]
	-a | --active         sets bootnum active
	-A | --inactive       sets bootnum inactive
	-b | --bootnum XXXX   modify BootXXXX (hex)
	-B | --delete-bootnum delete bootnum (hex)
	-c | --create         create new variable bootnum and add to bootorder
	-d | --disk disk      (defaults to /dev/sda) containing loader
	-e | --edd [1|3|-1]   force EDD 1.0 or 3.0 creation variables, or guess
	-E | --device num     EDD 1.0 device number (defaults to 0x80)
	-g | --gpt            force disk w/ invalid PMBR to be treated as GPT
	-H | --acpi_hid XXXX  set the ACPI HID (used with -i)
	-i | --iface name     create a netboot entry for the named interface
	-l | --loader name    (defaults to \elilo.efi)
	-L | --label label    Boot manager display label (defaults to "Linux")
	-n | --bootnext XXXX  set BootNext to XXXX (hex)
	-N | --delete-bootnext delete BootNext
	-o | --bootorder XXXX,YYYY,ZZZZ,...     explicitly set BootOrder (hex)
	-O | --delete-bootorder delete BootOrder
	-p | --part part       (defaults to 1) containing loader
	-q | --quiet           be quiet
	--test filename   don't write to NVRAM, write to filename
	-t | --timeout seconds   Boot manager timeout
	-T | --delete-timeout    delete Timeout value
	-u | --unicode | --UCS-2  pass extra args as UCS-2 (default is ASCII)
	-U | --acpi_uid XXXX    set the ACPI UID (used with -i)
	-v | --verbose         print additional information
	-V | --version         return version and exit
	-w | --write-signature  write unique sig to MBR if needed


Typical usage:
1) Root can use it to display the current Boot Manager settings.
  [root@localhost ~]# efibootmgr
  BootCurrent: 0004
  BootNext: 0003
  BootOrder: 0004,0000,0001,0002,0003
  Timeout: 30 seconds
  Boot0000* Diskette Drive(device:0)
  Boot0001* CD-ROM Drive(device:FF)
  Boot0002* Hard Drive(Device:80)/HD(Part1,Sig00112233)
  Boot0003* PXE Boot: MAC(00D0B7C15D91)
  Boot0004* Linux

  This shows:
  BootCurrent - the boot entry used to start the currently running
  system.

  BootOrder - the boot order as would appear in the boot manager.  The
  boot manager tries to boot the first active entry on this list.  If
  unsuccessful, it tries the next entry, and so on.

  BootNext - the boot entry which is scheduled to be run on next boot.
  This superceeds BootOrder for one boot only, and is deleted by the
  boot manager after first use.  This allows you to change the next boot
  behavior without changing BootOrder.

  Timeout - the time in seconds between when the boot manager appears
  on the screen until when it automatically chooses the startup value
  from BootNext or BootOrder.

  Five boot entries (0000 - 0004), the active/inactive flag (* means
  active), and the name displayed on the screen.


2) An OS installer would call 'efibootmgr -c'.  This assumes that
   /boot/efi is your EFI System Partition, and is mounted at /dev/sda1.
   This creates a new boot option, called "Linux", and puts it at the top
   of the boot order list.  Options may be passed to modify the
   default behavior.  The default OS Loader is elilo.efi.

3) A system administrator wants to change the boot order.  She would
   call 'efibootmgr -o 3,4' to specify PXE boot first, then Linux
   boot.

4) A system administrator wants to change the boot order for the next
   boot only.  She would call 'efibootmgr -n 4' to specify that the
   Linux entry be taken on next boot.

5) A system administrator wants to delete the Linux boot option from
   the menu.  'efibootmgr -b 4 -B' deletes entry 4 and removes it
   from BootOrder.

6) A system administrator wants to create a boot option to network
   boot (PXE).  Unfortunately, this requires knowing a little more
   information about your system than can be easily found by
   efibootmgr, so you've got to pass additional information - the ACPI
   HID and UID values.  These can generally be found by using the EFI
   Boot Manager (in the EFI environment) to create a network boot
   entry, then using efibootmgr to print it verbosely.  Here's one example:

     Boot003* Acpi(PNP0A03,0)/PCI(5|0)/Mac(00D0B7F9F510) \
	ACPI(a0341d0,0)PCI(0,5)MAC(00d0b7f9f510,0)

   In this case, the ACPI HID is "0A0341d0" and the UID is "0".
   For the zx2000 gigE, the HID is "222F" and the UID is "500".
   For the rx2000 gigE, the HID is "0002" and the UID is "100".
   You create the boot entry with:
   'efibootmgr -c -i eth0 -H 222F -U 500 -L netboot'

Many other uses may be found.

Please direct any bugs, features, patches, etc. to Matt Domsch
.
智能推荐
php session 操作,PHP session会话操作技巧小结-程序员宅基地
文章浏览阅读142次。本文实例总结了PHP session会话操作技巧。分享给大家供大家参考,具体如下:会话技术session将会话数据存储与服务器端,同时使会话数据可以区分浏览器为每个会话数据建立独立的会话数据区(来存储当前会话的全部数据),每个会话数据区存在唯一的标志,同时浏览器端存储该唯一标识配对使用。响应时给浏览器的session-id值也存储于浏览器端的cookie数据区。php.ini:session.au..._php session_end
html移出定时器,jquery 鼠标移入移出效果定时器-程序员宅基地
文章浏览阅读373次。$("#kefu3").bind({"mouseover":function(){var timerkf;$(this).css("background","url(/public/images/kefu3_over.png)");$("#saoma").fadeIn();},"mouseout":function(){$(this).css("background","url(/public/i..._jquery鼠标移入移出启动计时器
setTimeout()和setInterval()方法的区别?_settimeout和setinterval的区别-程序员宅基地
文章浏览阅读1.3w次,点赞2次,收藏3次。链接地址:https://zhidao.baidu.com/question/808980857761575052.html因为setTimeout(表达式,延时时间)在执行时,是在载入后延迟指定时间后,去执行一次表达式,记住,次数是一次而setInterval(表达式,交互时间)则不一样,它从载入后,每隔指定的时间就执行一次表达式所以,完全是不一样的很多人习惯于将setTimeout包含于被执行..._settimeout和setinterval的区别
解决:recv() failed (104: Connection reset by peer) while proxying upgraded connection,问题是连接websocket失败-程序员宅基地
文章浏览阅读803次,点赞8次,收藏8次。1、单客服端连接中转服务的时候,中转服务端就直接连接websocket服务端。_recv() failed (104: connection reset by peer)
linux开机运行jar包,Linux中jar包启动和jar包后台运行的实现方式-程序员宅基地
文章浏览阅读362次。linux 运行jar包命令如下:方式一:java -jar shareniu.jar特点:当前ssh窗口被锁定,可按CTRL + C打断程序运行,或直接关闭窗口,程序退出那如何让窗口不锁定?方式二java -jar shareniu.jar &&代表在后台运行。特定:当前ssh窗口不被锁定,但是当窗口关闭时,程序中止运行。继续改进,如何让窗口关闭时hYoeXW,程序仍然运行?方式..._开机自启jar包跟后台运行一样吗
安卓端APP遥控树莓派小车_手机实时遥控树莓派小车实现-程序员宅基地
文章浏览阅读2w次,点赞9次,收藏105次。在android端写一个小小的控制器来通过局域网来控制树莓派小车的行驶,基本思路是在树莓派上写一个socket服务器,android端写一个socket客户机,两边约定好命令的指令(例如可以简单的把停止约定为“0”,把前进约定为“1”),android负责发送,树莓派负责接受并执行。用这种方法理论上是可以远程控制的,前提是得要知道树莓派被分配的公网IP。_手机实时遥控树莓派小车实现
随便推点
安卓ListView的使用_android listview使用-程序员宅基地
文章浏览阅读1.1k次。listview是一个以垂直方式在项目中显示视图的列表。是一种不能实现确定视图中的内容的适配器视图(adapter view)。数据和视图的绑定,需要通过继承ListViewAdapter接口的适配器实现。确保当上下滚动的时候,能够动态刷新视图内容。通常我们都会自定义一个继承自BaseAdapter(已继承ListViewAdapter),ArrayAdapter(继承自BaseAdapter),SimpleAdapter(继承自BaseAdapter)的类,重写getView()方法,实现自己想要的功能。_android listview使用
全屏模式fullscreen_fullscreen error-程序员宅基地
文章浏览阅读1.3w次。全屏模式fullscreen_fullscreen error
wx.navigateTo 跳转时的参数传递问题_wx.navigateto传参-程序员宅基地
文章浏览阅读2.9k次,点赞2次,收藏3次。wx.navigateTo 可以保留当前页,新建目标页,跳转过去。不能跳转到 tabbar 页面。在跳转的过程中可以传 参,有两种传参的方案:正向传参假设A跳转到B,同时携带参数,A传参,B接收,这种方式为正向传参。A页面:wx.navigateTo({url: '/pages/testing/b/b?id=10&name=张三&pwd=1234'})B页面:Page({data: {},// 系统自动调用,options系统自动传入// optio._wx.navigateto传参
java 列表、集合与数组之间的转化_java list转集合 method threw 'java.lang.arraystoreexc-程序员宅基地
文章浏览阅读1.9w次。package test;import java.util.ArrayList;import java.util.Arrays;import java.util.HashSet;import java.util.List;import java.util.Set;public class Test2 { public static void main(String[] a_java list转集合 method threw 'java.lang.arraystoreexception' exception.
了解Linux磁盘及分区的过程-程序员宅基地
文章浏览阅读3.2k次,点赞7次,收藏4次。关机添加,自动识别 或 开机添加,命令识别: 扫描磁盘必须分区 格式化。
低代码平台会取代COTS吗_cots 风险-程序员宅基地
文章浏览阅读151次。以前很多企业都通过购买COTS的方式获得软件产品和技术服务,这使得很多的企业对IT的依赖性越来越强,但是现在出现了低代码开发平台,可以帮助企业减轻对IT的依赖,并且提高软件开发的效率,那么COTS会被低代码取代吗?下面一起来了解一下相关的知识吧! 变革助长了低代码 一些企业正在尝试用低代码代替COTS,通过低代码企业从一开始就可以自由的创建与业务目标直接相符的应用程序,构建核心和关键任务系统。 一些企业已经开始围绕任务关键型遗留系统进行创新。例如,员工福利、人力资源和工资管理公司希望为每个客户提_cots 风险